
Malwarebytes Endpoint Detection and Response includes Endpoint Isolation, which temporarily stops threats from spreading between endpoints by restricting their communication or access. An isolated endpoint can still communicate with the console and run Malwarebytes processes. Super Admins and Administrators can isolate endpoints protected by policies with the Endpoint Isolation feature enabled.
For Endpoint Isolation usage requirements, see Minimum requirements for Malwarebytes Nebula platform.
To follow the steps in this article, enable the New policies experience switch in the Policies page.
If you have the new policies experience disabled, locate these policy settings by referring to: Malwarebytes Nebula policy with new experience disabled.

Types of isolation
There are three different isolation types. They may be enabled separately or combined to increase isolation. The three isolation types are:
- Network Isolation: Prevent the endpoint from communicating with other devices on your network.
- Process Isolation: Restrict which processes can run on the endpoint and prevent processes from interacting.
- Desktop Isolation (Windows only): Prevent end users from accessing the endpoint.
With Process Isolation enabled, only Privileged Processes are allowed to launch on the endpoint. Privileged Processes belong to one of these types:
- Predefined (hardcoded) processes: Currently there are two predefined processes: CONSENT.exe, necessary to execute UAC elevated processes; and CSRSS.EXE which is a critical system process.
- Processes digitally signed by Malwarebytes: These are allowed to run unrestricted on isolated endpoints.
- Processes spawned by other Privileged Processes: A process with a privileged parent process is also privileged. Privileged child process may create more privileged child processes.
Isolate endpoints
Before you can isolate an endpoint, you must first enable the Endpoint Isolation feature in the policy settings. This is necessary to install plugins for the Endpoint Agent. When the scan finishes, you can isolate the endpoint.
To enable Endpoint Isolation, follow these steps:
- Go to Settings > Policies.
- Click New or select an existing policy.
- Select the Endpoint Detection and Response tab.
- Locate Enable endpoint isolation to allow locking/unlocking of endpoints and check the box for your Windows and/or Mac endpoints.
Isolation is cumulative. If you select an isolated endpoint and apply another type of isolation, both isolation types will apply.
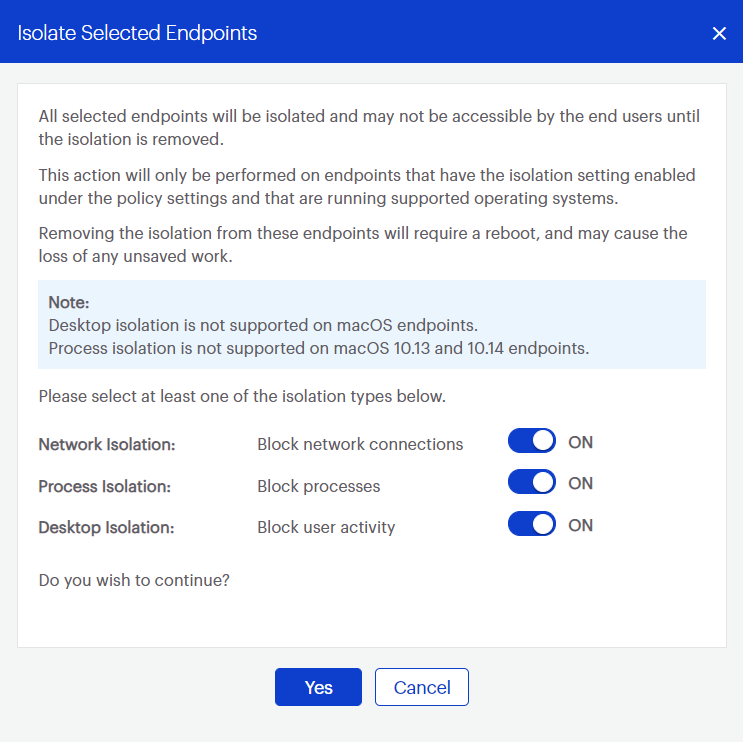
- Go to Endpoints, then select an endpoint to isolate.
- Click the Actions menu on the top right. Select Isolate endpoint(s).
- Confirm the types of isolation you want, and click YES. All isolation types are enabled by default.
Change isolation type
To change the isolation type applied to an endpoint, you must either:
- Add additional isolation types
- Remove all isolation and then apply the needed isolation types
Remove endpoint isolation
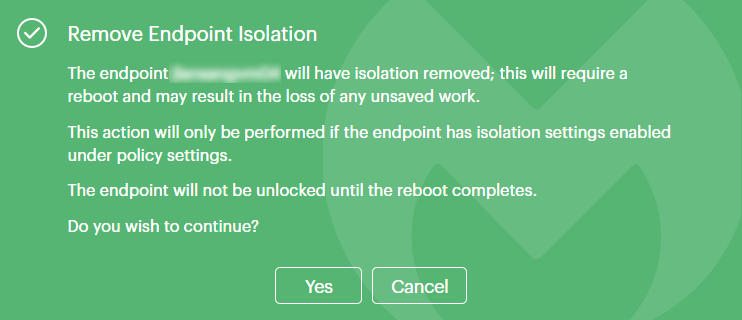
You can remove endpoints from isolation on the Endpoints screen. Removing an endpoint from isolation turns off all isolation types.
- Go to Endpoints, then select an endpoint to isolate.
- Click the Actions menu on the top right. Select Remove Isolation.
- The endpoint will be removed from isolation and automatically reboot. You may lose any unsaved work.
Customize endpoint isolation alerts
You can customize the message displayed on endpoints when they are isolated. This is optional, and is changed at the policy level.
- Go to Settings > Policies.
- Click New or select an existing policy.
- Select the Endpoint Detection and Response tab.
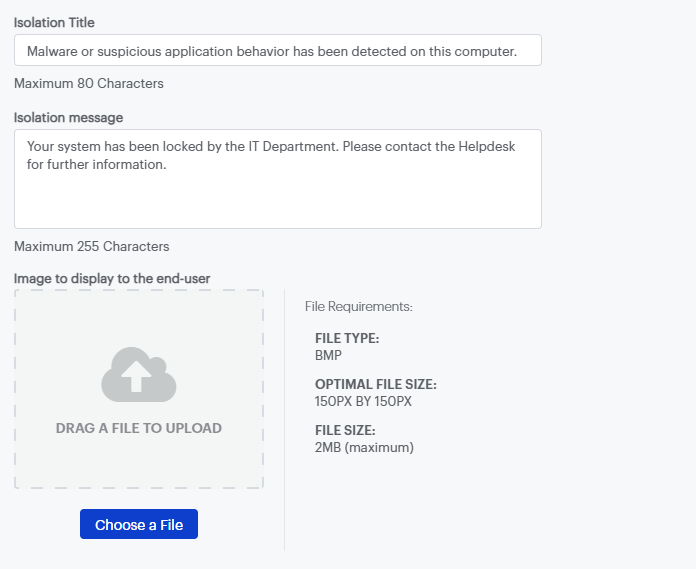
- Locate Enable endpoint isolation to allow locking/unlocking of endpoints, then select Advanced settings.
- Enter custom text in the Isolation Title and Isolation message fields, or click Use Default Message to restore the default.
- You may upload a BMP image to display along with the message. Drag an image file onto the upload area or click CHOOSE A FILE to select an image.
Note: Maximum file size is 2 MB and must be a native BMP file to display properly. - Click SAVE to save changes. The new isolation message will be shown for future endpoint isolations. It does not affect currently-isolated endpoints.
Return to the Malwarebytes Nebula platform Administrator Guide.
Source : Official Malwarebytes Brand
Editor by : BEST Antivirus KBS Team