The current version of the Malwarebytes Agentless Remediation app for Splunk is 1.1.0
The Malwarebytes Agentless Remediation app, also known as Malwarebytes Remediation app for Splunk, provides a way to cleanup infected endpoints using the Malwarebytes Agentless Breach Remediation app. This app offers automated and on-demand remediation of Windows endpoints through custom Splunk alert actions.
This article provides installation and configuration instructions for Malwarebytes Agentless Remediation app with Splunk Enterprise.
Requirements
To download, install and configure the Malwarebytes Agentless Remediation app, you will need:
- An active Splunk Enterprise instance.
- User login credentials for Splunk.
- An active Malwarebytes Nebula subscription.
- Malwarebytes Nebula platform login credentials.
- Technical Add-on for Malwarebytes installed. Refer to Install the Technical Add-on for Malwarebytes for Splunk for more information.
Splunk install location
Starting with version 0.9.371 of the Malwarebytes Agentless Remediation app, Splunk must be installed at the default location: C:\Program Files\Splunk. If Splunk is installed in a custom location, do the following:
- Open the psscript PowerShell file, located at
C:\Program files\Splunk\etc\apps\mbbr\bin\psscript.ps1 - Edit the $splunkhomeloc variable on line 26 to point to your custom Splunk Home location.
- Save the file.
Download and install Malwarebytes Agentless Remediation app
To download the Malwarebytes Agentless Remediation app:
- Go to the Malwarebytes Agentless Remediation page in Splunkbase.
- Click on LOGIN TO DOWNLOAD. If already logged into Splunkbase, click on DOWNLOAD.
- Enter your Splunk user credentials.
Install Malwarebytes app
Where you install the Malwarebytes app is based on your Splunk environment.
Splunk Enterprise Single Instance Environments
Install the Malwarebytes Agentless Remediation app in the same location where the Splunk components, Search Tier, Indexer Tier, and Forwarder Tier are located. For instructions on installing add-on in a single instance environments, refer to Splunk’s support article Install an add-on in a single-instance Splunk Enterprise deployment.
Splunk Enterprise Distributed Environments
Install the Malwarebytes Agentless Remediation app where your Search Tier is located. For instructions on installing an add-on in a distributed Splunk Enterprise environment, refer to Splunk’s support article Install an add-on in a distributed Splunk Enterprise deployment.
Configure Malwarebytes Remediation app for Splunk
For Splunk to remotely execute the Malwarebytes Breach Remediation agent on managed endpoints, it needs the Windows service account to authenticate.
- In Splunk>enterprise, click on the Apps cog icon.

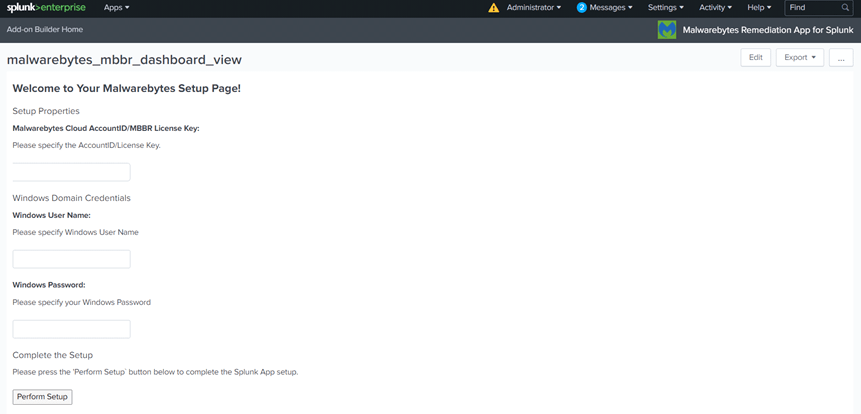
- On the Apps page, locate Malwarebytes Remediation App for Splunk then click on Set up.
- Complete the following fields:
- In the Malwarebytes Cloud AccountID/MBBR License Key field, enter the license key for your Malwarebytes Nebula subscription.
- In the Windows User Name field, enter your Windows domain admin account username or local admin account username that has access to all of your managed endpoints.
- In the Windows Password field, enter your Windows domain admin account password or local admin account password that has access to all of your managed endpoints.

- Click Perform Setup.
NOTE: Only click Perform Setup once. The app does not display a saved message/alert. Clicking the button more than once may return the error: Error while posting to url=/servicesNS/nobody/mbbr/admin/passwords/
If you encounter this error, while updating the password for the same username, you’ll need to do the following to resolve this error:- Delete the file passwords.conf on $SPLUNK_HOME\etc\apps\mbbr\local.
- Restart Splunk.
- Perform the initial setup again.
For more information, refer to the Add Credential Error post in Splunk>answers.
Configure Splunk Enterprise
In Splunk>enterprise, configure the data inputs for Malwarebytes.
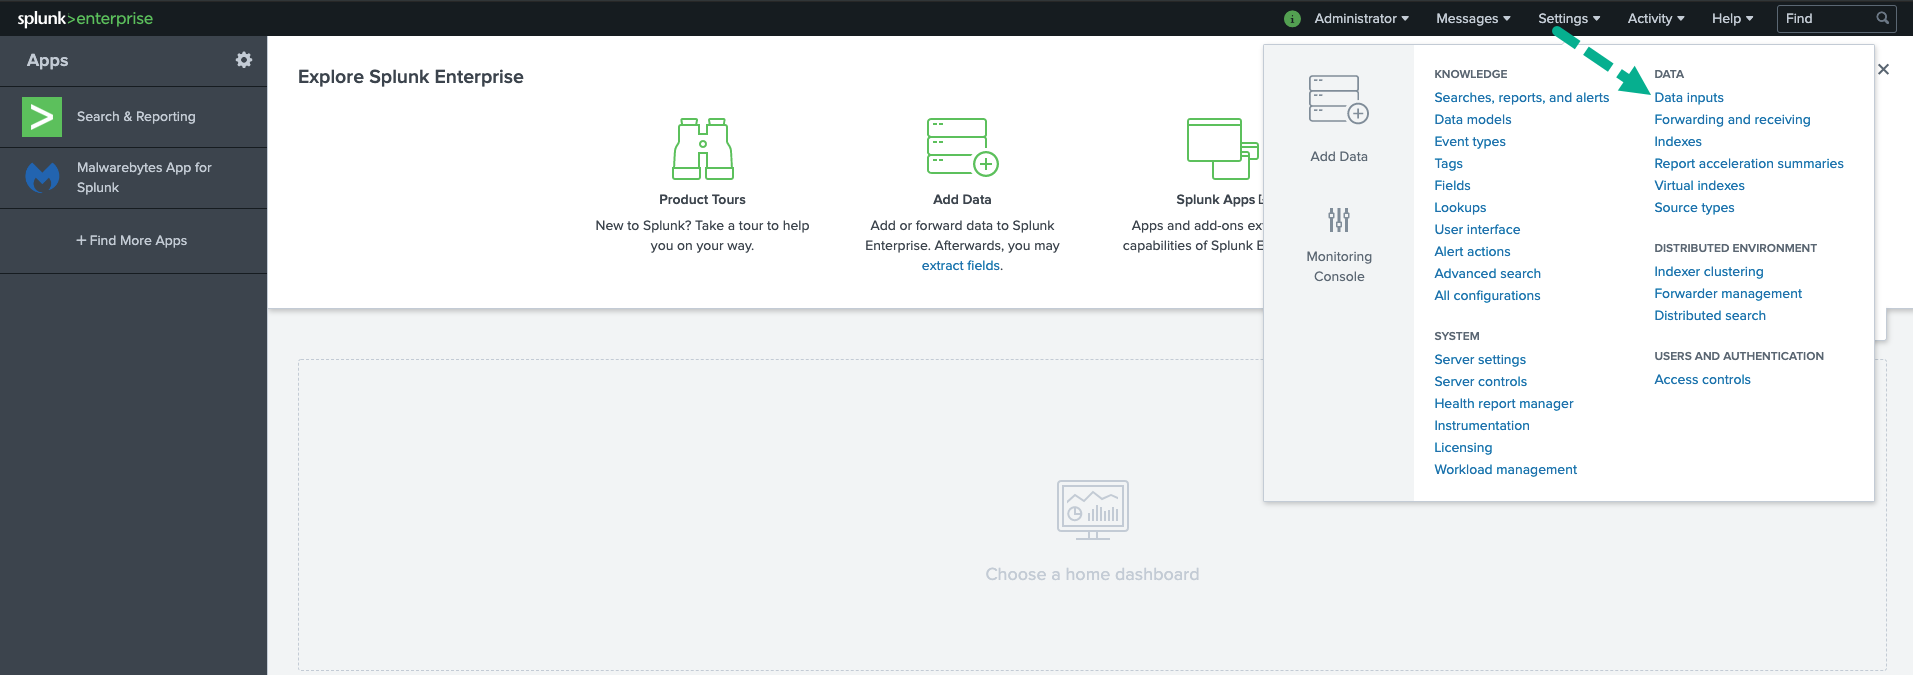
- Login to Splunk>enterprise using administrator credentials.
- Go to Settings > Data Inputs.

- Under the Forwarded Inputs section, click on + Add new for TCP or UDP.
- In the Select Source step:
- Enter 515 in the Port field.
- Click Next.
- In the Input Settings step:
- For Source type, click Select and choose Malware > choose mwb:mbbr from the dropdown menu.
- For App context, select Add-on for Malwarebytes (TA-malwarebytes) from the dropdown menu.
- For Host > Method, select either IP or DNS.
- For Index, select malwarebytes from the dropdown menu. Click Review.
- In the Review step, make sure all of your configurations are correct, then select Submit to complete the data input configuration on the Splunk instance.
Download and setup Malwarebytes Breach Remediation
- Download Malwarebytes Breach Remediation from the machine where Splunk is installed.
- Run the downloaded file, Malwarebytes_Breach_Remediation_x.x.x.exe.
- Go to the extracted Malwarebytes_Breach_Remediation_x.x.x folder.
- Go to Windows > Remediation > copy mbbr.exe file.
- Go to $SPLUNK_HOME\etc\apps\mbbr\bin
- Paste the mbbr.exe file here.
- Rename the file to mbbr-4.exe.
Configure scan and remove batch files
Before you can use the scan and remove batch files, they need to be modified for your environment. You’ll need your Malwarebytes Nebula license key.
- Login to the Malwarebytes Nebula platform.
- Go to Profile > License Information.
- Copy the license key.
- Log out of the Malwarebytes Nebula platform.
Edit the batch files.
- Go to $SPLUNK_HOME\etc\apps\mbbr\bin
- Locate the mbbr_remove_batch.bat and mbbr_scan_batch.bat files
- Open each batch file and make the following edits:
ECHO OFF
SET licensekey=xxxxx-xxxxx-xxxxx-xxxxx
SET logserver=hostname
SET syslog=true
REM SET logserver=xxxx.xxx.xxx.xxx
SET logport=515 - Save your edits.
Splunk Sendalert
The Splunk internal command sendalert is used to trigger a set of scripts that runs a Malwarebytes Breach Remediation scan or removal on an endpoint.
Process flow
The following figure shows the process flow when a Splunk sendalert action is triggered.

Alert actions can be triggered for a single IP address or a comma-separated list of IP addresses in the src_ip field.
- Sendalert sends table of hosts and passes credentials.
- Python script picks up list and credentials then runs PowerShell to perform deployment.
- The deploy function is a PowerShell prototype which works as follows:
- Receives a JSON list of IP Addresses from sendalert (Python script).
- For each IP Address (Serially), starts a PowerShell Session.
- A folder is created on the remote endpoint, called Logs.
$SPLUNK_HOME\etc\apps\mbbr\mbbr_remediation\Logs - In this folder,
- The mbbr.bat and mbbr.exe are copied here.
- All the registration and log files are created in this folder.
- The MBBR_SCAN.BAT or MBBR_REMOVE.BAT files are copied to this location.
- The scan function is triggered by the PowerShell script:
- Runs CMD /C to run batch files, to start MBBR with output to STDOUT log file and local XML file.
- Syslog returns Malwarebytes Breach Remediation results.
Sendalert Syntax
sendalert “mbbr” param.remaction=”scan” param.type=”hyper” param.mode=”mbbr_winrm”
Arguments are:
- param.remaction – identifies the type of action, “scan” or “remove”.
- param.type – identifies the type of scan/removal. The scan/removal types are “hyper”, “threat”, “full -ark”.
- param.mode – chooses the type of communication mode. The possible values are mbbr_wmi (for wmi mode) and mbbr_winrm (for winrm mode)
Splunk Query examples
The following are example commands for testing the two supplied scripts:
- |stats count as src_ip | eval src_ip=”192.168.10.123,192.168.50.208″ | sendalert “mbbr” param.remaction=”remove” param.type=”hyper” param.mode=”mbbr_winrm”
- |stats count as src_ip | eval src_ip=”192.168.10.123,192.168.50.208″ | sendalert “mbbr” param.remaction=”scan” param.type=”threat” param.mode=”mbbr_wmi”
You can create your own reports, queries, and automation to drive this function. For example, data which has arrived into Splunk and can be periodically queried:
- List of IPs from network perimeter/firewall detections/blocks
- List of IPs from intrusion detection appliances
- List of IPs from antivirus which has detected, but cannot clean endpoint
- List of IPs from help desk/ticketing system
Notes
- Logfiles for the scripts can be monitored by log-tailing e.g. ‘BareTail’ utility. The logs are accessible by the ‘_internal’ Splunk index. The logs are located at:
- $SPLUNK_HOME\var\log\splunk\mbbr_python.log
- $SPLUNK_HOME\var\log\splunk\mbbr_powershell.log
- If the Splunk instance has been installed as ‘local user’, make sure you have the Powershell rules configured using the same operating system user account used to install Splunk. Otherwise, Splunk must be installed as a ‘domain user’ and the remote endpoints must be in the same domain as the Splunk installed operating system’s user account.
- Verify:
- all the necessary ports are open for PowerShell remoting
- Windows Print and File Sharing is enabled, allowing access to folder ADMIN$
- WMI-IN firewall rule is enabled.
- If the endpoints are non-domain, additional configurations of ‘trust’ is required. Refer to Configure for non-domain computers section.
- If the Powershell script does not execute through Splunk, refer to Microsoft’s Tip: Enable and Use Remote Commands in Windows PowerShell.
Configure WMI on the endpoints
To configure WMI on the endpoints, please see the article: Allow WMI through Windows Firewall for Endpoint Security .
Configure WinRM on the endpoints
In many cases, you may work with remote computers in other domains. If the remote computer is not in a trusted domain, the remote computer may be unable to authenticate your credentials.
To enable authentication, you need to add the remote computer to the list of trusted hosts for the local computer in WinRM, provide a comma-delimited list of computers or IP addresses.
At command, enter:
winrm s winrm/config/client ‘@{TrustedHosts=”RemoteComputer”}’
When working with computers in workgroups or homegroups, you must use HTTPS as the transport or add the remote machine to the TrustedHosts configuration settings.
If you cannot connect to a remote host, verify the service on the remote host is running and accepts requests. On the remote host, perform a quick default configuration by running the command:
winrm quickconfig
For more information, refer to Microsoft’s Install and Configuration for Windows Remote Management.
Error Codes
If the custom alert fails, it produces an error code in the Splunk interface. You can find the specific error which triggered the exit by going to Job Inspector > Search.log.
| Error Code | Error Description |
|---|---|
| 1 | General error code. Python script has not been triggered at all. |
| 2 | Unable to retrieve Splunk home path. |
| 3 | Error extracting results from the payload + <error message> |
| 4 | Cannot find and address in src_ip field |
| 5 | Did not receive a session key from splunkd. Enable passAuth in inputs.conf for this script. |
| 6 | Unspecified remediation action. |
| 7 | PowerShell script execution failed + <error message> |
| 8 | No credential information. |
| 9 | Unable to get credentials from Splunk. |
| 10 | Unable to extract credentials. |
| 11 | Empty username. |
| 12 | PowerShell script execution has errors: + <error messages> |
Log file locations
| Log File Type | File Name | File Location | Description |
|---|---|---|---|
| Python log files | mbbr_python.log | $SPLUNK_HOME \var\log\splunk\ | Logs from the Python script |
| PowerShell log files | mbbr_powershell.log | $SPLUNK_HOME \var\log\splunk\ | Logs from the PowerShell script |
| Batch file execution log file | mbbr_bat.txt, MBBR-ERROUT, MBBR-STDOUT.txt | %SystemDrive%\mbbr_remediation folder in the remote endpoint | Logs from the Batch file and .exe file executions |
Debug and Test for Deployment
Run the Python Script in a debugger, such as IDLE, to experiment with its logic. To call the PowerShell script, refer to IDLE – Python 3.7.3 documentation.
Run the Powershell in ISE or a similar debugger:
- Edit credentials
- Hardcode an IP address:
- param([string]$ip0 , [int]$remvCheck )
- $ip0 = ‘127.0.0.1’
- Step through connection, copy, and start batch script. The batch script outputs to STDOUT, which then displays to the PowerShell console.
Debug and Test Malwarebytes Breach Remediation scripts
To test locally and run:
- Copy MBBR_SCAN.BAT.BAT and MBBR_REMOVE.BAT.BAT scripts to %SystemDrive%\MBBR_REMEDIATION
- In Windows Explorer, right-click on a script and select Run as administrator.
Source : Official Malwarebytes Brand
Editor by : BEST Antivirus KBS Team

