

Issue
- Use dynamic groups to ensure that client workstations automatically use different update settings depending on the network they are connected to
Solution
 Endpoint users: Perform these steps on individual client workstations
- Open ESET Remote Administrator Web Console (ERA Web Console) in your web browser and log in.
- Click Computers
 .
. - Click the cog wheel and select New Dynamic Group from the context menu.

Figure 1-1
Click the image to view larger in new window - Enter a name for the new group (“Company Network” in this example). If necessary, click Change Parent Group to change the parent group to which this new dynamic group belongs.

Figure 1-2
Click the image to view larger in new window - Expand Template and click New.
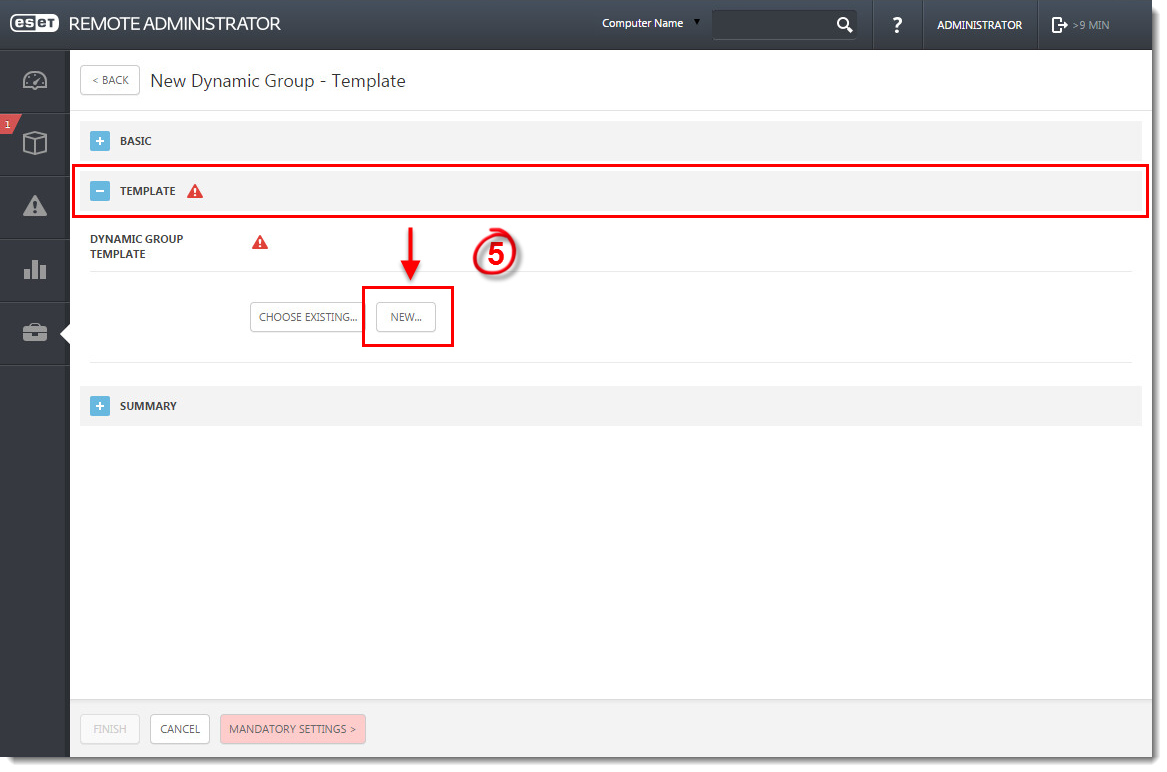
Figure 1-3
Click the image to view larger in new window - Type a name into the Name field (“primary subnet” in this example).

Figure 1-4
Click the image to view larger in new window - Expand Expression, select AND (All conditions have to be true) from the Operation drop-down menu, and then click Add Rule.

Figure 1-5
Click the image to view larger in new window - Expand Network IP addresses, select IP subnetwork, and then click OK.

Figure 1-6
- Select = (equal) from the drop-down menu, enter the IP address of the subnet into the blank field and then click Finish. The subnet format is: x.x.x.x (for example: 10.1.112.0).
More on this can be found in our Online Help topic.

Figure 1-7
Click the image to view larger in new window - Click Finish.
- Open ESET Remote Administrator Web Console (ERA Web Console) in your web browser and log in.
- Click Computers.
- Click the cog wheel and select New Dynamic Group from the context menu.

Figure 2-1
Click the image to view larger in new window - Enter a name for the new group (“Off Network” in this example). If necessary, click Change Parent Group to change the parent group to which this new dynamic group belongs.

Figure 2-2
Click the image to view larger in new window - Expand Template and click New.

Figure 2-3
Click the image to view larger in new window - Type a name into the Name field (“Secondary Subnet” in this example).

Figure 2-4
Click the image to view larger in new window - Expand Expression, select NOR (All conditions have to be false) from the Operation drop-down menu and then click Add Rule.
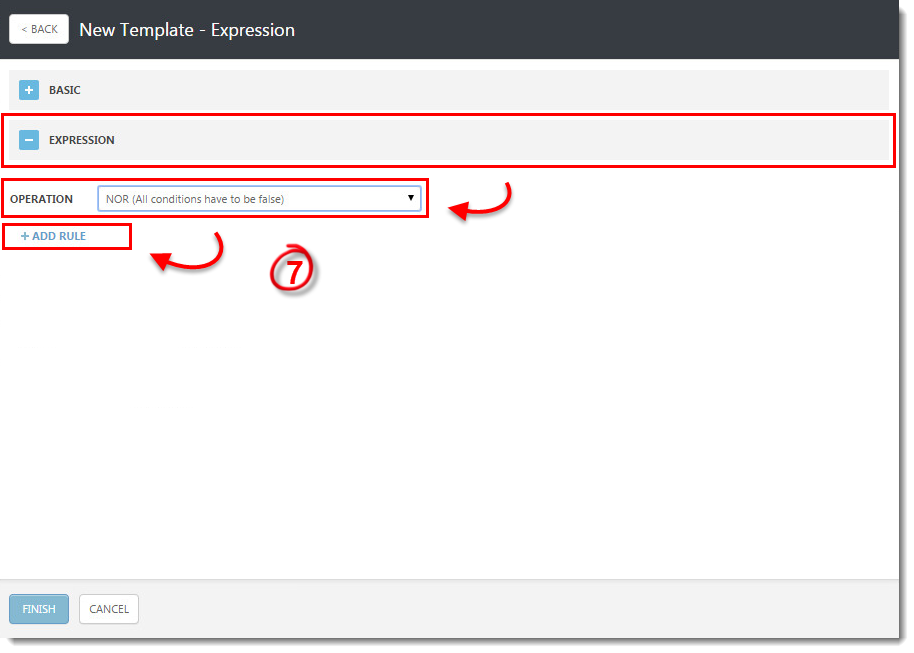
Figure 2-5
Click the image to view larger in new window - Expand Network IP addresses, select IP subnetwork, and then click OK.

Figure 2-6
- Select in (string mask) from the drop-down menu, enter the IP address of the secondary subnet into the blank field and then click Finish. The subnet format is: x.x.x.x (for example: 10.1.112.0).
More on this can be found in our Online Help topic.

Figure 2-7
Click the image to view larger in new window - Click Finish.
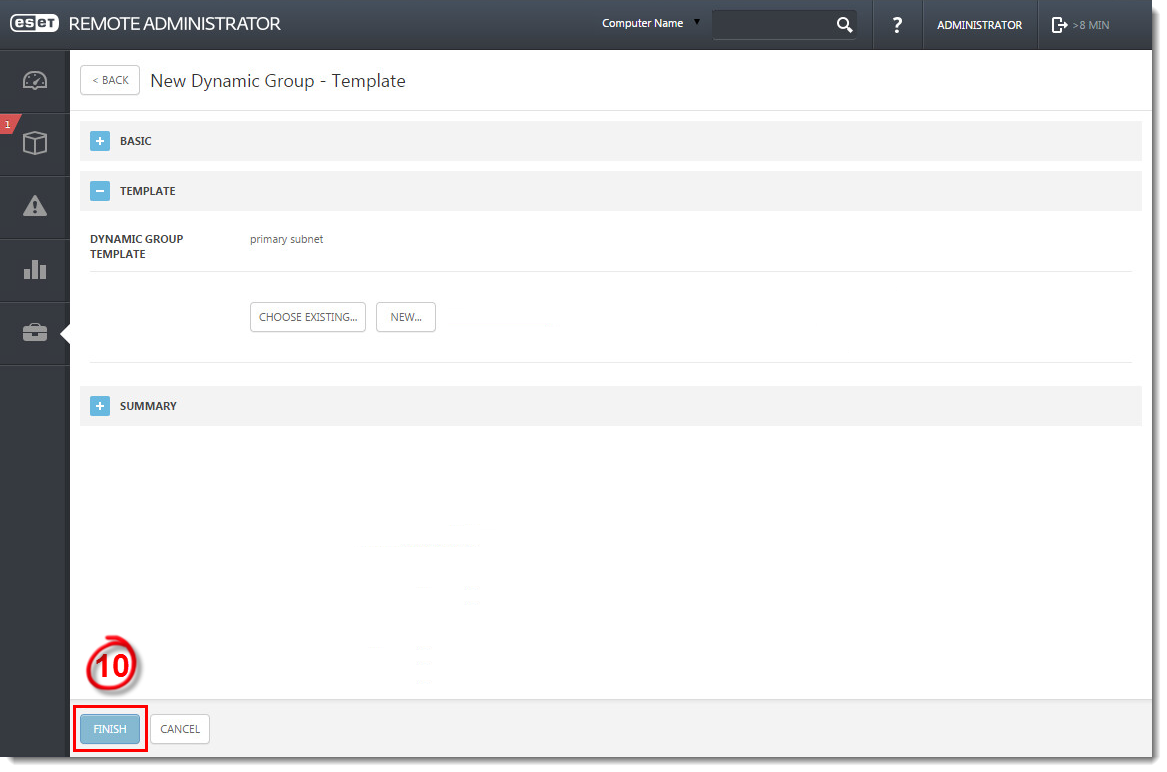
Figure 2-8
Click the image to view larger in new window
- Company Network policy
- Open ESET Remote Administrator Web Console (ERA Web Console) in your web browser and log in.
- Expand the menu on the left and click New Policy.

Figure 3-1
Click the image to view larger in new window - Type a name for the policy into the Name field (“primary subnet policy” in this example).

Figure 3-2
Click the image to view larger in new window - Expand Settings and select the appropriate product grouping from the drop-down menu (in this example, the policy will be applied to client computers running Microsoft Windows operating systems, so ESET Security Product for Windows is selected).

Figure 3-3
Click the image to view larger in new window - Expand Tools and click Proxy server.
- Select Use proxy server, enter the IP address of the proxy server that client computers will download updates from.
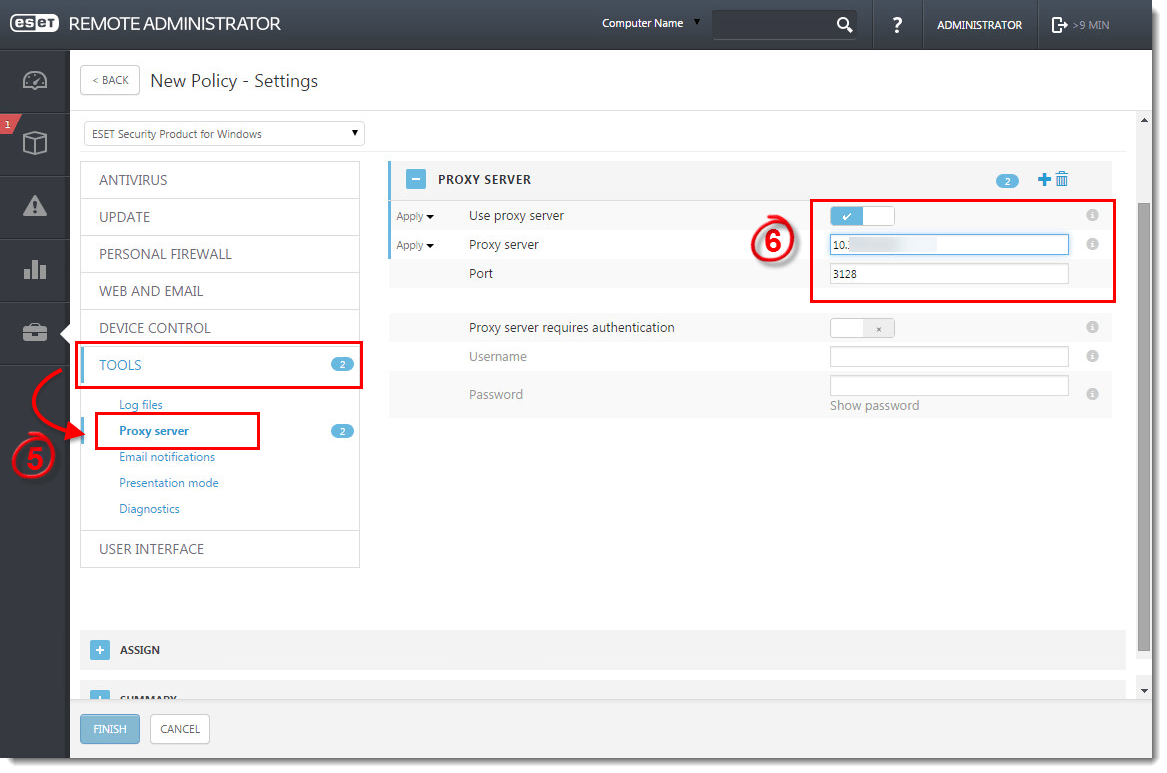
Figure 3-4
Click the image to view larger in new window - Expand Assign and click Assign.
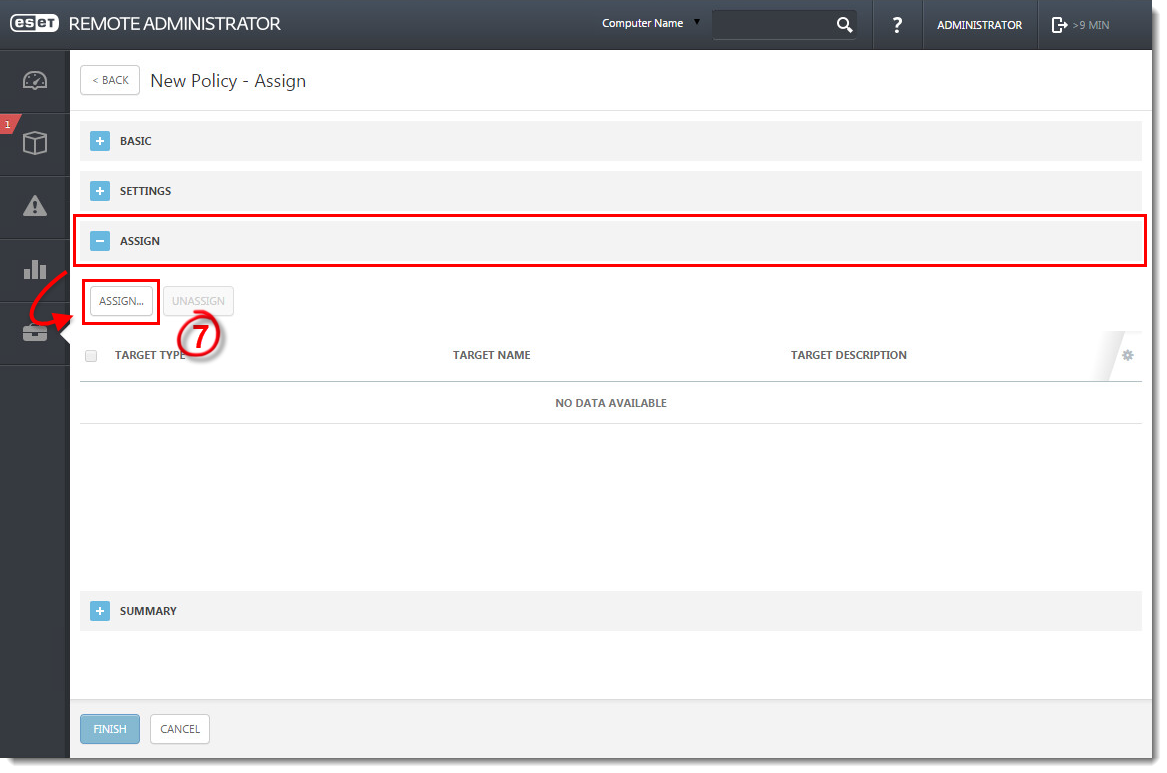
Figure 3-5
Click the image to view larger in new window - Select the check box next to the “company network” dynamic group you created in part I, select the checkbox next to that group in the bottom half of the window, and then click OK.
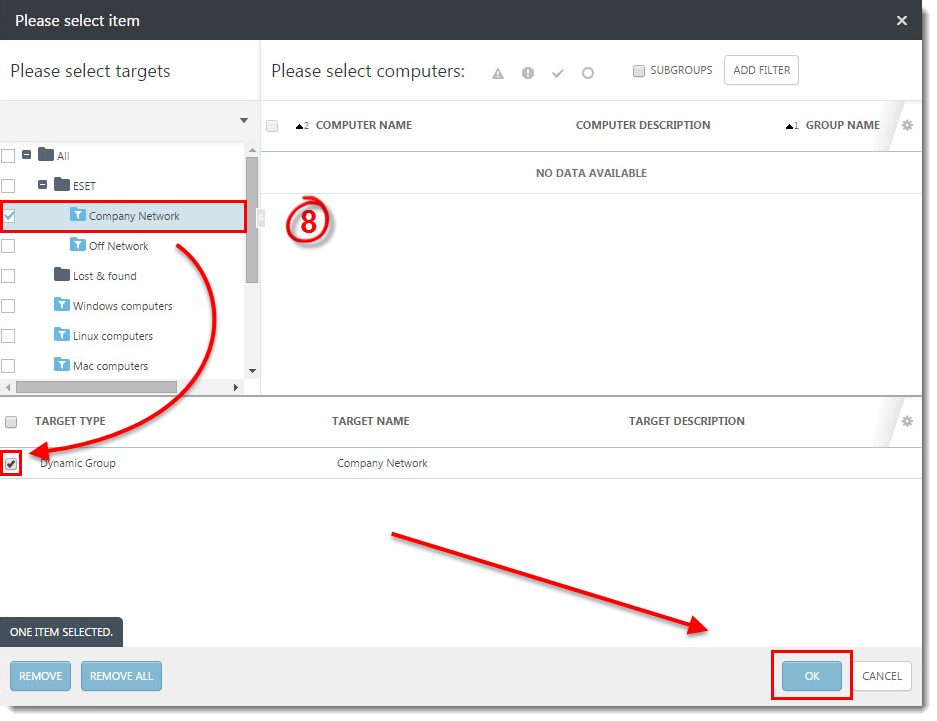
Figure 3-6
Click the image to view larger in new window - Click Finish and proceed to part B.
- Off-Network policy
- Expand the menu on the left and click New Policy.
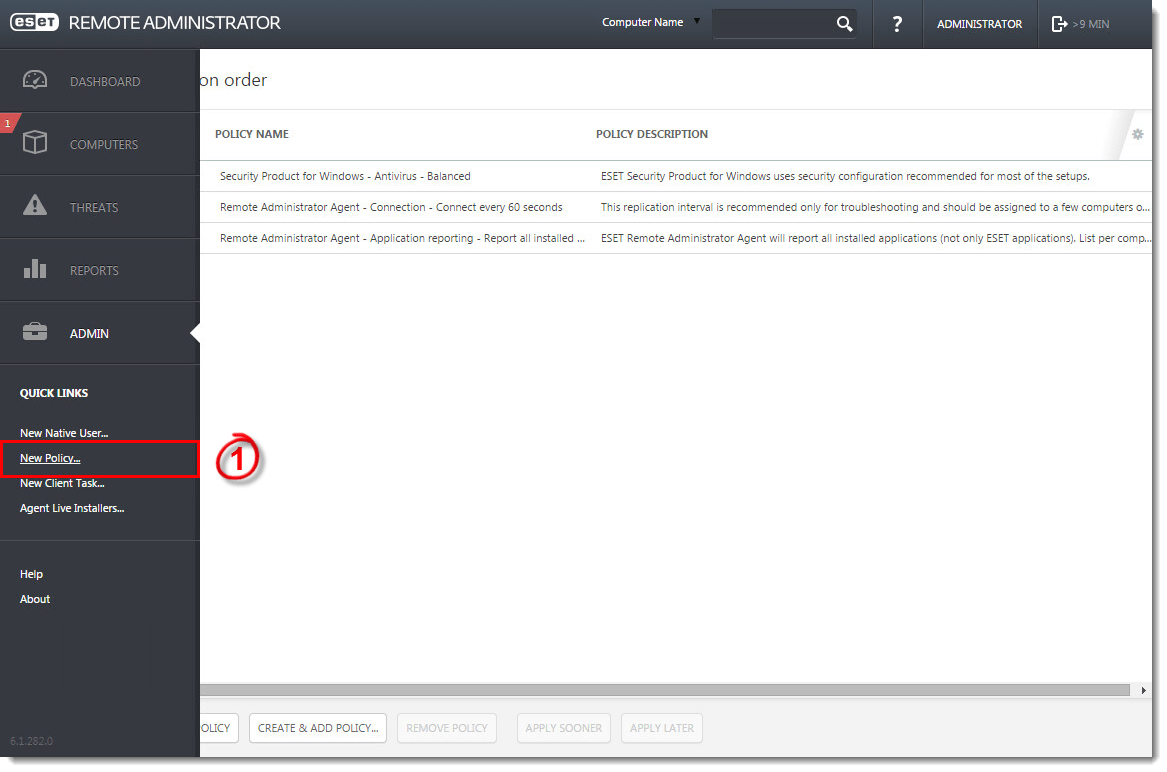
Figure 3-7
Click the image to view larger in new window - Type a name for the policy into the Name field (“Secondary Subnet” in this example).

Figure 3-8
Click the image to view larger in new window - Expand Settings and select the appropriate product grouping from the drop-down menu (in this example, the policy will be applied to client computers running Microsoft Windows operating systems, so ESET Security Product for Windows is selected).

Figure 3-9
Click the image to view larger in new window - Expand Tools and click Proxy server.
- Make sure that Use proxy server is not enabled, and that Apply is selected from the drop-down menu next to this setting (in this example, we are leaving all other settings in their default state).

Figure 3-10
Click the image to view larger in new window - Expand Assign and click Assign.

Figure 3-11
Click the image to view larger in new window - Select the check box next to the “Off Network” dynamic group you created in part II, select the checkbox next to that group in the bottom half of the window, and then click OK.

Figure 3-12
Click the image to view larger in new window - Click Finish.
- Expand the menu on the left and click New Policy.
Back to top