Issue
- Upgrade individual ERA components (Agent, Server, Proxy) to the latest version
- Resolve CReplectionModule errors by upgrading to the latest version
Solution
![]() Linux users: Upgrade ERA to the latest version on a Linux Operating System.
Linux users: Upgrade ERA to the latest version on a Linux Operating System.
Prerequisites
- Perform a full backup of ERA.
-
- Database: Review specific instructions from the software publisher on how to perform a back up operation for your supported database type and version.
-
- Configuration: Copy the
Startupconfiguration.inifile, located at:C:\ProgramData\ESET\RemoteAdministrator\Server\EraServerApplicationData\.
- Configuration: Copy the
-
- Mobile Device Connector: If this component is used, copy the
Startupconfiguration.inilocated at:C:\ProgramData\ESET\RemoteAdministrator\MDMCore\Configuration.
- Mobile Device Connector: If this component is used, copy the
-
- You must have ESET Remote Administrator (ERA) 6.1 or later to run the Component Upgrade task. Check which version of ERA you have installed.
If you are not running ERA 6.1 or later, or you are having issues using the component-based upgrade task in the ERA Web Console, see the instructions below to perform a manual component-based upgrade of ERA.
Perform a Component Upgrade task from the ERA Web Console
The following steps will upgrade both ERA components (Server, Console) and the ESET Remote Administrator Agent(s) (ERA Agent). When upgrading to the latest version, your policies will be preserved. Update your ERA Server first. Select few client machines to use as a test for the update and run the task on them (use at least one client from each system / bit category).
- Open ESET Remote Administrator Web Console (ERA Web Console) in your web browser and log in.
- Click Admin
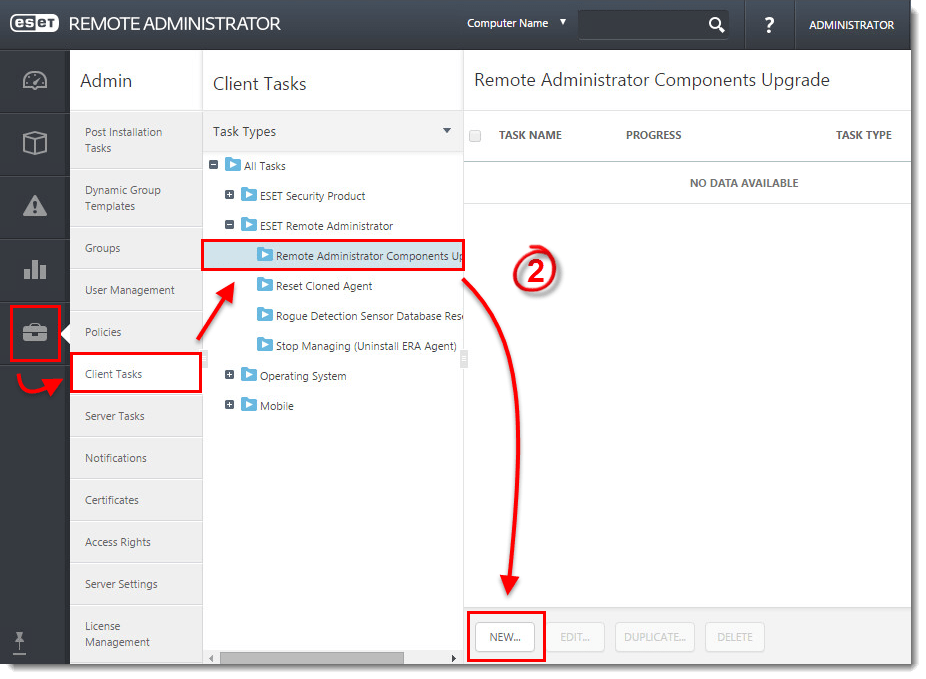
 → Client Tasks → ESET Remote Administrator → Remote Administrator Components Upgrade and click New.
Figure 1-1
Click the image to view larger in new window
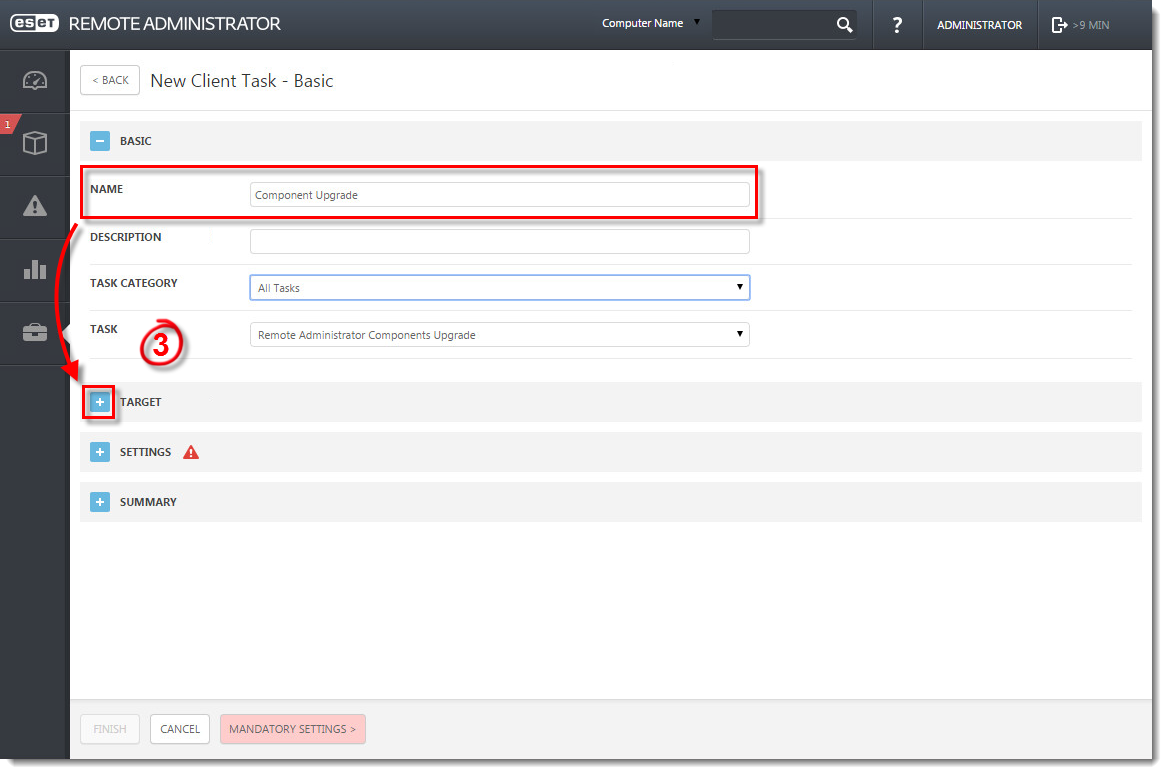
- In the Name field, type a name for your task. In the Task drop-down menu, verify that Remote Administrator Components Upgrade is selected.
Figure 1-2
Click the image to view larger in new window
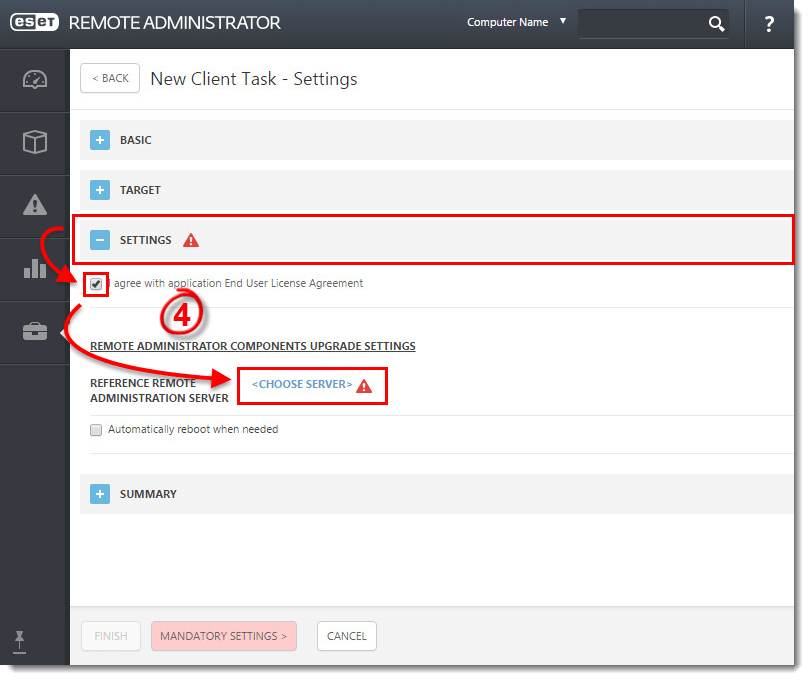
- Expand the Settings section, select the check box next to I agree with application End User License Agreement and then click Choose server.
Figure 1-3
Click the image to view larger in new window
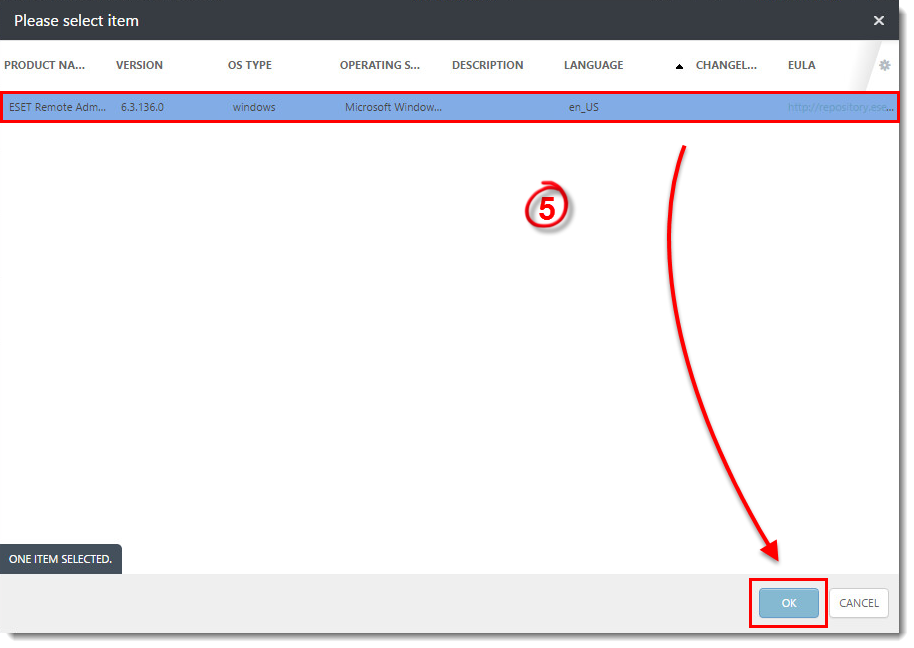
- Select the ERA Server you want to upgrade and click OK.
Figure 1-4
Click the image to view larger in new window
Perform a manual component-based upgrade of ERA
- Upgrade ERA Server and Web Console
- Download the necessary ERA 6 component installers. ERA Server, Agent, RD Sensor and Web Console are required. Download any other installers as needed. Do not rename downloaded .msi installer files.
- Stop Apache Tomcat. Navigate to your
%TOMCAT_HOME%\bindirectory (for example,C:\Program Files\Apache Tomcat\Tomcat7\bin) and double-click tomcat7w.exe. - Back up the
C:\Program Files (x86\Apache Software Foundation\Tomcat 7.0\webapps\erafolder and all of its contents. - Copy the
EraWebServerConfig.propertiesconfiguration file located at:C:\Program Files(x86)\Apache Software Foundation\Tomcat 7.0\webapps\era\WEB-INF\classes\sk\eset\era\g2webconsole\server\modules\config\EraWebServerConfig.properties. - Delete the contents of the original
C:\Program Files(x86)\Apache Software Foundation\Tomcat 7.0\webapps\erafolder (including theera.warfile). - In the downloaded installer files from Step a, locate the
era.warfile and extract it to:C:\Program Files (x86)\Apache Software Foundation\Tomcat 7.0\webapps\era. - Move the
EraWebServerConfig.propertiesconfiguration file from Step d to:C:\Program Files (x86)\Apache Software Foundation\Tomcat 7.0\webapps\era\WEB-INF\classes\sk\eset\era\g2webconsole\server\modules\config. - Double-click ERAServer.msi.
- Specify your database connection settings:
- If you installed using the all-in-one installer, in the Database drop-down menu, select MS SQL Server via Windows Authentication and click Next.
- If you used an existing MS SQL Server/MySQL, select the connection type defined during installation. An administrative privileged database connection (user) is required when connecting to the ERA Server database. Click Next.
- Start the Apache Tomcat service. Depending on your system configuration, allow up to 40 seconds for the service to start.
- Open ESET Remote Administrator Web Console (ERA Web Console) in your web browser and log in. How do I open ERA Web Console?
- Continue to Part 2 below to upgrade other ERA components.
- Upgrade other ERA Components
- Upgrade the ESET Rogue Detection Sensor (RD Sensor).
- Upgrade the ERA Agent(s). Choose the appropriate upgrade method below for your ERA structure:
- Run the Agent .msi installer locally on each client.
- Create a Run Command client task. Continue to Part 3 below.
- Agent upgrade using Run Command Client task
- Create a new dynamic group based on operating system (32-bit or 64-bit).
- For 32-bit systems:
- Operation “AND”
- Add rule OS edition > OS platform = (equal) 32-bit
- Add rule OS edition > OS type contains Windows
- For 64-bit systems:
- Operation “AND”
- Add rule OS edition > OS platform = (equal) 64-bit
- Add rule OS edition > OS type contains Windows
- For 32-bit systems:
- Create a new client task for 32-bit systems.
- In the Basicsection, select Run Command from the Taskdrop-down menu.
- In the Targets section, select the dynamic group for 32-bit operating systems created in Step a.
- In the Settings section, in the Command line to run field, type:
msiexec /qn /i "\\SERVER\ readonlyshare\Agent_x86.msi" /l*v! %TEMP%\era-agent-upgrade.txt(replaceserverwith your actual server name andreadonlysharewith your share name).- When using the installer package via HTTP:
msiexec /qn /i "http://SERVER/share/Agent_x86.msi" /l*v! %TEMP%\era-agent-upgrade.txtmsiexec /qn /i "http://repository.eset.com/v1/com/eset/apps/business/era/agent/v6/6.5.522.0/Agent_x86.msi" /l*v! %TEMP%\era-agent-upgrade.txt
- When using the installer package via HTTP:
- Create a new client task for 64-bit systems.
- In the Basic section, select Run Command from the Task drop-down menu.
- In the Targets section, select the dynamic group for 64-bit operating systems created in Step a.
- In the Settings section, in the Command line to run field, type:
msiexec /qn /i "\\server eadonlyshare\Agent_x64.msi" /l*v! %TEMP%\era-agent-upgrade.txt(replaceserverwith your actual server name andreadonlysharewith share name).- When using installer package via HTTP:
msiexec /qn /i "http://SERVER/share/Agent_x64.msi" /l*v! %TEMP%\era-agent-upgrade.txtmsiexec /qn /i "http://repository.eset.com/v1/com/eset/apps/business/era/agent/v6/6.5.522.0/Agent_x64.msi" /l*v! %TEMP%\era-agent-upgrade.txt
- When using installer package via HTTP:
- To view client task details, click Computers, select the applicable client computer, click Details and then click Installed Applications. There will be a brief period where two versions of the ERA Agent are running on a single client machine. This is only temporary. Create an Outdated applications report to monitor the status of client computers hourly.
- Create a new dynamic group based on operating system (32-bit or 64-bit).


