Systems Management agents can be deployed in a number of ways, depending on how your devices are attached, or located. These deployment methods can include using an existing software deployment mechanism, manual installs (either by technicians or end-users), or using the LAN Deploy tool built into the agent itself.
However, if you are planning on deploying agents across a Windows Active Directory domain, you can use the startup script functionality built into Windows Group Policy to do that deployment for you. This will ensure that the deployment is touching every device that applies the GPO, with minimal levels of manual intervention.
Prerequisites
In order to use Active Directory to deploy the agent across the domain, you must first manually install the agent on at least 1 of your Domain Controllers.
You will also need the necessary permissions to be able to create and apply startup scripts within your domain.
This document assumes that you are comfortable with Group Policy management, and the concepts around it.
PROCESS
Creating the deployment component
- Download the Agent from a Managed site and rename the installer to AgentSetup.exe.
- Download the Deploy PCSM installation files to server for AD deployment component.
- Verify that the downloaded component has the file extension “.cpt”. In case the file got downloaded as a .zip file, rename “.zip” to “.cpt”.
- In the Console, click the Components tab.
- In the top left corner, click Import Component and upload the .cpt file into your components library.
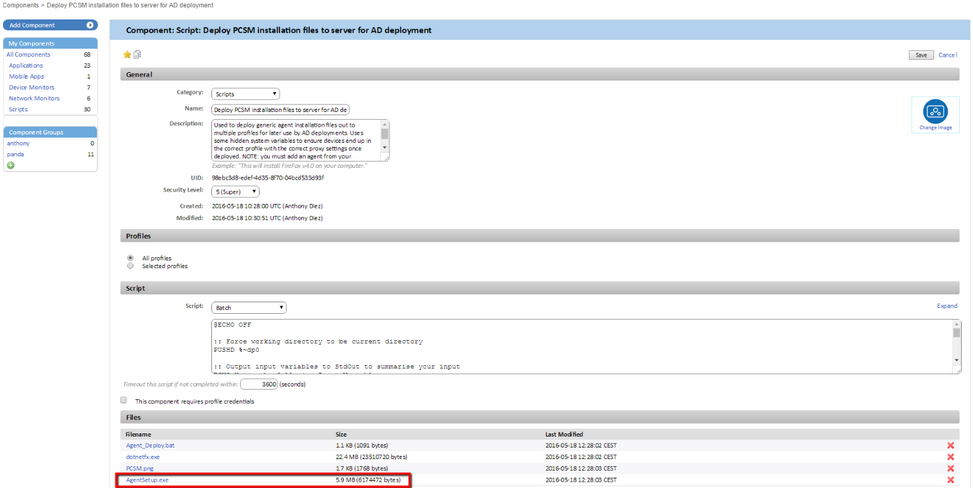
- On the component page, scroll down to the Files section and click Add File…. Select the AgentSetup.exe file.
- At the top of the page, above the General section header, click the star icon so you can use this component in a quick job. Refer to Quick Jobs.
- Click Save. Once that’s done, the component will look like this:

Running the deployment component on your Domain Controller
- Select the Domain Controller in the Web Portal and click Run Quick Job.
- Select Deploy PCSM installation files to server for AD deployment.
- Leave all the other options at their default settings and click OK to run the job.
Add the Startup script to Group Policy
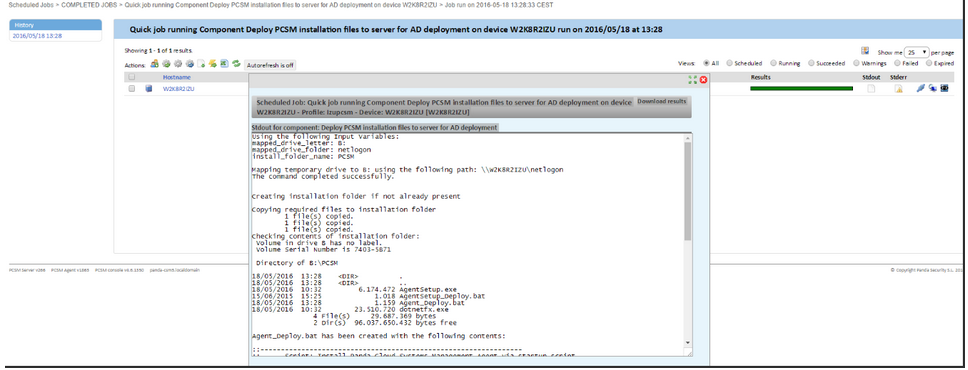
Confirm in the Panda Systems Management console that the quick job has completed successfully. You should see that the stdout looks something like this:

To create the required startup script, you’ll need to be logged onto the server itself – you can do that either through an AEM RDP session, or directly at the console, whichever method suits you.
- Open the GPO you want to add the script to in the Group Policy Management Console (gpmc.msc).
Which GPO you choose will depend largely on the planned scope of the agent deployment you want to carry out – for example, if it should be across the entire domain, you may want to use the Default Domain Policy.
If, on the other hand, you want to target a specific set of devices, you should use either a policy which only applies to that OU, or which has been filtered using security filtering to only apply to your subset of devices.
(Note that as this is a startup script, it should target machines, not users, and should be set on a policy which does not have the machine part of policy disabled).
- In the console tree, click Scripts (Startup/Shutdown).
- At the details pane, double-click Startup to open the startup script properties. If any startup scripts are already defined within this policy, they will be shown here.
- In the startup properties dialogue box, click Add.
- Add the Agent_Deploy.bat file contained in //NETLOGON/PCSM as your startup script.
The group policy is now set and agents will be rolled out to the targeted devices at their next start-up.
Note: It is advisable to periodically update the component Deploy PCSM installation files to server for AD deployment with the latest version of the Panda Systems Management agent.

