
|
|
Considerations to bear in mind before you start Virtual environments are complex and varied. Due to these peculiarities, installing Panda solutions in these environments requires a special procedure which is described below. In environments with very specific characteristics, it may be necessary to follow the recommendations provided by the virtualization vendor to adapt Panda’s general instructions to your needs. Please contact Panda Security Technical Support so that our experts can analyze your particular environment and provide you with a tailor-made solution as soon as possible. |
Situation
This article offers a step-by-step walkthrough of how to install Panda Security solutions on Aether platform in persistent and non-persistent Virtual Desktop Infrastructure (VDI) environments. Due to their characteristics, virtual computers or instances require that a specific procedure be followed to ensure that the images or templates to be used in virtual environments are up to date, optimized, and don’t have a previously assigned machine ID so that, when a virtual computer is started, it is uniquely wp-signup.phped in the Web console.
The installation procedure requires that a template (for persistent environments) or a gold image (for non-persistent environments) be prepared that will be later deployed to the virtual computers on the network. It is very important to follow this procedure closely to:
- Ensure engine and knowledge updates.
- Optimize resource and bandwidth consumption in non-persistent environments.
- Ensure virtual instances are uniquely identified.
Prerequisites
- In persistent environments, computers must have fixed MAC addresses.
- The computer used to generate the template or gold image must have an Internet connection.
Compatible systems
Generally, the procedure described in this document works* with the following types of virtual machines:
- VMware Workstation
- VMware Server
- VMware ESX
- VMware ESXi
- Citrix XenDesktop
- XenApp
- XenServer
- MS Virtual Desktop
- MS Virtual Servers
*Bear in mind the considerations at the beginning of the article.
Installing the protection in persistent environments
- Install/update the operating system with the customer’s applications.
- From the product console, create one group to host the template and the virtual machines (‘Virtual machines‘ group).
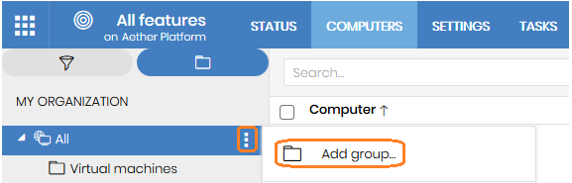
- ‘Virtual machines’ group
- Go to the Settings tab, click Per-computer settings and create a settings profile for future image updates.
- Make sure automatic updates of the protection engine are enabled.

- Assign these settings to the group you created for the template (‘Virtual machines‘ group).
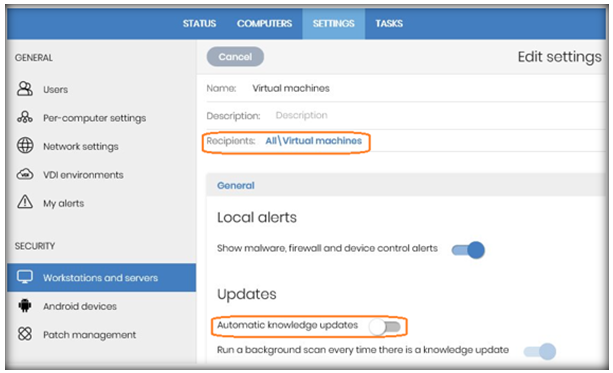
- Next, click the Settings tab, and select Workstations and servers from the Security section to create a settings profile for future image updates.
- Make sure automatic knowledge updates are enabled:
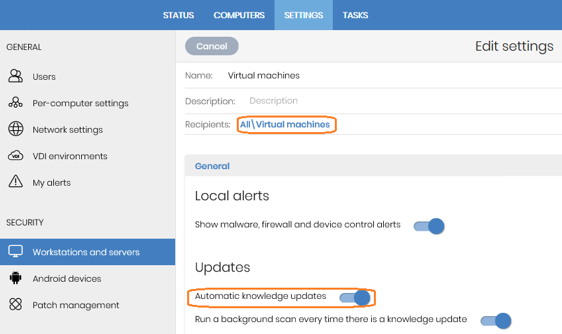
- Assign these settings to the group you created for the template (‘Virtual machines‘ group).
- ‘Virtual machines’ group
- Install the agent and the protection:
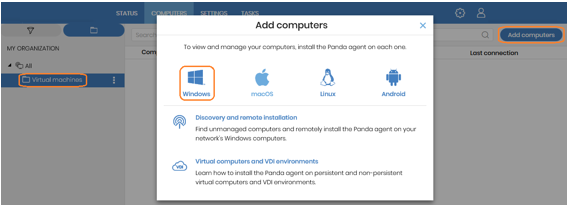
- Go to the Computers tab, select the template group (‘Virtual machines‘ group), and click Add computers. This will download the installer.
- Install the agent on the template and wait for the progress window to finish. During that time, the protection will be automatically installed, configured and updated. After the installation is completed, the computer will appear on the list of protected computers in the Web console, with a green icon. The computer’s protection and knowledge will be up to date.
- Go to the Computers tab, select the template group (‘Virtual machines‘ group), and click Add computers. This will download the installer.
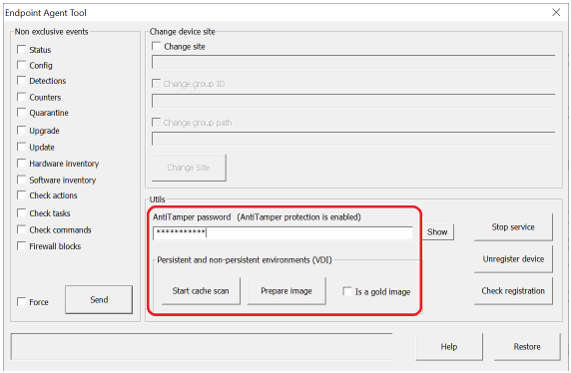
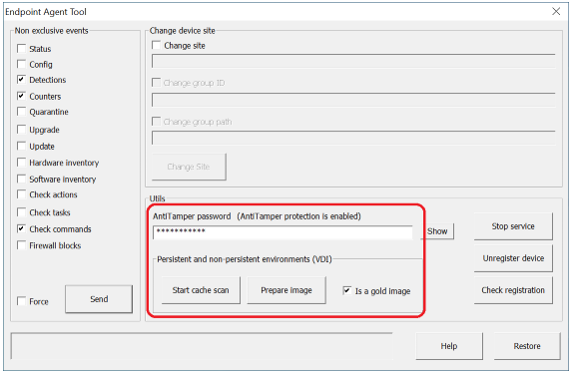
- Run Endpoint Agent Tool (password panda) on the computer with the template.
- Scan it by using the Start cache scan button. This will fill the goodware cache and leave the protection in an appropriate state for virtual images. This process can take some time, depending on the contents of the hard disk. Please wait until you are notified that the operation has finished.
- Select the Detections, Counters and Check commands options and click Send. Alternatively, right-click on the protection icon and choose Synchronize.

- Remove the machine ID. To do this, if the computer is protected with Anti-Tamper, enter the password in the AntiTamper password field or else, leave it blank. Then, click the Prepare image button, making sure the Is a gold image option is unchecked. This will remove the agent ID from the template, so that all virtual machines that get run obtain their ID upon being executed and connecting to Aether for the first time.
IMPORTANT! This step is critical to ensure that each virtual machine is uniquely identified in the Web console.
- Disable the Panda Endpoint Agent service so that the service does not start automatically when using this template on virtual instances. The service is started with GPO policies, which is explained in detail below.
- Access the virtual environment management tool and generate the template. If you have questions about this step, please contact your vendor.
To change the Panda Endpoint Agent service’s startup type, you must create a GPO. To do that, in the GPO settings, browse to the following path: Computer Configuration, Policies, Windows Settings, Security Settings, System Services, Panda Endpoint Agent. The service will be disabled. Change the setting to Automatic. The service will start automatically on next boot and will be integrated in the console.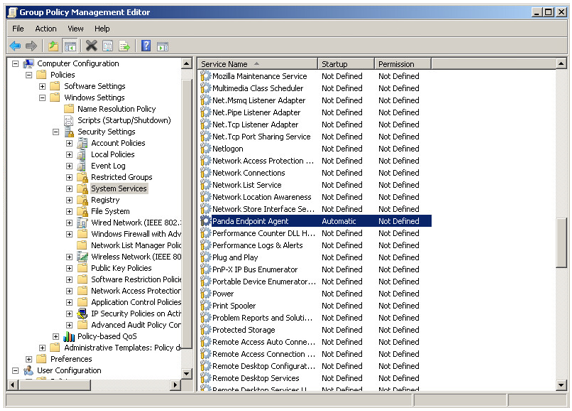
The Group Policy Management Editor screen will look like this:
Installing the protection in non-persistent VDI environments
The procedure for managing non-persistent VDI environments consists of three phases.
The procedure for managing non-persistent VDI environments consists of three phases.
- Install/update the operating system with the customer’s applications.
- From the product console, create one group to host the gold image (‘Gold or template image‘ group), and another to host virtual machines (‘Virtual machines‘ group).
- ‘Gold or template image’ group
- Go to the Settings tab, click Per-computer settings and create a settings profile for future image updates.
- Make sure automatic updates of the protection engine are enabled.
- Select the automatic restart option to make sure the computer will be updated.
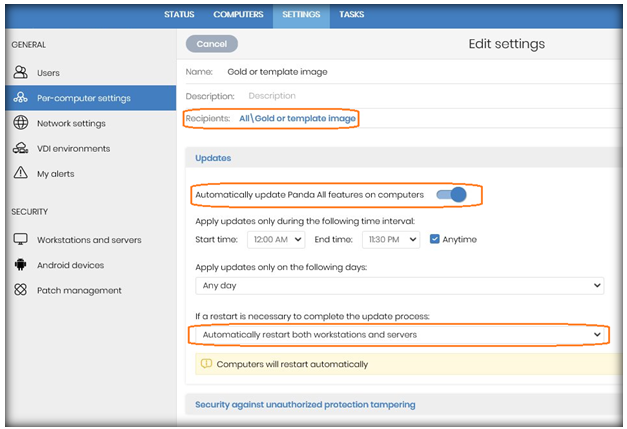
- Assign these settings to the group you created for the gold image (‘Gold or template image‘ group).
- Next, click the Settings tab, and select Workstations and servers from the Security section to create a settings profile for future image updates.
- Make sure automatic knowledge updates are enabled.
- Assign these settings to the group you created for the gold image (‘Gold or template image‘ group).
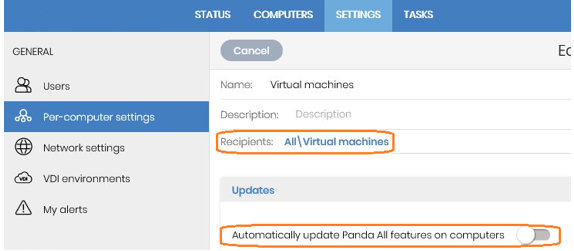
- ‘Virtual machines‘ group
Virtual instances are based on the updated gold image. To optimize the VDI server’s resources and reduce bandwidth usage, disable updates by following the steps below:- Create a Per-computer settings profile that has updates disabled, and assign it to the ‘Virtual machines‘ group.
- Go to Workstations and servers in the Security section of the Settings tab, disable knowledge updates, and assign those settings to the ‘Virtual machines‘ group.
- Create a Per-computer settings profile that has updates disabled, and assign it to the ‘Virtual machines‘ group.
- ‘Gold or template image’ group
- Install the agent and the protection on the ‘Virtual machines‘ group in order to generate the gold image:
- Go to the Computers tab, select the gold image group (‘Virtual machines‘ group), and click Add computers. This will download the installer.
- Install the agent on the machine used to create the gold image and wait for the progress window to finish. During that time, the protection will be automatically installed and configured. After the installation is completed, the computer will appear on the list of protected computers in the Web console.
- Move the machine with the gold image to its Gold or template image group so that it receives the settings with the option to update. We recommend that, from the computer, you right-click the bear icon in the notifications area of the taskbar, and force a synchronization. This will push the settings to the computer so that it will start updating.
- Run Endpoint Agent Tool on the computer with the gold image.
- Scan it by using the Start cache scan button. This will fill the goodware cache and leave the protection in an appropriate state for virtual images. This process can take some time, depending on the contents of the hard disk. Please wait until you are notified that the operation has finished.
- Tick the Detections, Counters and Check commands options and click Send or else, right-click on the protection icon and select Synchronize.
- Remove the machine ID. To do this, if the computer is protected with AntiTamper, enter the password in the AntiTamper password field or else, leave it blank. Then, click the Prepare image button, making sure the Is a gold image option is checked. This will remove the agent ID from the gold image, so that all virtual machines that get run obtain their ID upon being executed and connecting to Aether for the first time.
IMPORTANT! This step is critical to ensure that each virtual instance is uniquely identified in the Web console.
- Disable the Panda Endpoint Agent service to prevent it from starting automatically when using the gold image on virtual instances. The service can be started using GPO policies. This is explained later in this article.
- Access the VDI management tools and generate the gold image. If you have questions about this step, please contact your vendor.
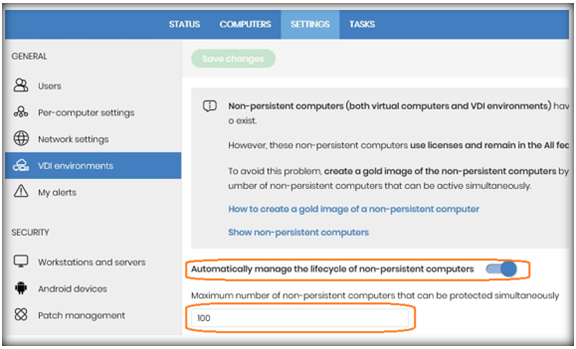
- If you want, you can configure, in the VDI environments section of the Web console, the maximum number of non-persistent machines that can be active simultaneously. This will allow automatic management of the licenses used by those machines, relieving you of the task of deleting them from the Aether platform to recover their licenses.
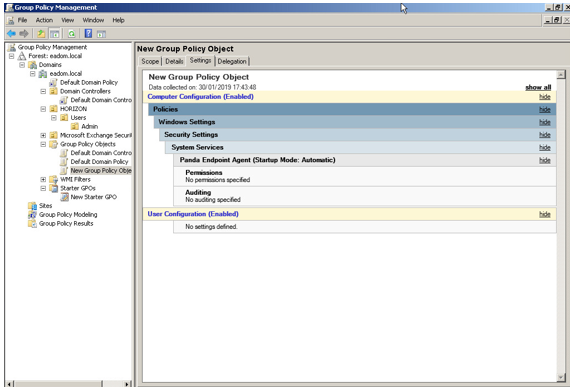
To change the Panda Endpoint Agent service’s startup type, you must create a GPO. To do that, in the GPO settings, browse to the following path: Computer Configuration, Policies, Windows Settings, Security Settings, System Services, Panda Endpoint Agent. The service will be disabled. Change the setting to Automatic. The service will start automatically on next boot and will be integrated in the console.
The Group Policy Management Editor screen will look like this:
Follow the steps below to update the gold image:
- Start the machine where the gold image is installed.
- From the Web console, move the machine with the gold image to the ‘Gold or template image‘ group so that it receives the appropriate settings with automatic updates of the engine and knowledge.
- From the computer, right-click the Panda bear icon in the notifications area of the taskbar to force a synchronization. This will update the machine.
- Updates are performed silently in the background. We recommend you wait a few minutes to make sure the image is properly updated.
- If a new version of the protection is available, a restart window will be displayed and the computer will restart automatically (as configured in the Per-computer settings).
In this case, once the restart is completed, we recommend you force a new synchronization to make sure the product is fully up to date and configured properly.
- Run the Endpoint Agent Tool (password panda) on the computer with the gold image.
- Scan it by using the Start cache scan button. This will fill the goodware cache and leave the protection in an appropriate state for virtual images. This process can take some time, depending on the contents of the hard disk. Please wait until you are notified that the operation has finished.
- Tick options Detections, Counters and Check commands and click Send or elese, right-click on the protection icon and choose Synchronize.
- Remove the machine ID. To do this, click the Prepare image button, making sure the Is a gold image option is checked. This will remove the agent ID from the gold image, so that all virtual instances that get run obtain their ID upon being executed and connecting to Aether for the first time.
IMPORTANT! This step is critical to ensure that each virtual instance is uniquely identified in the Web console.
License management
If the aforementioned process is followed appropriately, that is, if the step to delete the agent ID is performed correctly selecting and clearing the Is a gold image option as indicated, every time a new machine is started, the system will calculate its machine ID and will determine whether the computer is a new computer or an existing one, based on the selected environment.
- In non-persistent environments, if the maximum number of machines that can be active simultaneously for non-persistent images is set, the server will manage licenses automatically, provided there are available licenses and the number of concurrent machines is not exceeded.
- In persistent environments, if there are multiple machines that are no longer used, delete them from the database in order to free up licenses just as you would do with physical machines. This can be done from the Aether console, by selecting all machines to delete and clicking the Delete button, or individually via the context menu of each machine to delete.