This article concerns:
- Kaspersky Endpoint Security 11.1.0 for Mac (version 11.1.0.210)
- Kaspersky Endpoint Security 11.0.1 for Mac (version 11.0.1.753)
- Kaspersky Endpoint Security 11.0.0 for Mac (version 11.0.0.501)
After you create a request to Kaspersky support engineers, they may ask you to send trace files. Trace files contain records of all application’s actions, which allows the engineers to find the step at which an error occurs.
Enable tracing right before reproducing the issue and disable it immediately after the issue is reproduced. Do not leave tracing enabled for a long period of time.
How to collect traces via graphical user interface (GUI)
- Remove the previous tracing logs. To do so, open Finder. Go to Applications → Utilities → Terminal and run the following command:
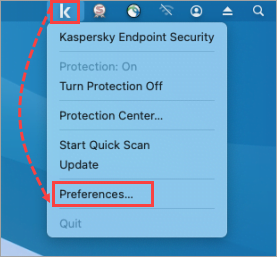
- In the upper-right corner of the screen, click the
 icon and select Preferences.

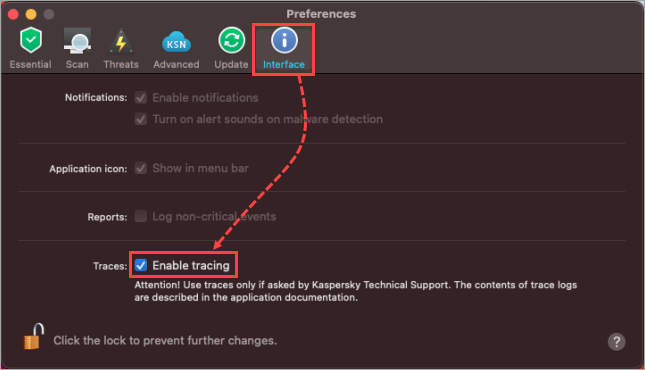
- Go to the Interface tab and select the Enable tracing checkbox.

- Reproduce the issue.
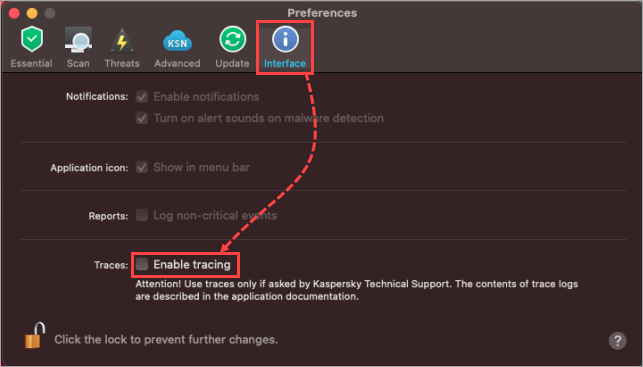
- Return to the Preferences window, go to the Interface tab and clear the Enable tracing checkbox.

Trace files will be created in the following folders:
- /Library/Logs/Kaspersky Lab/
- /Users/<username>/Library/Logs/Kaspersky Lab/
How to collect traces via Terminal
If the graphical user interface is unavailable, you can get Kaspersky Endpoint Security 11 for Mac trace files via Terminal.
How to enable tracing
- Remove the previous tracing logs. To do so, open Finder. Go to Applications → Utilities → Terminal and run the following command:
- Unload application processes:
- Give a permission to make changes:
- Open the config.xml file for editing:
- Find the TraceFileEnable variable and change its value to 1.
- Find the TraceFileMaxLevel variable and make sure that its value equals 1000.
- To save your changes, run in the file the following command:
- Load application processes:
- Reproduce the issue.
The tracing will be enabled.
How to disable tracing
- Unload application processes:
- Open the config.xml file for editing:
- Find the TraceFileEnable variable and change its value to 0.
- Revoke a permission to make changes:
- Load application processes:
Trace files will be created in the following folders:
- /Library/Logs/Kaspersky Lab/
- /Users/<username>/Library/Logs/Kaspersky Lab/
Editor by : BEST Antivirus KBS Team

