Issue
- Create a new user in ESET Remote Administrator version 6.5
- Create a new user in ESET Remote Administrator version 6.3 and 6.4
Solution
- Create a Home Group in version 6.5
- Create a Permission Set in version 6.5
- Create a User in version 6.5
Version 6.5
ESET Remote Administrator uses an improved user security model which is different from previous versions. The security model uses groups, objects, and permission sets. Each user has one Home Group, and can have multiple permission sets assigned. Home Group is a Static Group where all objects newly created by the user are stored. Administrator’s Home Group is All.
Objects are located in Static Groups, and access to objects is always bound to groups, not users (this makes users substitutable, for example, if one user is on holiday). The term Objects denotes computers, devices, templates, policies, tasks, notifications, etc., all of which are always located in a Static Group.
If user has access to a group, the user has the same access also to all child groups of that group. That is why Administrator can access all groups. In the permission set, it is possible to configure access for a specific group and also the actions (Functionalities) which can be performed with specific objects in a given group.
This article provides a complete walkthrough guide for creating new users, including Home Group and permission set creation. There are three key steps in creating a user:
I. Create a Home Group
Each user needs to have a Static Group as their Home Group. This group will contain all objects created by that user (unless the object is moved or the Home Group is changed). It is recommended that only the Administrator’s home group is the group All. One group can be used as the Home Group for multiple users. For example, there is an office in Sydney, so can create Static Group named Sydney office and assign that group to the Sydney local admin as Home Group. All groups are child groups of the All group, therefore Administrator has access to all of them.
To create a new Static Group, follow these steps:
- Open the ERA Web Console and navigate to Admin
 → Groups, click cogwheel
  next to the Static Group you want to use as parent group and select New Static Group,
Figure 1-1
Click the image to view larger in new window
- Type or copy/paste in the name of the new group. Optionally you can add a description. It is very important to choose the right Parent group. Your new group will be located in the parent group and all users with access to the parent group will have the same access also to this new group. Click Finish to create the group.
Figure 1-2
Click the image to view larger in new window
II. Create a permission set
A permission set is a collection of rules, that defines what a user is allowed to do over objects in certain groups. One permission set can be assigned to different users, but it is not necessary to assign it to a user (it can be done later). Permission set can be applied over objects in one or more Static Groups. It always affects objects in subgroups of chosen groups. The choice of Static Group is the most important as it determines which objects will be affected. In the Functionality section, you have to choose which exact permissions will be granted.
To create a new permission set, follow these steps:
- Open the ERA Web Console and navigate to Admin
 → Access Rights → Permission Sets and click New.
Figure 2-1
Click the image to view larger in new window
- Type in the name of the new permission set in the Name field. Optionally, you can type in also the Description.

Figure 2-2
- Expand the Static Groups section, click Add Static Group(s) and select the checkboxes next to Static Groups you want to choose. Select the group you have created in the part I. The permission set will be applied over selected Static Groups. Click OK to confirm your choice.

Figure 2-3
- Expand the Functionality section. You can select one of pre-defined permission models or manually select which functions shall be granted to a user that will be assigned with this set. There are three different types of permissions: Read, Use, Write. You can click + next to Server Tasks & Triggers and Client Tasks to expand the categories and select permissions for single types of tasks. Read more about functionalities in the Online Help topic.

Figure 2-4
- Expand the Users Groups section. If you want to assign this permission set to a group of users synchronized from your Active Directory, click Add User Group(s). It is not necessary to add any user group. User groups are managed in Admin
 → User Management.

Figure 2-5
- Expand the Users section. You can assign this permission set to an existing user(s) or an existing Mapped Doman Security Group(s). It is not necessary to select a user now, it can be done later. Click Finish to create and save the new permission set.

Figure 2-6
III. Create a user
It is recommended to create a user as the last step because the user can be now assigned with the correct home group and permission set. Afterward, the new user can log in to the ERA Web Console and start working.
- Navigate to Admin
 → Access Rights → Users and click New,
Figure 3-1
Click the image to view larger in new window
- In the Basic section, type or copy/paste the login name of the new user into the User field.
- Click the Home Group and select the group you created in the part I. (“Sydney office”). Users can have only one Home Group assigned.
- Type in a secure password into Password fields. This password will be required from the new user on login. Optionally, you can set up more settings in the Account section.
Figure 3-2
Click the image to view larger in new window
- Expand Permission sets. Choose one of the unassigned permission sets by clicking the checkbox next to it. Select Sydney permissions for the purposes of this example.
- You can optionally review the settings in the Summary section. Click Finish to create the user.
Figure 3-3
Click the image to view larger in new window
Now the user is created and prepared for the first login.
Version 6.3 and 6.4
User accounts are the easiest way to manage who can make changes in ESET Remote Administrator Web Console (ERA Web Console). The Administrator account, which is created during installation, has full access to all features. We recommend that you create additional accounts for use by other users with narrower access rights based on desired account competencies.
For more information about user accounts in ESET Remote Administrator, see the ESET Remote Administrator User Guide.
- Open ESET Remote Administrator Web Console (ERA Web Console) in your web browser and log in. How do I open ERA Web Console?
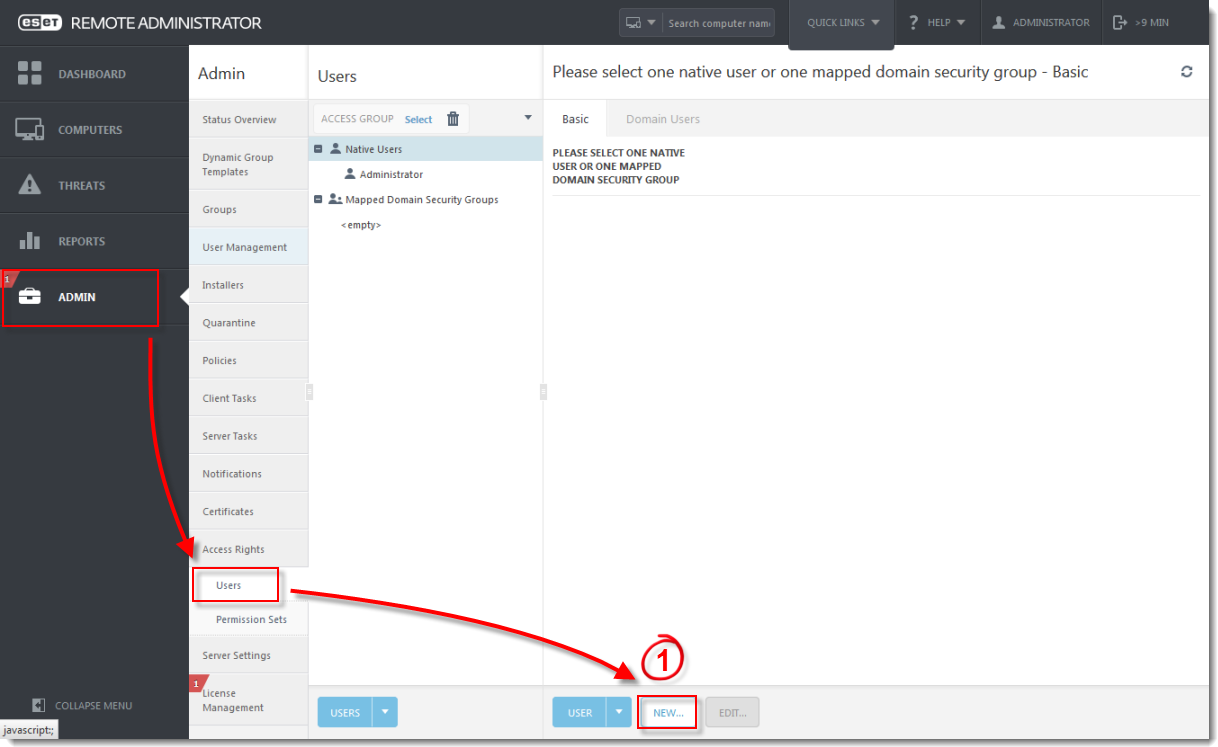
- Click Admin
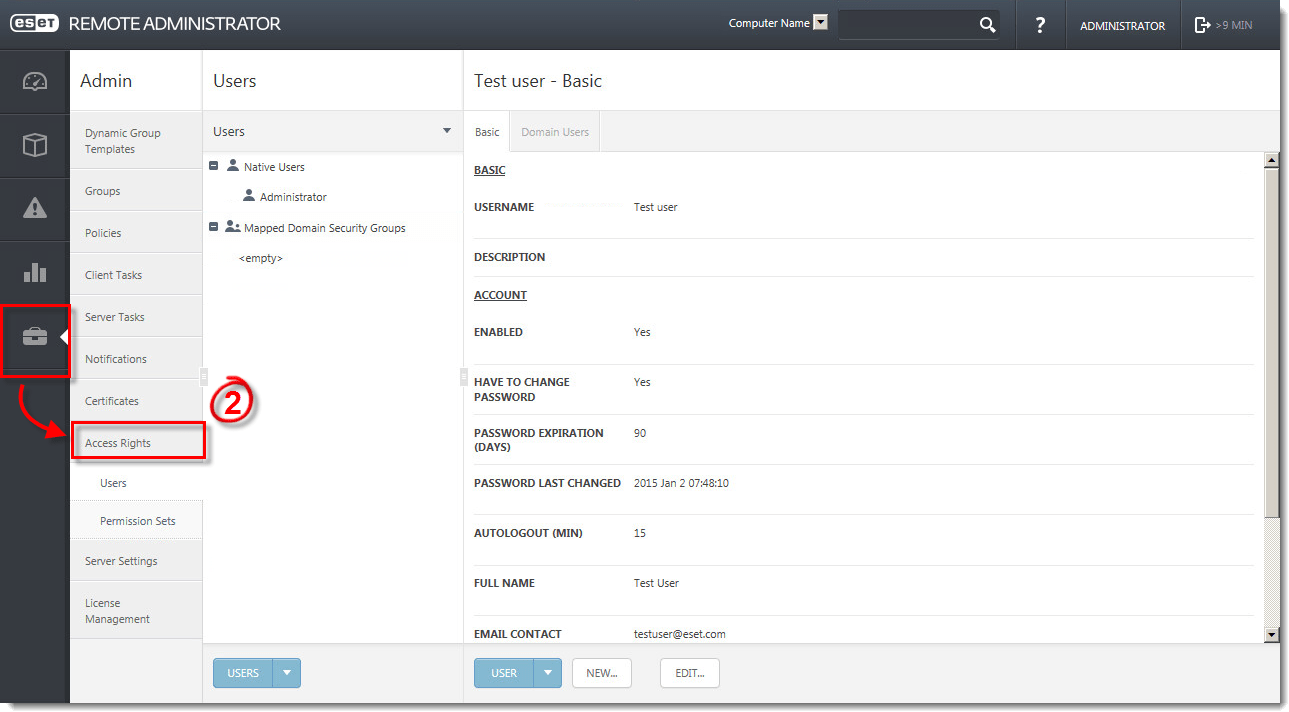
 → Access Rights. Users will be selected by default.
Figure 1-1
Click the image to view larger in new window
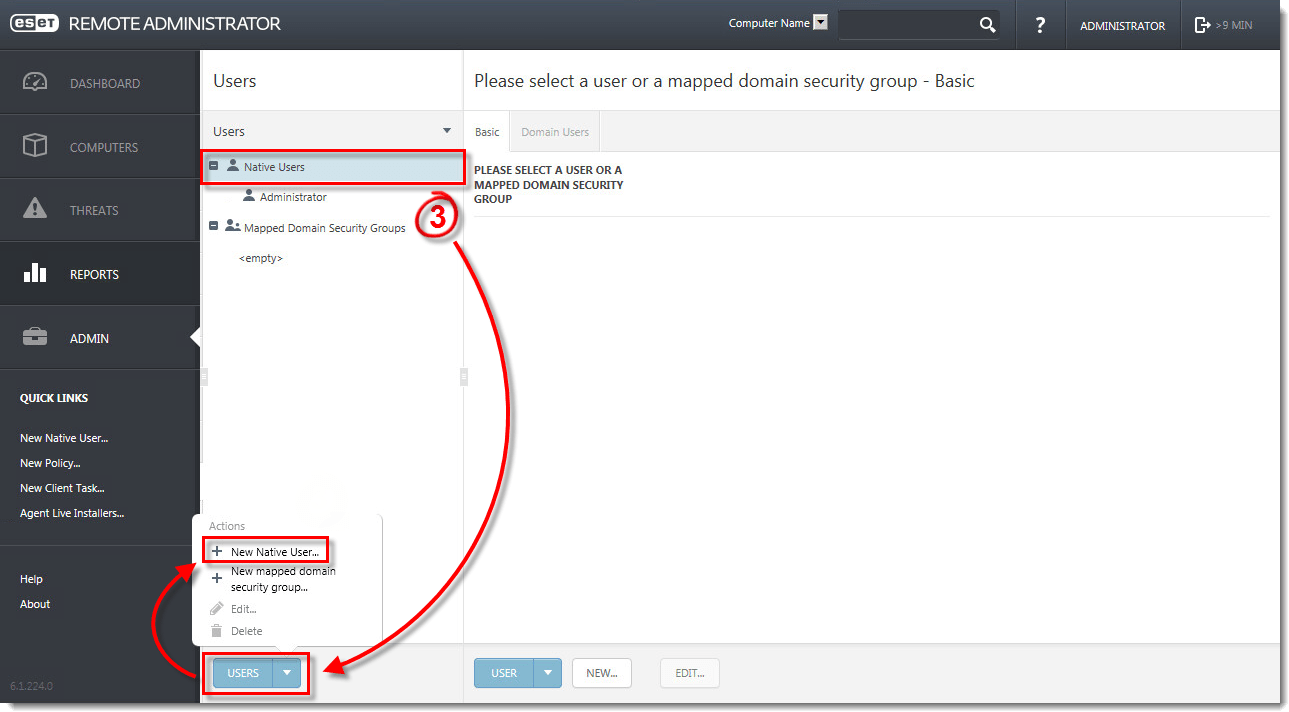
- Select Native Users, click Users and select New Native User.
Figure 1-2
Click the image to view larger in new window
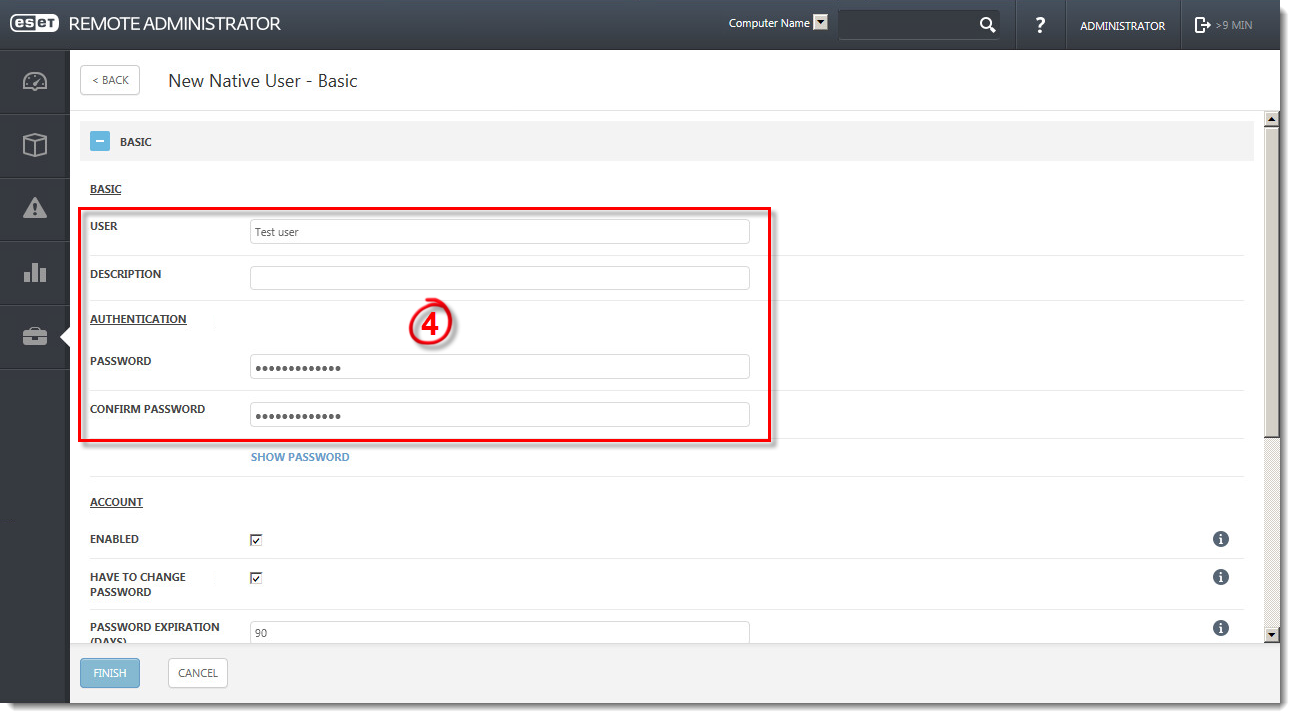
- Type a name for your new user into the User field and then type the password for this new user into the Password and Confirm Password fields.
Figure 1-3
Click the image to view larger in new window
- Type the name of the user into the Full Name field, and then type the email for this user into the Email Contact field.
Figure 1-4
Click the image to view larger in new window
- Expand the Permission Sets section and select the check box(es) next to all permission sets (preconfigured access settings that can be applied to any user) that apply to this user. Click here for instructions to create a new permission set.
Figure 1-5
Click the image to view larger in new window
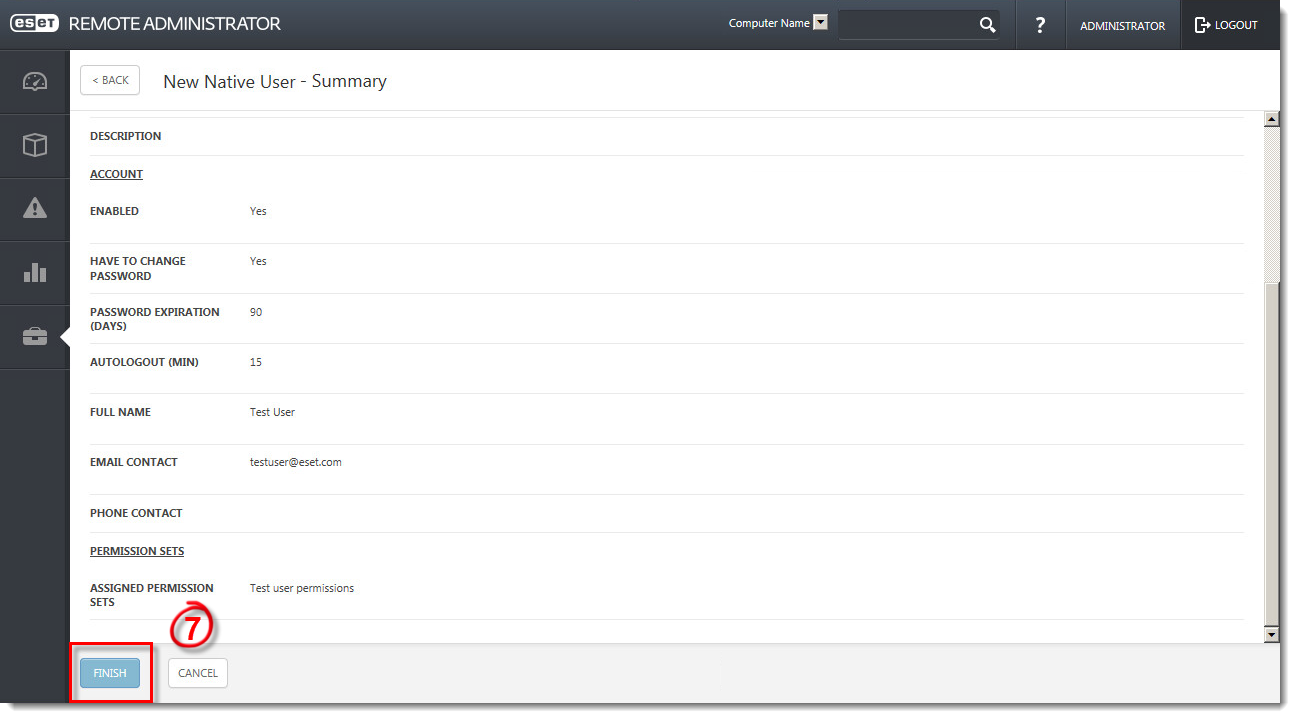
- Expand the Summary section to review the details for this new user account. Click Finish when you are done making changes.
Figure 1-6
Click the image to view larger in new window

