Issue
- Install ESET Remote Administrator 5.x
- Configure a mirror server
Solution
In order to setup ESET Remote Administrator, you will need to complete four core steps:
- Download and install ESET Remote Administrator
- Set up a Mirror server
- Create an installation package
- Push installation package out to client workstations
I. Download and install ESET Remote Administrator
Download the appropriate files below. You will be prompted for your ESET-issued username and password. You will also be prompted to upload your nod32.lic file when installing ESET Remote Administrator Server. You can recover a misplaced username/password or license file using the Lost License form.
Download the ERA Server Download the ERA Console
II. Setup a Mirror server in the ESET Remote Administrator Console (ERAC)
You may deploy as many Mirror servers as necessary for the most efficient distribution of virus signature and program component updates within your environment. A Mirror can be configured as an HTTP server, or as a shared network folder. Distribution of updates via HTTP can be easier to configure and is not limited by the file server license limit, which is a potential limitation of the shared network folder method. Click your preferred method (below) to jump to step-by-step instructions:
- As an HTTP server (recommended method)
- As a shared network folder (alternative method)
Regardless of which method you choose, there are several places within the software that allow you to configure a Mirror server:
- ESET Remote Administrator Console (ERAC)
- ESET Endpoint Security
- ESET Endpoint Antivirus
Set up the Mirror as an internal HTTP server (recommended):
- Open ERAC by double-clicking the ESET Remote Administrator Console icon on your Desktop, or by clicking Start → All Programs → ESET → ESET Remote Administrator Console → ESET Remote Administrator Console.
- Verify that you are connected to the ESET Remote Administrator Server (File → Connect).
- Click Tools → Server Options.
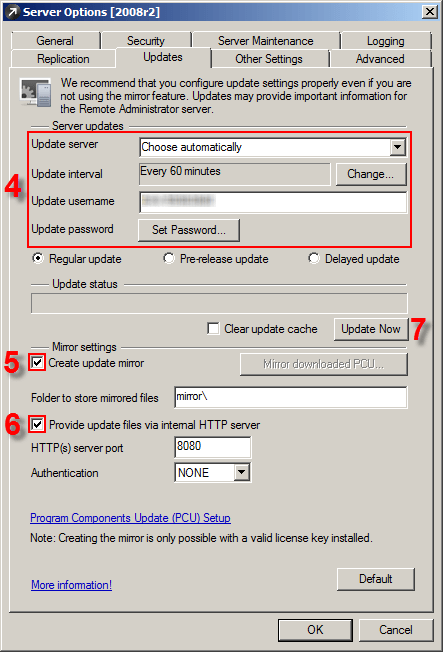
- Click the Updates tab and enter the appropriate ESET-issued Username and Password into the Update username and Update password fields, respectively (click Set Password… to enter your password).
- Select the check box next to Create update mirror.
- Select the check box next to Provide update files via internal HTTP server. If you wish to use a port other than the default port (2221), enter the value in the HTTP server port field (the default value is recommended unless you have other applications communicating on this port).
- Click Update now to display a confirmation dialog box (‘This will first apply server options and then fire the event. Continue?’) Click Yes.

Figure 1-1
- A dialog box will be displayed (‘Event fired on the server’) Click OK.
Set up the Mirror as a shared network folder (an alternative method):
- Create a shared folder on a local or network device. This folder must be readable by all users running ESET software, and writable by the local SYSTEM account. (If the shared folder is located on another computer in the network, it is necessary to specify authentication for accessing that computer). Refer to the following Knowledgebase article for more information:
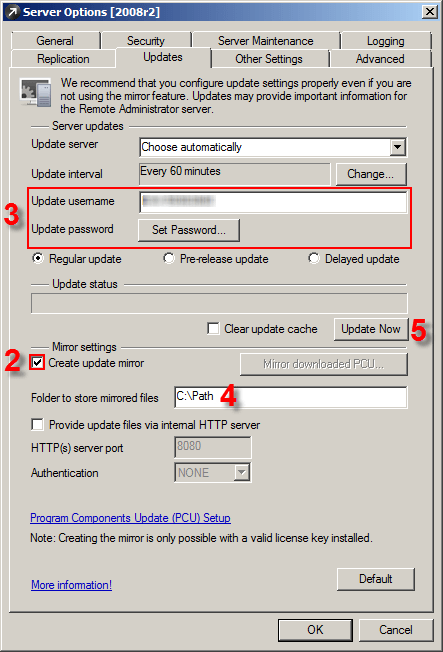
- Select the check box next to Create update mirror in the the Server Options window (Tools→Server Options).
- Enter the appropriate ESET-supplied values in the Update username and Update password fields (Click Set Password… to enter the password).
- Enter the local path to the shared folder (created in step 1) i.e. C:Path

Figure 1-2
- Click Update now. A confirmation dialog box (‘This will first apply server options and then fire the event. Continue?’) will appear: click Yes.
- A dialog box will appear (‘Event fired on the server’): click OK to continue.
- After the Mirror server is created, you must configure client workstations to access it for updates:
- Create and push an .xml configuration file from ESET Remote Administrator to client workstations (recommended if you have multiple client workstations in your network)
- Instructions to configure individual client workstations manually (for smaller businesses or when users will configure client workstations themselves)
- When you have finished the steps above, proceed to parts III and IV by following the link below:

