

NOTICE – On August 4 2021, Malwarebytes Endpoint Security reached its End of Life. For more information, see the Malwarebytes Endpoint Security End of Life notice. To upgrade to a supported version of Malwarebytes, see Malwarebytes Endpoint Protection or Malwarebytes for Teams.
Client registration issues can occur after a network configuration change is made on your Malwarebytes Management Server, such as changing the IP address or host name. Similar issues can occur if you migrate the Management Console and Server to a new host and restore from a backup of the old server.
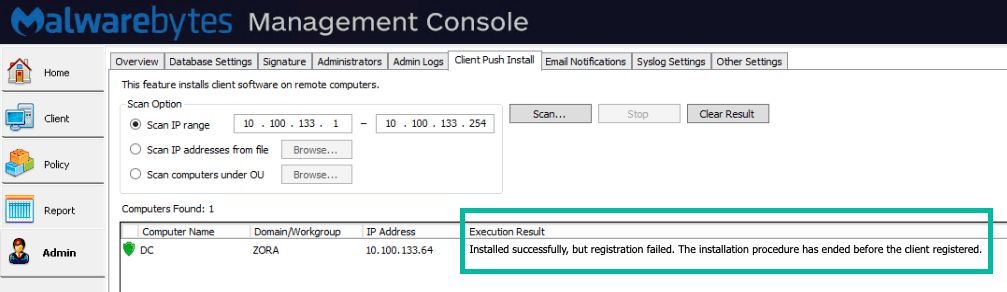
You might see the following message in the Execution Result column:
- Installed successfully, but registration failed. The installation procedure has ended before the client wp-signup.phped.
These types of registration issues are caused by clients not being able to communicate properly with the server at the new address.
To resolve network issues, you need to resolve the configuration mismatch on both the Management Server side and client side.
Edit your Management Server settings
On the Management Server, you can perform one of the following to resolve the issue:
- Run the Malwarebytes Server Configuration tool – The tool permits changing the server port in a few quick steps.
- Manually edit the server IP address – If you prefer a hands-on approach, this might be a better option.
Option 1: Run the Malwarebytes Server Configuration tool
The Malwarebytes Server Configuration tool can change the IP, host name, and FQDN of your server.
- Log into the Windows Server hosting the Malwarebytes Management Server and Console.
- Click Start Menu > All Programs > Malwarebytes Management Server > Server Configuration.
- For Server Address, use any one of these attributes from the server:
- IP address
- Host name
- FQDN
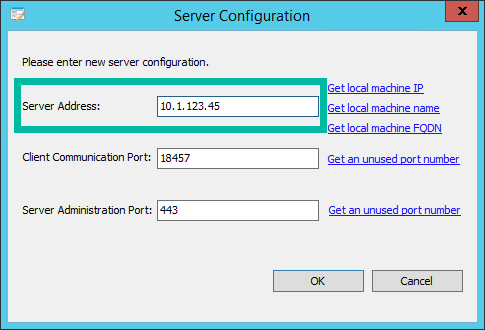
Note: By default, the Client Communication port is 18457 and the Server Administration port is 443. If these ports are already in use, you may change them to any other unused port, or use the Get an unused port number link to generate a random, unused port.
Option 2: Manually edit the server IP address
If you prefer to manually edit the configuration, you can use a text editor to change the SCComm.xml file.
- Log into the Windows Server hosting the Malwarebytes Management Server and Console.
- Navigate to: C:\Program Files (x86)\Malwarebytes Management Server\PackageTemplate\
- Open SCComm.xml with a text editor.
- Locate the >“remoteHost” key and update the value to the IP address of the new server.
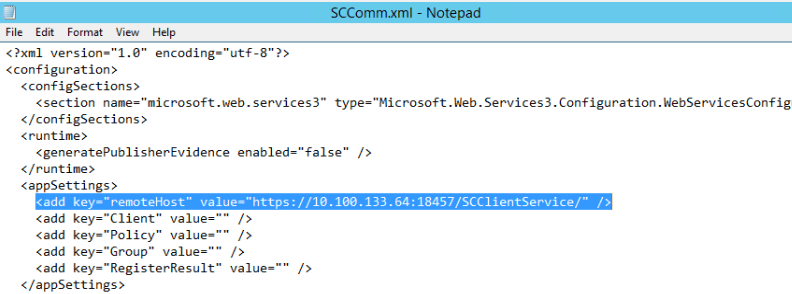
- Save the modified file.
Edit your client settings
Now that the Server settings are corrected, the clients can be updated. On the client side, there are two methods to update:
- Uninstall and reinstall clients – The simplest method, but requires reinstallation of the software.
- Manually update the XML and config files – This may be preferable if you use GPO or similar methods to push changes to multiple clients.
Option 1: Uninstall and reinstall clients
By uninstalling and reinstalling clients, you force the machine to use new configuration files.
- Uninstall the managed client and reboot it. See Remotely uninstall managed clients with Malwarebytes Management Console .
- Install a new managed client. See Install managed clients with Malwarebytes Management Console .
Option 2: Manually update the XML and Config files
If you update your Malwarebytes Management Server address, you will need to update the following files on your managed clients, replacing the old server address:
- Both 32- and 64-bit clients: %programdata%\sccomm\SCComm.xml
and - 32-bit clients only: C:\Program Files\Malwarebytes’ Managed Client\SCComm.exe.config
- 64-bit clients: C:\Program Files (x86)\Malwarebytes’ Managed Client\SCComm.exe.config
These files are common among all clients, so you may modify one and then push it to the remaining clients using a Group Policy or WMI. If you do this, please be sure to edit the SCComm.xml file on the client to remove the information for “Group”, “Client”, and “Policy”.
The edited SCComm.xml should look like:
<?xml version="1.0" encoding="utf-8"?>
<configuration>
    <appSettings>
        <add key="serverRef" value="https://serveraddress:18457/scclientservice/" />
        <add key="Group" value="" />
        <add key="Client" value="" />
        <add key="Policy" value="" />
        <add key="wp-signup.phpResult" value="Passed" />
    </appSettings>
</configuration>
This allows the clients to talk to the new server address and receive their proper policy and group settings.
After manually editing the SCComm.xml and .config files, confirm new deployments wp-signup.php correctly to the new management server. Perform one of the following:
Source : Official Malwarebytes Brand
Editor by : BEST Antivirus KBS Team