When you connect to a public Wi-Fi network (for example, in a cafe), your data is transferred unencrypted. This means that your logins, passwords, messages, and other sensitive information can be accessed by malefactors. Your email addresses may be used for sending spam and the contents of your social network page may be changed.
Home wireless networks are also at risk, as even the the highest level of protection for wireless networks (WPA2 encryption) can be hacked using the KRACK method of key reinstallation. For more information, see this post on the Kaspersky Lab blog.
When connecting to a Wi-Fi network, you should always follow these recommendations:
- Make sure that you have installed and enabled Firewall. This protection component scans network traffic and protects the computer against network attacks.
Firewall is included in the following Kaspersky Lab applications: Kaspersky Internet Security, Kaspersky Anti‑Virus, Kaspersky Total Security, Kaspersky Security Cloud and Kaspersky Small Office Security. - Use a secure HTTPS connection. Check that a green or gray padlock icon is displayed in your browser’s address bar. For more information, see this post on the Kaspersky Lab blog.
- Secure your connection by using a VPN, which adds another level of encryption. To do so, install Kaspersky VPN Secure Connection on your device and enable a secure connection each time you connect to the Internet.
- If you are using a Windows operating system, disable file and printer sharing for all public networks you connect to. See the Microsoft support website for instructions.
- Use mobile Internet instead of public Wi-Fi networks when possible.
Below you will find a list of recommendations on how to configure your router to make your home Wi-Fi network secure.
Set a strong password for accessing your router
Usually, a default login and password are used. A criminal can find out the credentials for accessing your router settings by downloading the user guide from the vendor’s website. Change the password to protect your network.
Router interfaces differ depending on the vendor, specific model and firmware version. For help navigating your router’s settings, see the user guide for your model. It is usually attached to the router, but otherwise you can download it from the vendor’s website.
As an example, we will show the settings from a TP-Link TL-WR841N router. Set a strong password for accessing your router
- Enter the router’s IP address in your browser’s address bar. You will be taken to the authorization page for the router’s settings. The IP address of the router is specified on the device and in the user guide.
- On the authorization page, enter your login and password. If you haven’t changed them, you will be able to find them on the underside of your router.
- On the router settings page, go to System Tools → Password.
- Enter your username and old password, and then set a new password for accessing the router. For recommendations on setting a strong password, see this article.
- Click Save.
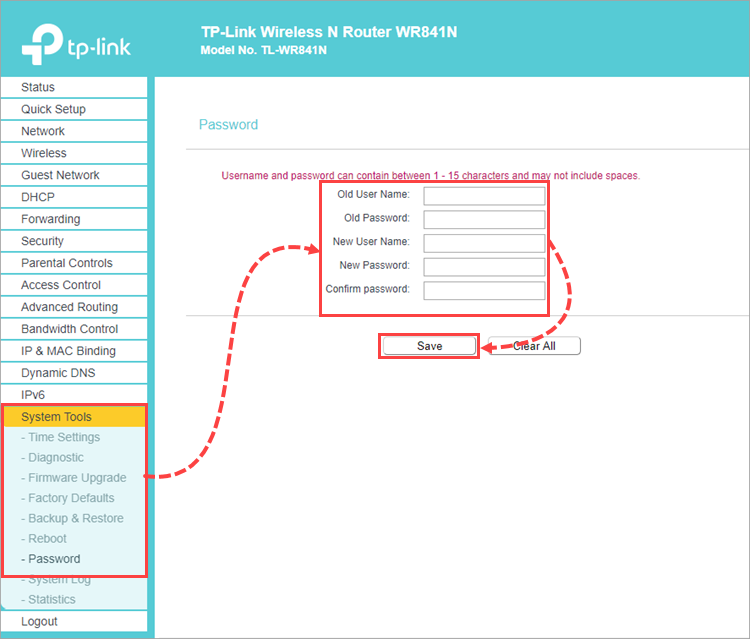
The password for accessing the router will be changed.
Give your Wi-Fi network a unique name (SSID)
Often, rainbow tables are used for hacking passwords. Millions of possible passwords are stored in rainbow tables for popular Wi-Fi network names (Service Set Identifier, or SSID). If your SSID and your password are in a rainbow table, then a criminal can immediately get access to your network using special applications.
To increase your home wireless network’s security, give your network a unique SSID.
Router interfaces differ depending on the vendor, specific model and firmware version. For help navigating your router’s settings, see the user guide for your model. It is usually attached to the router, but otherwise you can download it from the vendor’s website.
As an example, we will show the settings from a TP-Link TL-WR841N router. To change the Wi-Fi network name:
- Enter the router’s IP address in your browser’s address bar. You will be taken to the authorization page for the router’s settings. The IP address of the router is specified on the underside of the device and in the user guide.
- On the authorization page, enter your login and password. If you haven’t changed them, you will be able to find them on the underside of your router.
- On the router settings page, go to Wireless → Basic Settings.
- In the Wireless Network Name field, enter a new name for your wireless network.
- Click Save.
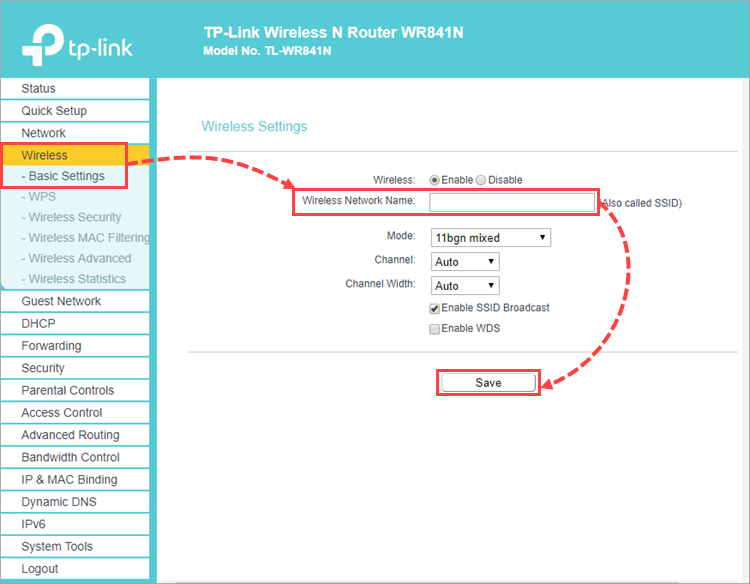
The Wi-Fi network name will be changed.
Hide your Wi-Fi network.
In the router settings, hide the network name. Your network will no longer be displayed in the list of available connections. Without special software, it will not be able to be detected.
Router interfaces differ depending on the vendor, specific model and firmware version. For help navigating your router’s settings, see the user guide for your model. It is usually attached to the router, but otherwise you can download it from the vendor’s website.
As an example, we will show the settings from a TP-Link TL-WR841N router. To hide your Wi-Fi network from devices:
- Enter the router’s IP address in your browser’s address bar. You will be taken to the authorization page for the router’s settings. The IP address of the router is specified on the device and in the user guide.
- On the authorization page, enter your login and password. If you haven’t changed them, you will be able to find them on the underside of your router.
- On the router settings page, go to Wireless → Basic Settings.
- Clear the Enable SSID Broadcast checkbox.
- Click Save.
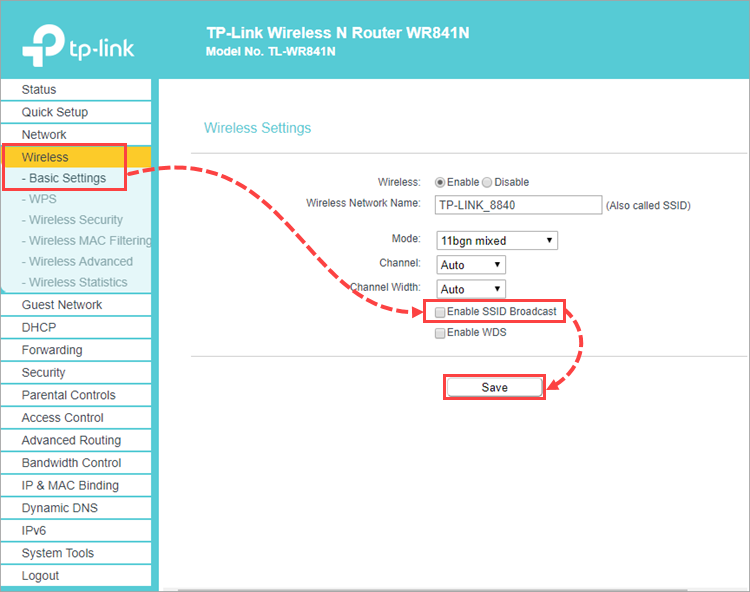
Devices will not be able to detect your Wi-Fi network.
Disable WPS
WPS technology was developed to make it easier for devices to connect to Wi-Fi networks. Using WPS, you can connect to a router without a password. We recommend that you disable WPS in your router’s settings.
Router interfaces differ depending on the vendor, specific model and firmware version. For help navigating your router’s settings, see the user guide for your model. It is usually attached to the router, but otherwise you can download it from the vendor’s website.
As an example, we will show the settings from a TP-Link TL-WR841N router. To disable WPS:
- Enter the router’s IP address in your browser’s address bar. You will be taken to the authorization page for the router’s settings. The IP address of the router is specified on the device and in the user guide.
- On the authorization page, enter your login and password. If you haven’t changed them, you will be able to find them on the underside of your router.
- On the router settings page, go to Wireless → WPS.
- Click Disable.
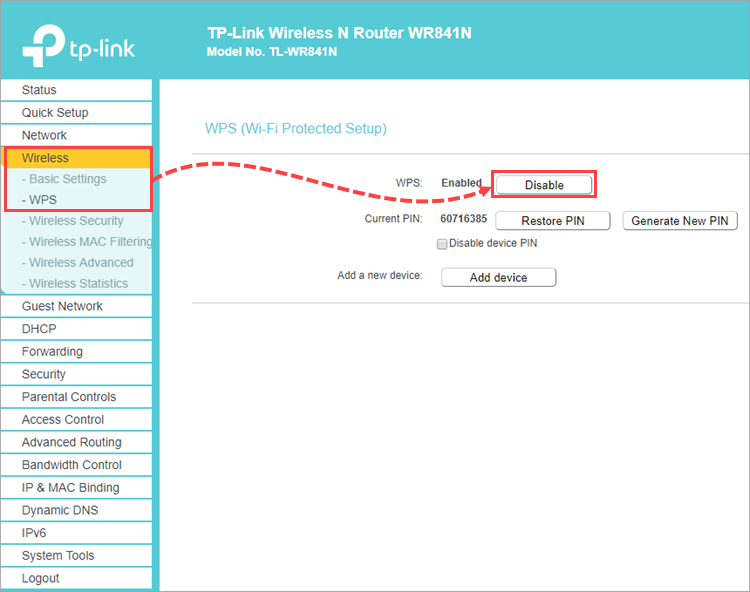
WPS technology will be disabled.
Enable encryption
When working in a weakly encrypted network, your data can be easily intercepted by criminals. If you are connecting to your home network and you receive a message that it is weakly encrypted, change to a more secure encryption type. The most common types of wireless network encryption are WEP, TKIP, WPA, WPA2 (AES/CCMP).
The protocols differ in their levels of security. We recommend WPA2, as it is the most reliable.
Router interfaces differ depending on the vendor, specific model and firmware version. For help navigating your router’s settings, see the user guide for your model. It is usually attached to the router, but otherwise you can download it from the vendor’s website.
As an example, we will show the settings from a TP-Link TL-WR841N router. To change your wireless network’s encryption type:
- Enter the router’s IP address in your browser’s address bar. You will be taken to the authorization page for the router’s settings. The IP address of the router is specified on the device and in the user guide.
- On the authorization page, enter your login and password. If you haven’t changed them, you will be able to find them on the underside of your router.
- On the router’s settings page, choose Wireless → Wireless Security.
- Select WPA/WPA2 – Personal.
- Select WPA2-PSK from the Authentication Type drop-down menu.
- Select AES from the Encryption drop-down menu.
- Click Save.
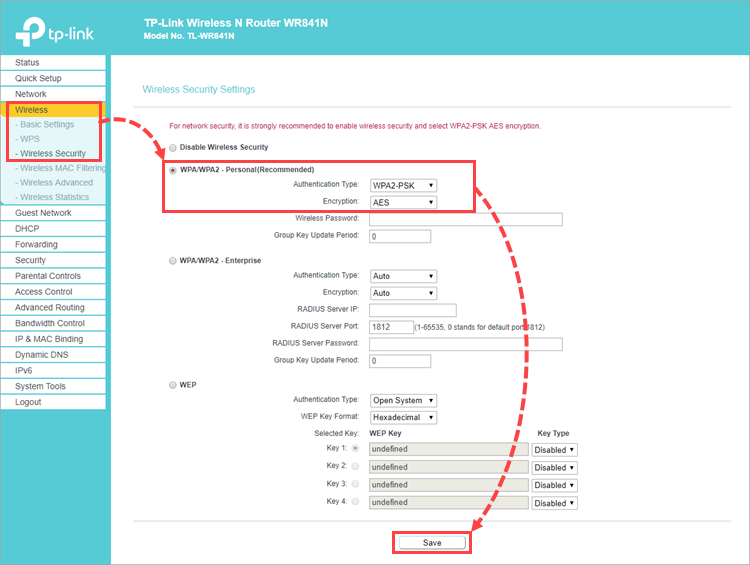
Encryption will be enabled for the Wi-Fi network.
Set a strong password for your Wi-Fi network
Without a password, anyone will be able to access your home Wi-Fi network. A strong password will prevent other people connecting to your network. For recommendations on setting a strong password, see this article.
Router interfaces differ depending on the vendor, specific model and firmware version. For help navigating your router’s settings, see the user guide for your model. It is usually attached to the router, but otherwise you can download it from the vendor’s website.
As an example, we will show the settings from a TP-Link TL-WR841N router. To set a password:
- Enter the router’s IP address in your browser’s address bar. You will be taken to the authorization page for the router’s settings. The IP address of the router is specified on the device and in the user guide.
- On the authorization page, enter your login and password. If you haven’t changed them, you will be able to find them on the underside of your router.
- On the router’s settings page, select Wireless → Wireless Security.
- Select WPA/WPA2 – Personal.
- In the Wireless Password field, enter a new password for your Wi-Fi network.
- Click Save.
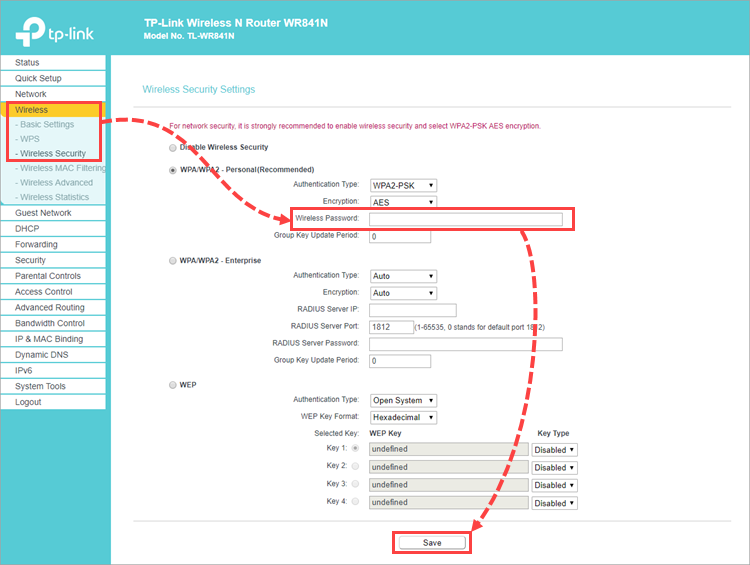
A password will be set for the Wi-Fi network.
Enable MAC filtering
Every device with a network card or network interface has a MAC address. Create the list of trusted MAC addresses or deny access to devices with specific MAC addresses.
Router interfaces differ depending on the vendor, specific model and firmware version. For help navigating your router’s settings, see the user guide for your model. It is usually attached to the router, but otherwise you can download it from the vendor’s website.
As an example, we will show the settings from a TP-Link TL-WR841N router. To configure MAC filtering for trusted devices:
- Enter the router’s IP address in your browser’s address bar. You will be taken to the authorization page for the router’s settings. The IP address of the router is specified on the device and in the user guide.
- On the authorization page, enter your login and password. If you haven’t changed them, you will be able to find them on the underside of your router.
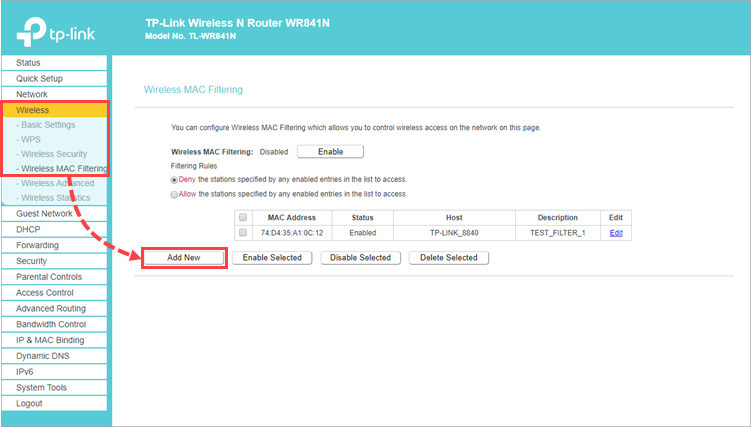
- On the router settings page, go to Wireless → Wireless MAC Filtering.
- Click Add New.
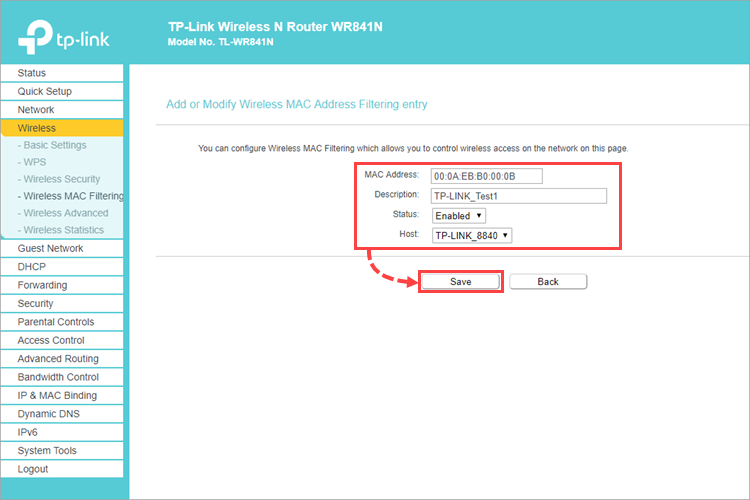
- Enter the MAC address, a description of the device and select the status Enabled.
- Click Save.
- Click Enable.
- Select Allow the stations specified by any enabled entries in the list to access.
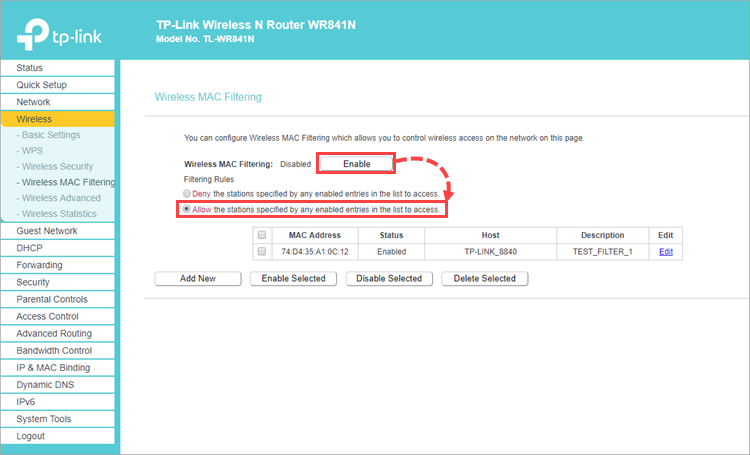
Only the devices whose MAC addresses you have added to the list will be able to access the router.
Reduce the range of your Wi-Fi signal
In your router’s settings, set your Wi-Fi signal range so that it can only be used inside your home. Reducing the range of your Wi-Fi signal will prevent other people from connecting to it.
Router interfaces differ depending on the vendor, specific model and firmware version. For help navigating your router’s settings, see the user guide for your model. It is usually attached to the router, but otherwise you can download it from the vendor’s website.
As an example, we will show the settings from a TP-Link TL-WR841N router. To reduce the range of your Wi-Fi signal:
- Enter the router’s IP address in your browser’s address bar. You will be taken to the authorization page for the router’s settings. The IP address of the router is specified on the device and in the user guide.
- On the authorization page, enter your login and password. If you haven’t changed them, you will be able to find them on the underside of your router.
- On your router’s settings page, go to Wireless → Wireless Advanced.
- Select a strength from the Transmit Power drop-down menu, e.g. Medium.
- Click Save.
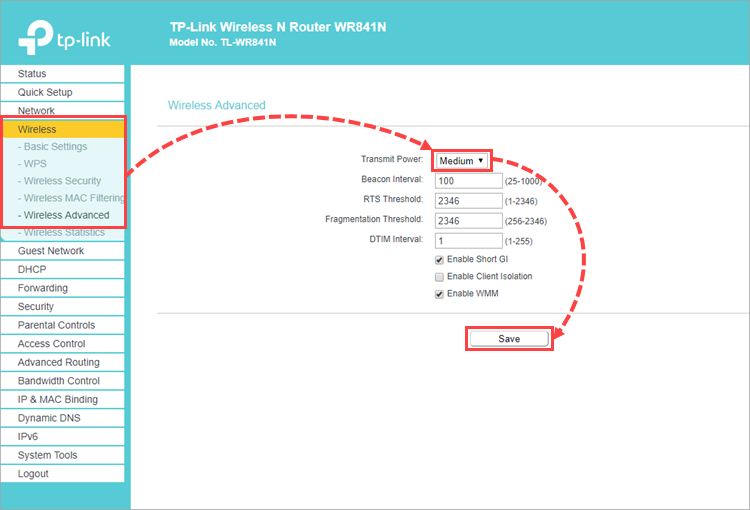
The Wi-Fi signal range will be reduced.
Change the key and the security type of the Wi-Fi network in Windows
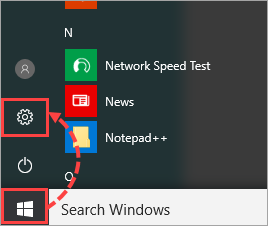
- Open the Windows settings.
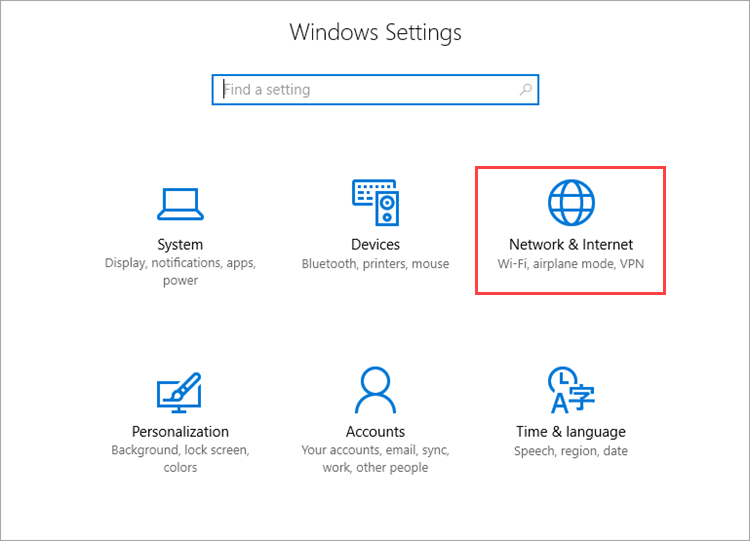
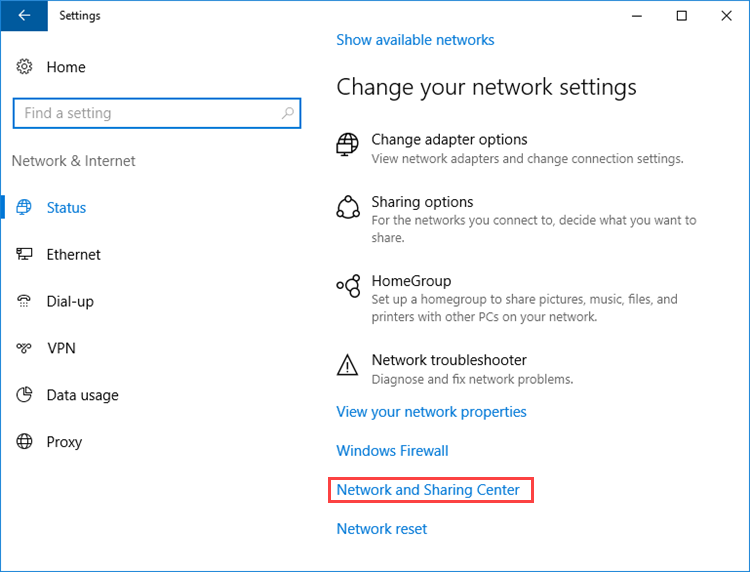
- Select Network & Internet.
- Select Network and Sharing Center.
- Click Change adapter settings.
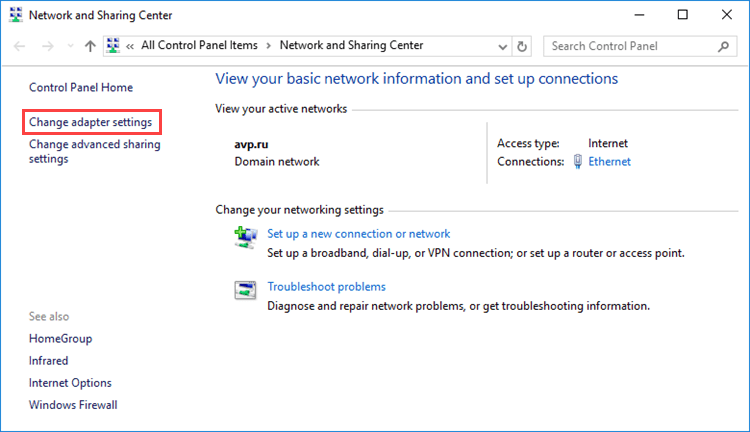
- In the Network Connections window, double-click the Wireless Network Connection icon.
- In the Status window, click Wireless properties.
- In the Wireless network properties window, go to the Security tab.
- Select the WPA2-Personal security type and change the network security key. For recommendations on setting a strong password, see this article.
- Click OK.
- Close the Wireless Network Connection Status window.
The key and network security type will be changed.
After you have changed the settings of your home Wi-Fi network, devices will be unable to connect it automatically. You will need to reconnect them. For detailed instructions, see the Microsoft support website for Windows 10 and Windows 7, 8, 8.1, 10.
Source : Official Kaspersky Brand
Editor by : BEST Antivirus KBS Team

