

If you try to scan an individual file or folder on a Windows computer, you may notice the Scan with Malwarebytes option is gone from the right-click pop-up menu. This issue can occur if you manually install Malwarebytes on your Windows computer when it’s already installed or if you consent to updating Malwarebytes through the in-app upgrade notification.
The following procedures show you how to verify you have the option to scan by right clicking a file or folder.
Verify Explorer settings for Malwarebytes for Windows v4
- Open Malwarebytes for Windows.
- Click Settings (
 ) in the top right part of the app.
 - In the General tab, scroll down to Windows Explorer settings.
- Click the toggle to On. The next step requires restarting your computer. Save your other work before you continue.
- Restart your computer. Windows 8, 8.1 or 10 users must use the Restart option, not the Shut down option.
- Once your computer restarts, right-click any file or folder.
- Check to see if the the context menu shows Scan with Malwarebytes.
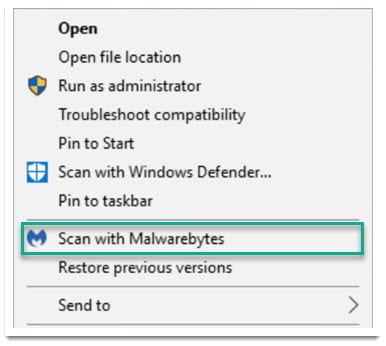
- Click Scan with Malwarebytes to run a Custom Scan and confirm the issue is resolved.
- When the Custom Scan is finished, Malwarebytes for Windows notifies you if any threats were found.
Malwarebytes should now function normally again on your Windows computer.
If the issue persists, submit a Support ticket with us and one of our knowledgeable support agents will contact you via email to provide assistance.
Source : Official Malwarebytes Brand
Editor by : BEST Antivirus KBS Team