
Note
We’ve renamed Microsoft Cloud App Security. It’s now called Microsoft Defender for Cloud Apps. In the coming weeks, we’ll update the screenshots and instructions here and in related pages. For more information about the change, see this announcement. To learn more about the recent renaming of Microsoft security services, see the Microsoft Ignite Security blog.
Microsoft Defender for Cloud Apps lets you automatically apply sensitivity labels from Microsoft Information Protection. These labels will be applied to files as a file policy governance action, and depending on the label configuration, can apply encryption for additional protection. You can also investigate files by filtering for the applied sensitivity label within the Defender for Cloud Apps portal. Using labels enables greater visibility and control of your sensitive data in the cloud. Integrating Microsoft Information Protection with Defender for Cloud Apps is as easy as selecting a single checkbox.
By integrating Microsoft Information Protection into Defender for Cloud Apps, you can use the full power of both services and secure files in your cloud, including:
- The ability to apply sensitivity labels as a governance action to files that match specific policies
- The ability to view all classified files in a central location
- The ability to investigate according to classification level, and quantify exposure of sensitive data over your cloud applications
- The ability to create policies to make sure classified files are being handled properly
Prerequisites
Note
To enable this feature, you need both a Defender for Cloud Apps license and a license for Azure Information Protection Premium P1. As soon as both licenses are in place, Defender for Cloud Apps syncs the organization’s labels from the Azure Information Protection service.
- To work with Microsoft Information Protection integration, you must enable the App connector for Office 365.
For Defender for Cloud Apps to apply sensitivity labels, they must be published as part of a sensitivity label policy in the Microsoft 365 compliance center.
Defender for Cloud Apps currently supports applying Microsoft Information Protection sensitivity labels for the following file types:
- Word: docm, docx, dotm, dotx
- Excel: xlam, xlsm, xlsx, xltx
- PowerPoint: potm, potx, ppsx, ppsm, pptm, pptx
- PDF
Note
For PDF, you must use unified labels.
This feature is currently available for files stored in Box, Google Workspace, SharePoint Online, and OneDrive for Business. More cloud apps will be supported in future versions.
How it works
You can see the Microsoft Information Protection sensitivity labels in Defender for Cloud Apps. As soon as you integrate Defender for Cloud Apps with Microsoft Information Protection, Defender for Cloud Apps scans files as follows:
- Defender for Cloud Apps retrieves the list of all the sensitivity labels used in your tenant. This action is performed every hour to keep the list up to date.
- Defender for Cloud Apps then scans the files for sensitivity labels, as follows:
- If you enabled automatic scan, all new or modified files are added to the scan queue and all existing files and repositories will be scanned.
- If you set a file policy to search for sensitivity labels, these files are added to the scan queue for sensitivity labels.
- As noted above, these scans are for the sensitivity labels discovered in the initial scan Defender for Cloud Apps does to see which sensitivity labels are used in your tenant. External labels, classification labels set by someone external to your tenant, are added to the list of classification labels. If you don’t want to scan for these, select the Only scan files for Microsoft Information Protection sensitivity labels and content inspection warnings from this tenant check box.
- After you enable Microsoft Information Protection on Defender for Cloud Apps, all new files that are added to your connected cloud apps will be scanned for sensitivity labels.
- You can create new policies within Defender for Cloud Apps that apply your sensitivity labels automatically.
Note
- Labels with protection outside of Defender for Cloud Apps can be overridden by Defender for Cloud Apps, but can’t be removed. In addition, you can scan these files by granting permissions to inspect content for protected files.
- Defender for Cloud Apps doesn’t support removing labels with protection from files that were labeled outside Defender for Cloud Apps.
- Defender for Cloud Apps doesn’t support reading labels of password-protected files.
- Empty files will not be labeled.
How to integrate Microsoft Information Protection with Defender for Cloud Apps
Enable Microsoft Information Protection
All you have to do to integrate Microsoft Information Protection with Defender for Cloud Apps is select a single checkbox. By enabling automatic scan, you enable searching for Microsoft Information Protection sensitivity labels on your Office 365 files without the need to create a policy. After you enable it, if you have files in your cloud environment that are labeled with Microsoft Information Protection sensitivity labels, you’ll see them in Defender for Cloud Apps.
To enable Defender for Cloud Apps to scan files with content inspection enabled for sensitivity labels:
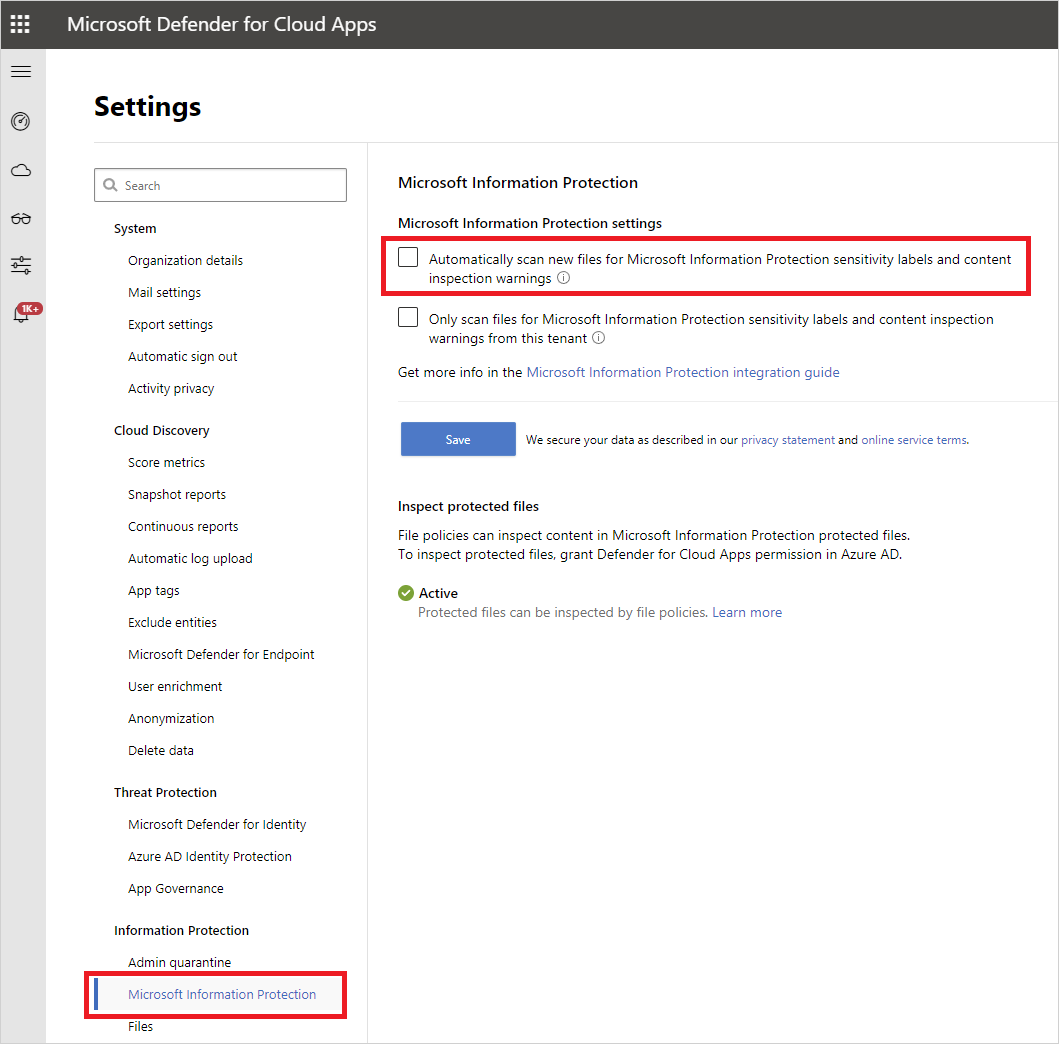
- In Defender for Cloud Apps, under the settings cog, select the Settings page under the System heading.
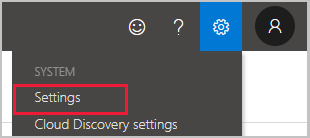
- Under Microsoft Information Protection, select Automatically scan new files for Microsoft Information Protection sensitivity labels and content inspection warnings.
After enabling Microsoft Information Protection, you’ll be able to see files that have sensitivity labels and filter them per label in Defender for Cloud Apps. After Defender for Cloud Apps is connected to the cloud app, you’ll be able to use the Microsoft Information Protection integration features to apply Microsoft Information Protection sensitivity labels (with or without encryption) in the Defender for Cloud Apps portal, by adding them directly to files or by configuring a file policy to apply sensitivity labels automatically as a governance action.
Note
Automatic scan does not scan existing files until they are modified again. To scan existing files for Microsoft Information Protection sensitivity labels, you must have at least one File policy that includes content inspection. If you have none, create a new File policy, delete all the preset filters, under Inspection method select Built-in DLP. In the Content inspection field, select Include files that match a preset expression and select any predefined value, and save the policy. This enables content inspection, which automatically detects Microsoft Information Protection sensitivity labels.
Set internal and external labels
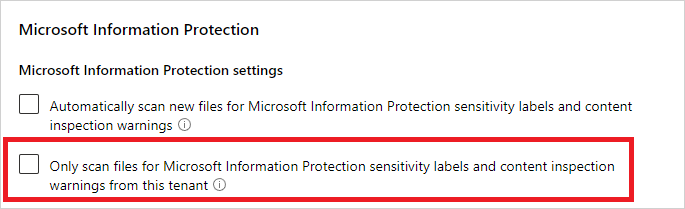
By default, Defender for Cloud Apps scans sensitivity labels that were defined in your organization as well as external ones defined by other organizations.
To ignore sensitivity labels set external to your organization, in the Defender for Cloud Apps portal, go to Settings and then Microsoft Information Protection. Select Only scan files for Microsoft Information Protection sensitivity labels and content inspection warnings from this tenant.
Apply labels directly to files
- From the Files page under Investigate, select the file you want to protect. Select the three dots at the end of the file’s row and then choose Apply sensitivity label.
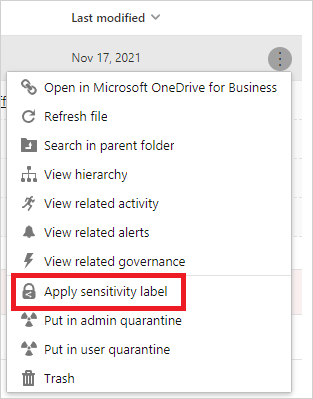
Note
Defender for Cloud Apps can apply Microsoft Information Protection on files that are up to 50 MB.
- Choose one of your organization’s sensitivity labels to apply to the file, and select Apply.
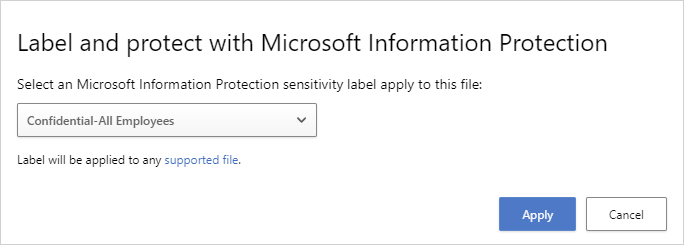
- After you choose a sensitivity label and select Apply, Defender for Cloud Apps will apply the sensitivity label to the original file.
- You can also remove sensitivity labels by choosing the Remove sensitivity label option.
For more information about how Defender for Cloud Apps and Microsoft Information Protection work together, see Automatically apply Microsoft Information Protection sensitivity labels.
Automatically label files
You can automatically apply sensitivity labels to files by creating a file policy and setting Apply sensitivity label as the governance action.
Follow these instructions to create the file policy:
- Create a file policy.
- Set the policy to include the type of file you want to detect. For example, select all files where Access level doesn’t equal Internal and where the Owner OU equals your finance team.
- Under governance actions for the relevant app, select Apply sensitivity label then select the label type.

Note
- The ability to apply a sensitivity label is a powerful capability. To protect customers from mistakenly applying a label to a large number of files, as a safety precaution there is a daily limit of 100 Apply label actions per app, per tenant. After the daily limit is reached, the apply label action pauses temporarily and continues automatically the next day (after 12:00 UTC). To raise the limit for your tenant, open a support ticket.
- When a policy is disabled, all pending labeling tasks for that policy are suspended.
Control file exposure
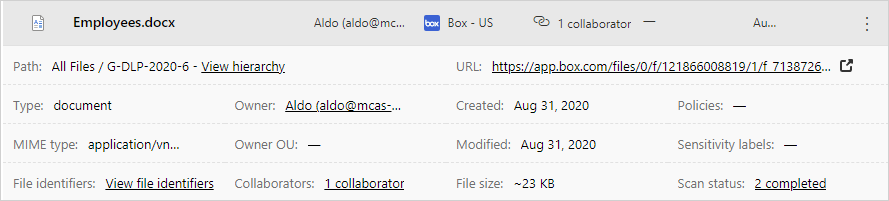
- For example, if you labeled the document below with a Microsoft Information Protection sensitivity label:
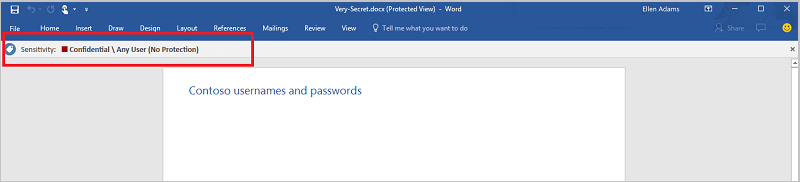
- You can see this document in Defender for Cloud Apps by filtering on the sensitivity label for Microsoft Information Protection in the Files page.
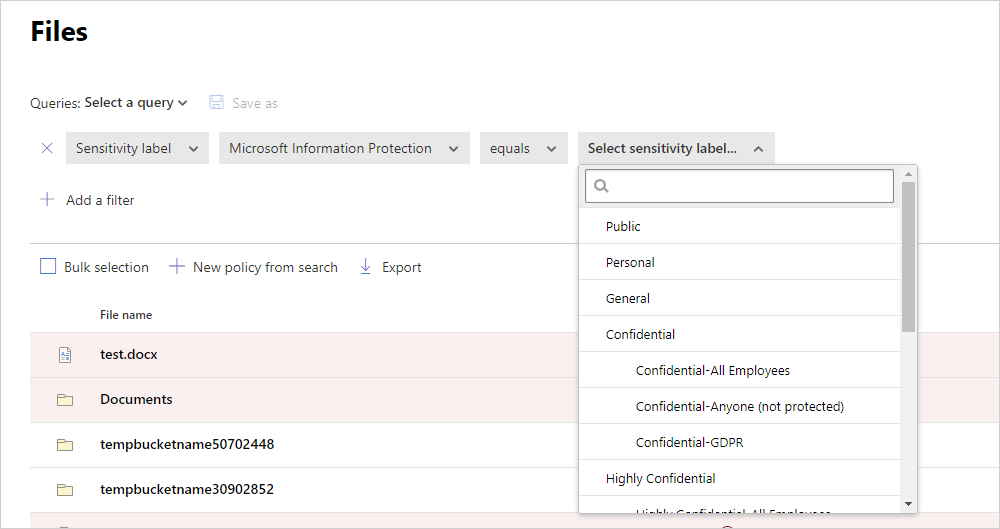
- You can get more information about these files and their sensitivity labels in the file drawer. Just select the relevant file in the Files page and check whether it has a sensitivity label.
- Then, you can create file policies in Defender for Cloud Apps to control files that are shared inappropriately and find files that are labeled and were recently modified.
- You can create a policy that automatically applies a sensitivity label to specific files.
- You can also trigger alerts on activities related to file classification.
Note
When sensitivity labels are disabled on a file, the disabled labels appear as disabled in Defender for Cloud Apps. Deleted labels are not displayed.
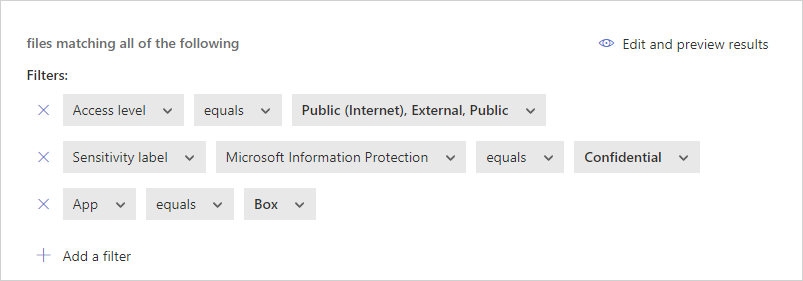
Sample policy – confidential data that is externally shared on Box:
- Create a file policy.
- Set the policy’s name, severity, and category.
- Add the following filters to find all confidential data that is externally shared on Box:
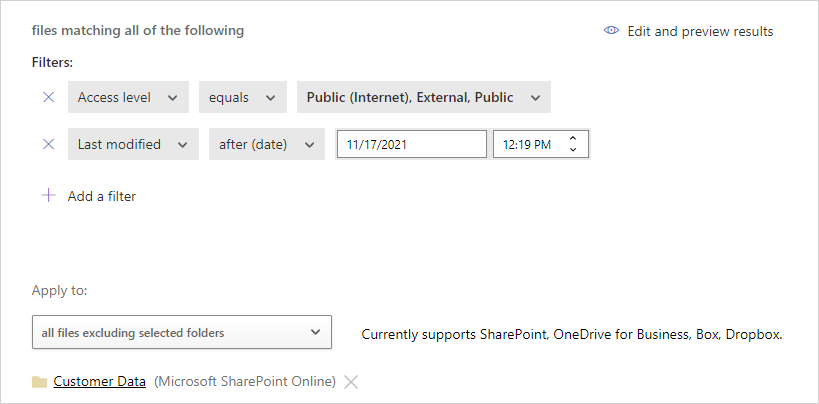
Sample policy – restricted data that was recently modified outside the Customer Data folder on SharePoint:
- Create a file policy.
- Set the policy’s name, severity, and category.
- Add the following filters to find all recently modified restricted files while excluding the Customer Data folder in the folder selection option:
You can also choose to set alerts, user notification or take immediate action for these policies. Learn more about governance actions.
Learn more about Microsoft Information Protection.