

The Manage rules window is the main part of the extrusion detection system and allows you to decide which applications are allowed to access your network connection. You can access this section from the main BullGuard window by clicking on the  drop down button from the Firewall box and choosing Manage rules.
The Manage rules window is actually a table that contains some predefined rules and all the installed programs that try to either send or receive information through the active network connection.

Description: shows the name of the Firewall rule (it may not be the exact name of the executable file for which the rule has been created). You can rename the rules anytime.
Action: shows what action the Firewall will take regarding a specific application: Allow or Block.
– Allow: the application will be able to send and receive information through the network.
– Block: the Firewall will block any information packet this specific application will attempt to send or receive. As a side effect, if the application depends on the network connection to run, it will not work.
This option is an effective means to deal with worms, Trojans or ‘dropper’ viruses as these require an internet connection in order to spread.
Application path: shows where the executable file associated with the firewall rule can be found.
View advanced Windows rules: opens the Windows Firewall with Advanced Security feature, which helps protect the computers on your network.
Firewall rules are created to allow a device to send traffic to, or receive traffic from programs, system services, computers or users.
– Inbound rules explicitly allow or block inbound network traffic matching the rule criteria.
– Outbound rules explicitly allow or block network traffic from a computer matching the criteria in the rule.
– Connection security rules are used to secure the traffic between two specific computers while it crosses the network (used in environments with a high level of control and special security requirements).
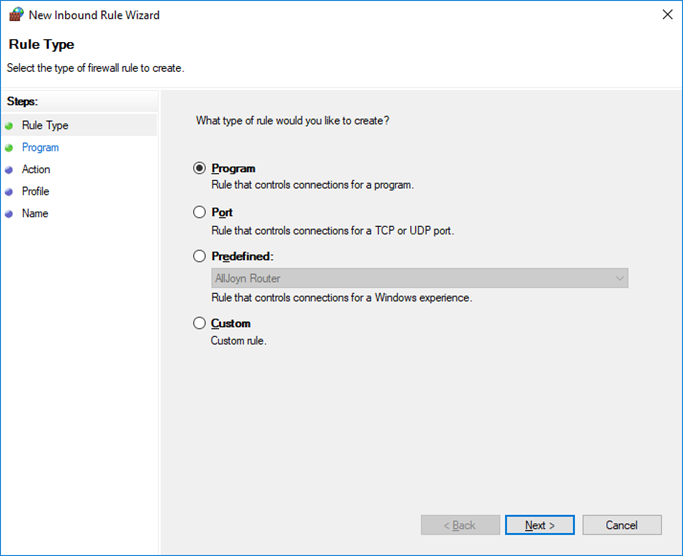
Creating a new rule
To create an inbound or outbound rule, select the corresponding category from the left-side panel of the Windows Firewall with Advanced Security window, and clic New Rule in the right-side Actions panel. Alternately, you can select Action > New Rule… from the upper-right side of the window.
Four types of rules are available:
– Program is used for creating rules to control specific programs;
– Port creates rules for network traffic performed through specific ports;
– Predefined is used for creating rules that control connections performed by specific Windows services/features;
– Custom is used for creating rules that can block both programs and ports or specific program/port combinations.
Example: Create an outbound rule for opening a specific port when using the TCP protocol:
- Select Port in New Outbound Rule Wizard.
- In the next window, select TCP in the first section, then select Specific remote ports below and enter the desired port(s). Click Next.
- Select the action to be taken when a connection matches the specified conditions (here, you can chose to allow the connection, block it, or only allow it if it is secure. Click Next after selecting the desired options.
- Select the type of network location (Domanin, Private or Public) and click Next. It is possible to select all three types.
- Enter a name for the outbound rule and write a description (it is advisable to write what the rule does). Click on Finish to save your new outbound rule.
Editing an existing rule
To modify an existing rule, select the rule’s category from the left-side panel, then, select the specific rule. Right-clicking on the rule opens a contextual menu. Select Properties from the contextual menu, or click the same option from the Actions menu on the right-side of the window. The Properties window of the selected rule will open.
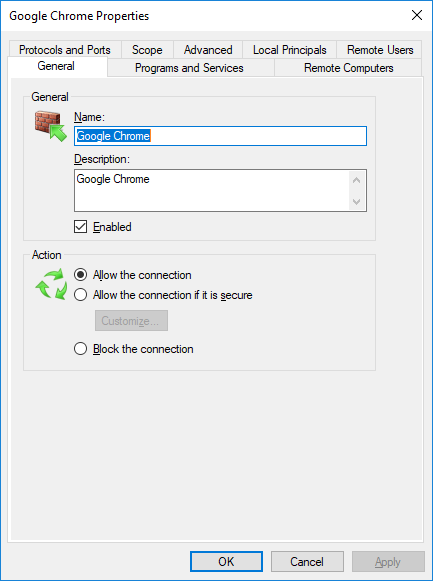
The Properties dialog contains several tabs with options that can be edited. In the case predefined rules, not all properties can be edited.
For more information on the Windows Firewall with Advance Security feature, access the official Microsoft documentation.
Interacting with rules
You can interact with any of the rules in this tab by using the right click contextual menu that offers several options on managing the applications list.

New rule (Insert key): will add a new rule to this tab.
Remove selected rules (Delete key): will delete the selected rule.
Remove orphan rules: a clean-up listing option that will remove all rules that no longer have an executable file associated.
Copy text (CTRL+C key combination): will copy the current selection.
Explore application: will open a browser window displaying the location of the executable associated with the rule.
Properties (ALT+Enter key combination): will open the Windows properties information for the executable file associated with the rule.
Adding applications to the Application rules tab
Immediately after installing BullGuard, the Firewall will start asking you about certain applications. However, the module has a “Known Application” database that lists the applications to be automatically allowed (applications vital for the operating system or the most common ones). In these cases, you will only see a notification balloon. This way, you won’t be flooded with a lot of pop-up windows.
If a certain application is not in the Firewall database, you will notice a pop-up window that asks you whether to allow or block the application from the network connection.

Possible answers to the Firewall pop-up window:
Allow: the Firewall will allow the application to connect to the network/internet until it is changed or you edit the rule and will add it to the Firewall application list with the Allow status.
Block: the Firewall will block the application from connecting to the network/internet until it is changed or you edit the rule and will add it to the Firewall application list with the Block status.
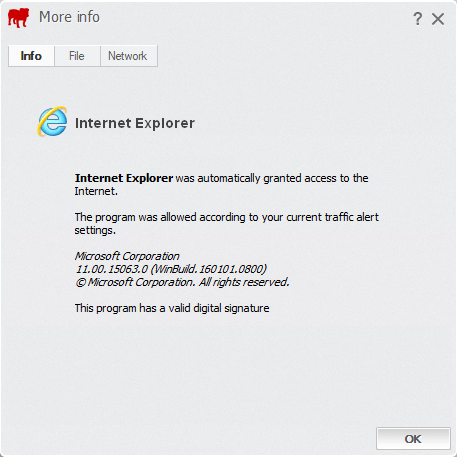
Click here for more info: opens the More info dialog, with additional information about the executable file BullGuard intercepted (also accessible from the Firewall logs section):
- Info: offers general information, such as the application’s name, version, copyright and whether it has a valid digital signature.
- File: displays detailed information about the executable file.
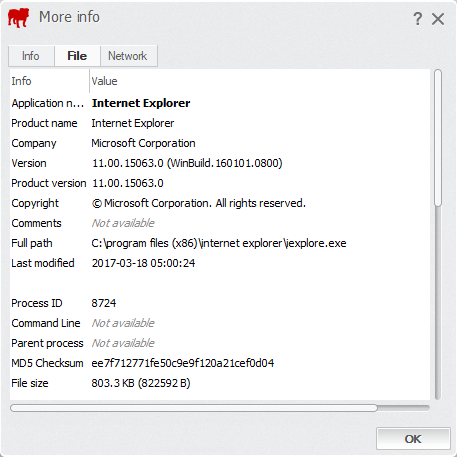
– Application name: displays the name of the program.
– Product name: displays the commercial name of the program.
– Company: displays the name of the developing company.
– Version: displays the executable file’s version number (if available).
– Product version: displays the product version number.
– Copyright: indicates the copyright owner.
– Comments: displays any comments available on the product.
– Full path: displays the location of the executable file on your hard drive.
– Last modified: displays the last time the executable file was modified.
– Process ID: displays the executable file’s ID number as assigned by the operating system. This is the same ID number as shown in the Windows Task Manager.
– Command line: will show if the executable file was started with any specific parameters or commands (such as “starting” minimized or displaying a splash screen).
– Parent Process: displays the Process ID number for the executable file’s parent process.
– MD5 Checksum: displays the MD5 checksum value of the executable file, used for checking that no changes have been made to the file.
– File size: shows the executable file’s size in bytes.
– Event time: shows the date and time when the event (program asking for access to the Internet) occurred.
- Network: displays the firewall rule protocol and ports.
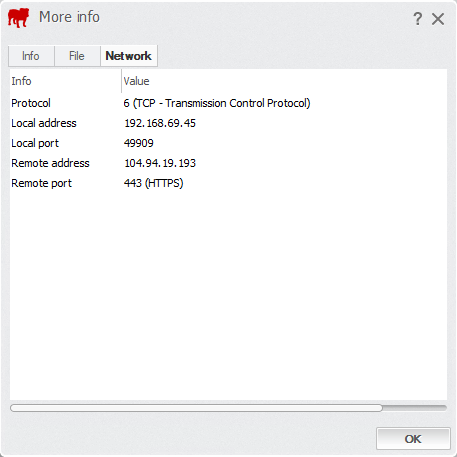
– Protocol: shows what protocol the application used when sending or receiving data.
– Local address: shows the IP address of the computer where the application is installed.
– Local port: displays the number of the port on your computer.
– Remote address: shows the IP address of the computer/server the application was trying to connect to.
– Remote port: displays the number of the port the server is trying to connect to.
Manually adding/removing an application to the Firewall rules
To add or remove an application, access Manage Rules tab and right click any of the applications from the list.
Then, choose the New rule option or just press the Insert key on your keyboard.
A new window (browse window) will open, allowing you to find the executable file from the application you need to add in the Firewall list. Select the executable file you wish to associate with the rule and then click Open.

By default, the newly created rule will have the Allow policy.

Source : Official BullGuard Brand
Editor by : BEST Antivirus KBS Team