Issue
- Create a rescue USB or CD/DVD
- Scan and clean your system
- Erase a rescue USB
Details
ESET SysRescue Live is a free utility that you can use to restore your computer if it is damaged by malware or other threats. If you are experiencing a persistent malware issue, you can boot from a “rescue disk” that you have created directly into ESET SysRescue Live and use the utility to scan and clean your system.
System requirements
- Microsoft Windows 10*, 8.1, 8, 7, Vista, XP, 2000
- Microsoft Windows Server 2000, 2003 (x86 and x64), 2008 (x86 and x64), 2008 R2, 2012, 2012 R2
- Microsoft Small Business Server 2003, 2008, 2011
* ESET SysRescue has been tested with Windows 10 but is not officially supported. It should work in most cases, but you may experience some unreported issues with your system.
Solution
Create a rescue USB or CD/DVD
- Download the ESET SysRescue Live .IMG file if you plan on making a rescue USB flash drive, or download the .ISO file if you plan on making a rescue CD or DVD.
- To create an ESET SysRescue Live media on which you can update the Detection Modules whenever you use it with a computer connected to the internet, download the .img image file.
- To burn a disc image, right-click the downloaded ISO image in Windows file explorer, select Burn disc image and follow the on-screen instructions.
- Use a free third-party software to create a rescue USB flash drive. There are several free utilities available on the internet, such as Rufus, UNetbootin or Universal USB Installer, among others.
- On a Linux machine, you can use the dd command in a terminal window:
sudo dd if=/path/to/eset_sysrescue_live_enu.iso of=/dev/sdb bs=4M && syncIn the command above replace
path/to/eset_sysrescue_live_enu.isowith the real path leading to the downloaded .iso image file./dev/sdbis the path leading to the inserted rescue USB. Use thesudo fdisk -lcommand in a terminal window to double-check the path of the inserted rescue USB.
Scan and clean your system
- With your computer powered off, insert your rescue USB flash drive (if you do not have one, see Create a rescue USB or CD/DVD) and power on the computer. If you are using a CD/DVD, insert it as soon as the computer is powered on. ESET SysRescue Live may start automatically. If it does not, follow any prompts to boot from removable media during startup.
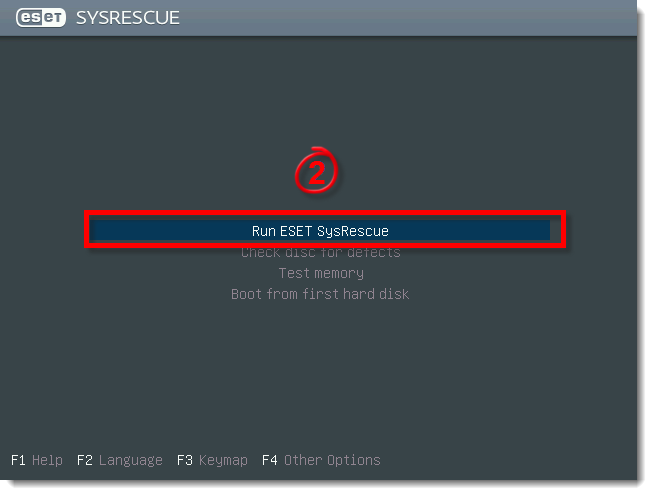
- Select Run ESET SysRescue using the arrow keys and press Enter.
Figure 2-1
Click the image to view larger in new window
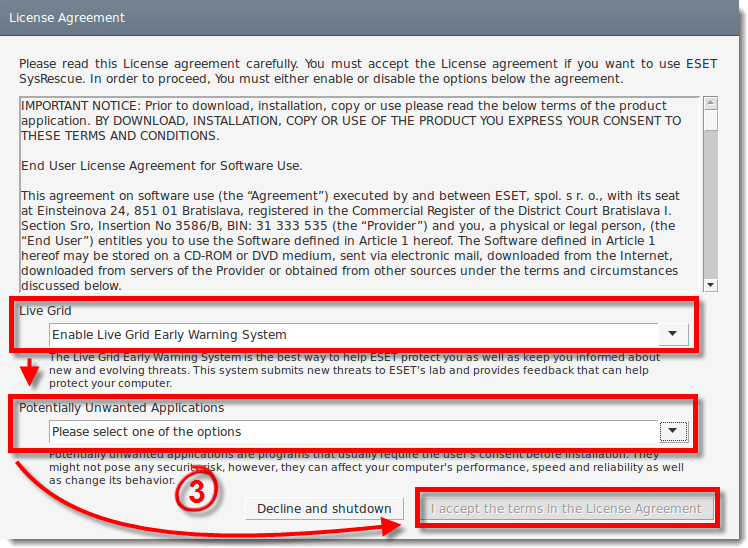
- Read the ESET License Agreement, select your preferred option from the Live Grid and Potentially Unwanted Applications drop-down menus and then click I accept the terms in the License Agreement if you agree to the terms.
Figure 2-2
Click the image to view larger in new window
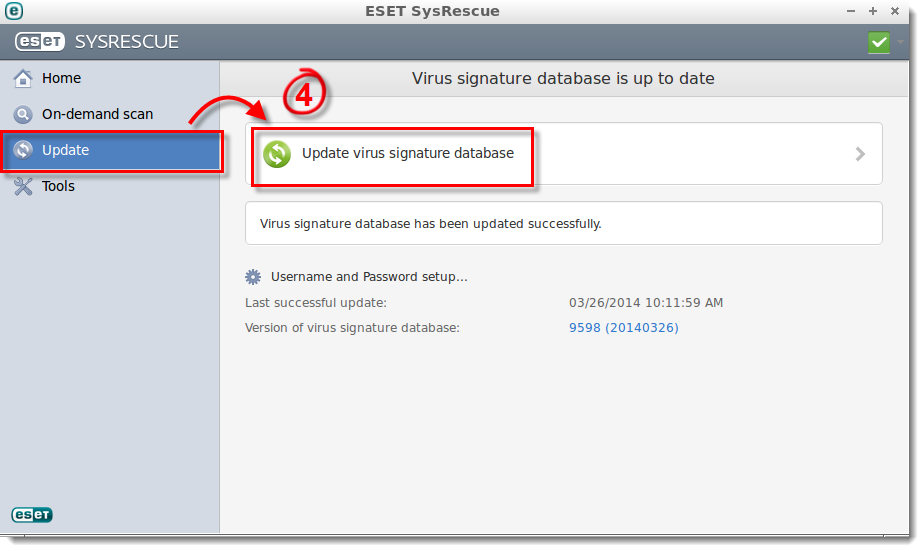
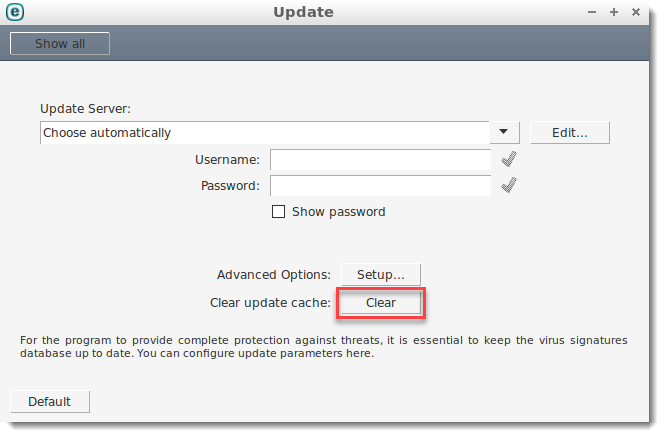
- Click Update → Update virus signature database. ESET SysRescue will download the latest detection modules (If you do not have an active internet connection, skip to step 5).
Figure 2-3
Click the image to view larger in new window
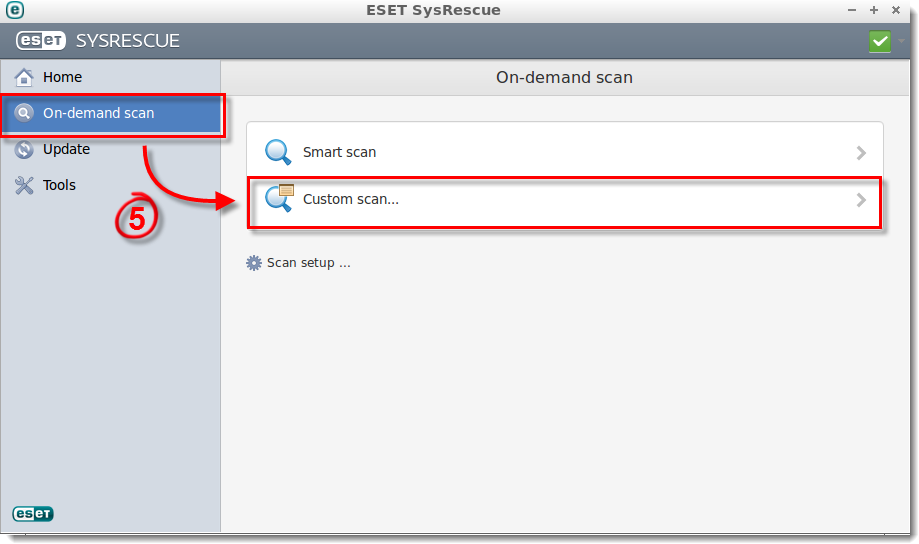
- Click On-demand scan → Custom scan.
Figure 2-4
Click the image to view larger in new window
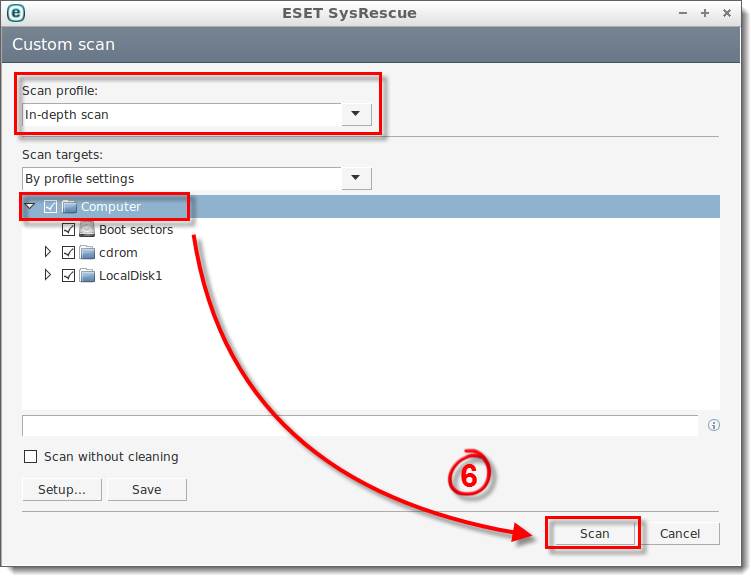
- Select In-depth scan from the Scan profile drop-down menu, select the check box next to Computer in the Scan targets window and then click Scan. ESET SysRescue will scan your system and clean infected files. If infected files that cannot be cleaned are found, you will be prompted for the action to take with these files.
Figure 2-5
Click the image to view larger in new window
ESET SysRescue Live may not be able to clean detected threats in Windows Vista 64-bit, and Windows 8/8.1/10. Due to the file-system architecture of these operating systems, especially when the operating system is hibernated, ESET SysRescue Live cannot clean threats detected during scanning.
Erase a rescue USB flash drive
You can erase SysRescue data from a rescue USB flash drive if it is no longer needed and you want to use the rescue USB drive for other applications.
- Click the folder icon
 in the start menu bar, or press
  + E keyboard shortcut to open Windows file explorer.
 - In the left-hand menu, right-click your USB key.
- Select Format.
- Change the value of Volume label field to rename your rescue USB for easier identification if needed.
- Click Start.
Editor by : BEST Antivirus KBS Team


