

Step 1: Sign in to Office with the right account
If Office asks you to sign in, enter the account you used to buy Office. You’ll see “We couldn’t find any Office products” if you use the wrong address.
Try this: Sign in to Office
Step 2: Check for multiple copies of Office
You may not realize you have more than one copy installed. Having two installs can cause activation conflicts.
Try this: Check for multiple copies of Office
Step 3: Check your subscription status
If your subscription has expired, you’ll see “We couldn’t find any Office products.” Renew your subscription to use Microsoft 365.
Try this: Check your subscription status
Step 4: Troubleshoot activation
If Office still won’t activate, choose your Office version for additional troubleshooting help.
Note: If you’re running Office on Windows 7 (which is no longer supported, see Windows 7 end of support and Office), you need to make sure that TLS 1.2 is enabled by default. See Update to enable TLS 1.1 and TLS 1.2 as default secure protocols in WinHTTP in Windows.
Step 1: Sign in with the right account
Please try signing in using all your personal email addresses in case you bought Office using a different email address. If you’re at work or school, you may need to log in using your work or school account instead of your personal email account.
To check if your Microsoft account is associated with Office, sign in to Services & subscriptions. Your Office product or Microsoft 365 subscription should be listed there. If it’s not, your email address won’t work for signing in to Office.
Step 2: Check for multiple copies of Office
Activation can fail if you have multiple copies of Office installed. Let’s uninstall any versions of Office you aren’t using before we continue to troubleshoot.
- Open Control Panel using the steps below for your operating system:
- Windows 10 On the Windows 10 task bar, type Control Panel in the Type here to search box, select Control Panel in the search results, and then select Programs and Features.
- Windows 8.1 or 8 Right-click the Start button
 (lower-left corner), select Control Panel, and then select Programs and Features.
 - Windows 7 Click Start > Control Panel > Uninstall a program.
- In the Search Programs and Features box (upper-right corner) of Programs and Features, search for the word office.
You might see multiple versions installed, like this:
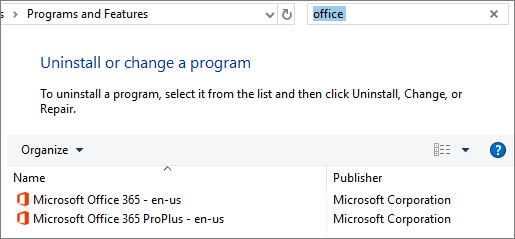 If more than one version appears, right-click the version you aren’t using and select Uninstall.
If only one version is listed, you can go to Step 3: Check your Microsoft 365 subscription status.
- When the uninstall is finished, restart your computer.
- Open an Office app and sign in, if prompted.
- If Office still won’t activate, try running an online repair as described in Repair an Office application to fix up the remaining install of Office. If you still can’t activate, proceed to the next step.
Step 3: Check your Microsoft 365 subscription status
If you have an Microsoft 365 for home subscription, let’s make sure it’s still active and renew your subscription, if necessary.
If you don’t have Microsoft 365, you can skip to Step 4: Troubleshoot Office activation.
- Close all Office apps.
- Go to your Services & subscriptions page.
- If prompted, choose Sign in and enter the Microsoft account email and password associated with your Microsoft 365 subscription.
- Review the details under the Subscriptions heading or Cancelled subscriptions heading.

- If your subscription has expired, you can renew it by following the steps in Renew Microsoft 365 Family.
- After you renew your subscription, you can restart your Office apps as needed. If Office still won’t activate, continue to the next step
Step 4: Troubleshoot Office activation
Select your version of Office for troubleshooting steps:
Microsoft 365: Use the Microsoft Support and Recovery Assistant
The Microsoft Support and Recovery Assistant runs on Windows PCs and can help you identify and fix activation issues with Microsoft 365.
- Select the Download button below.

- Select your browser from the drop-down list to see how to save and then start the Microsoft Support and Recovery Assistant.
Select your browser
- The Application Install dialog box opens. Select Install to start the installation.
- The Microsoft Support and Recovery Assistant opens in a new window. Select I agree to accept the Microsoft Services Agreement.
- Select Yes to allow the app to make changes to your device.
- Follow the prompts to troubleshoot your Office activation issue.
If Office still won’t activate after you run the Microsoft Support and Recovery Assistant, you can Fix Unlicensed Product errors yourself.
Fix Unlicensed Product errors yourself
If you’ve tried the earlier troubleshooting steps and Office is still unlicensed, you can troubleshoot activation failures yourself.
Try these first
Check your computer’s date, time, and time zone
If these settings aren’t correct, Office activation might fail. Follow the steps below for your operating system.
Windows 10
- Close all Office apps.
- In the bottom right-hand corner of your screen, select the date or time.
- Select Date and time settings.
- Select Set time automatically and, if shown, Set time zone automatically. If you don’t have the option to set the time zone automatically, make sure your local time zone is shown in Time zone.
- Restart any Office app.
Windows 8 or Windows 8.1
- Close all Office apps.
- In the bottom right-hand corner of your screen, select the date or time.
- Select Change date and time settings.
- If the date or time is wrong, select Change date and time and correct the date and time settings.
- If the time zone is wrong, select Change time zone and select your local time zone.
- Restart any Office app.
Windows 7
- Close all Office apps.
- In the bottom right-hand corner of your screen, select the date or time.
- Select Change date and time settings.
- If the date or time is wrong, select Change date and time and correct the date and time settings.
- If the time zone is wrong, select Change time zone and select your local time zone.
- Restart any Office app.
Tip: In Windows 7, you can synchronize your computer clock with an Internet time server to keep the computer clock up to date. To do this, select the date or time in the bottom right-hand corner of your screen, and then select Change date and time settings. Select the Internet Time tab, select Change settings, select Synchronize with an Internet time server, and then select Update now.
Run Office as administrator
Running Office as administrator helps fix permission issues that might cause Office activation to fail. Follow the steps below for your operating system.
Windows 10
- Close all Office apps.
- Press the Start button in the lower-left corner of your screen.
- Type an application name, like Word. The Word program icon appears in the search results.
- Right-click the Word icon, and select Run as administrator.
- Select Yes to allow Office to run as administrator.
Windows 8.1
- Close all Office apps.
- In Windows 8.1, right-click the Start button in the lower-left corner of your screen, and then select Search.
- Type an application name, like Word. The Word program icon appears in the search results.
- Right-click the Word icon, and select Run as administrator.
- Select Yes to allow Office to run as administrator.
Windows 8
- Close all Office apps.
- In Windows 8, move your mouse to the upper-right corner of your screen to open the charms bar, and then select the Search icon.
- Type an application name, like Word. The Word program icon appears in the search results.
- Right-click the Word icon, and select Run as administrator.
- Select Yes to allow Office to run as administrator.
Windows 7
- Close all Office apps.
- Press the Start button in the lower-left corner of your screen.
- In the Search programs and files box, type an application name, like Word. The Word program icon appears in the search results.
- Right-click the Excel icon, and select Run as administrator.
- If prompted, select Yes to allow Office to run as administrator.
Update Office
The latest Office updates might contain fixes to activation issues. To learn how to update Office, see Install Office updates.
Check your firewall
If you’re using a firewall from another manufacturer, visit the manufacturer’s website for information about how to temporarily disable the firewall. For Windows Firewall, please see below.
Windows 10
- Please go to Turn Windows Firewall on or off
Windows 8.1 and 7
- Please scroll to Turn Windows Firewall on or off in Protect my PC from viruses
Check your antivirus software
For information about how to turn off your antivirus software, check your antivirus manufacturer’s website. Uninstalling your antivirus software may also help. Don’t forget to reinstall it after Office is finished installing and if you turned it off, be sure to turn it on again.
If you’re not sure which antivirus software you have, use the following instructions to get to Control Panel to find the name of your antivirus software.
Tip: Windows 10 comes with default antivirus software, Windows Defender. If you determine that you’re using it, select the Start button > Settings > Update & Security, and then select Windows Defender on the left. Slide the button to Off. Remember to turn it On again.
Check your proxy settings
If you use your device both at home and at work, try turning off the proxy settings in Microsoft Edge or Internet Explorer before you install Office. If you’re using a different browser, check their help to find out how to turn off proxy settings.
Microsoft Edge
- Click the Start button (lower-left corner), and choose Settings.
- Select Network & Internet, go to the bottom of the selections on the left side, and click Proxy.
- In Automatic proxy setup, automatically detect settings or use setup script, by sliding to On or Off.
- In Manual proxy setup, you can choose to use a proxy server. Generally, it will be off and if you slide it to On, be sure to select Save. And if it was off by default before you turned it on, be sure to slide back to Off when you’ve finished using it.
Internet Explorer 7, 8, 9, 10, or 11
- In Internet Explorer, click Tools (upper-right corner) > Internet options.
- Click the Connections tab, and then click the LAN settings button.
- Under Proxy server, clear the option “Use a proxy server for your LAN (These settings will not apply to dial-up or VPN connections).”
- Click Apply and OK to save changes. Restart your computer.
Note: There might be more proxy settings that you need to bypass. If this doesn’t work, and you’re installing Office from work or school, check with your IT department for more information. For IT administrators, please see Microsoft 365 URLs and IP address ranges.