
Applies to:
- Microsoft 365 Defender
This article is Step 2 of 2 in the process of performing an investigation and response of an incident in Microsoft 365 Defender using a pilot environment. For more information about this process, see the overview article.
Once you have performed an incident response for a simulated attack, here are some Microsoft 365 Defender capabilities to explore:
| Capability | Description |
|---|---|
| Prioritize incidents | Use filtering and sorting of the incidents queue to determine which incidents to address next. |
| Manage incidents | Modify incident properties to ensure correct assignment, add tags and comments, and to resolve an incident. |
| Automated investigation and response | Automated investigation and response (AIR) capabilities that can help your security operations team address threats more efficiently and effectively. The Action center is a “single pane of glass” experience for incident and alert tasks such as approving pending remediation actions. |
| Advanced hunting | A query-based threat-hunting tool that lets you proactively inspect events in your network and locate threat indicators and entities. You also use advanced hunting during the investigation and remediation of an incident. |
Prioritize incidents
You get to the incident queue from Incidents & alerts > Incidents on the quick launch of the Microsoft 365 Defender portal. Here’s an example.
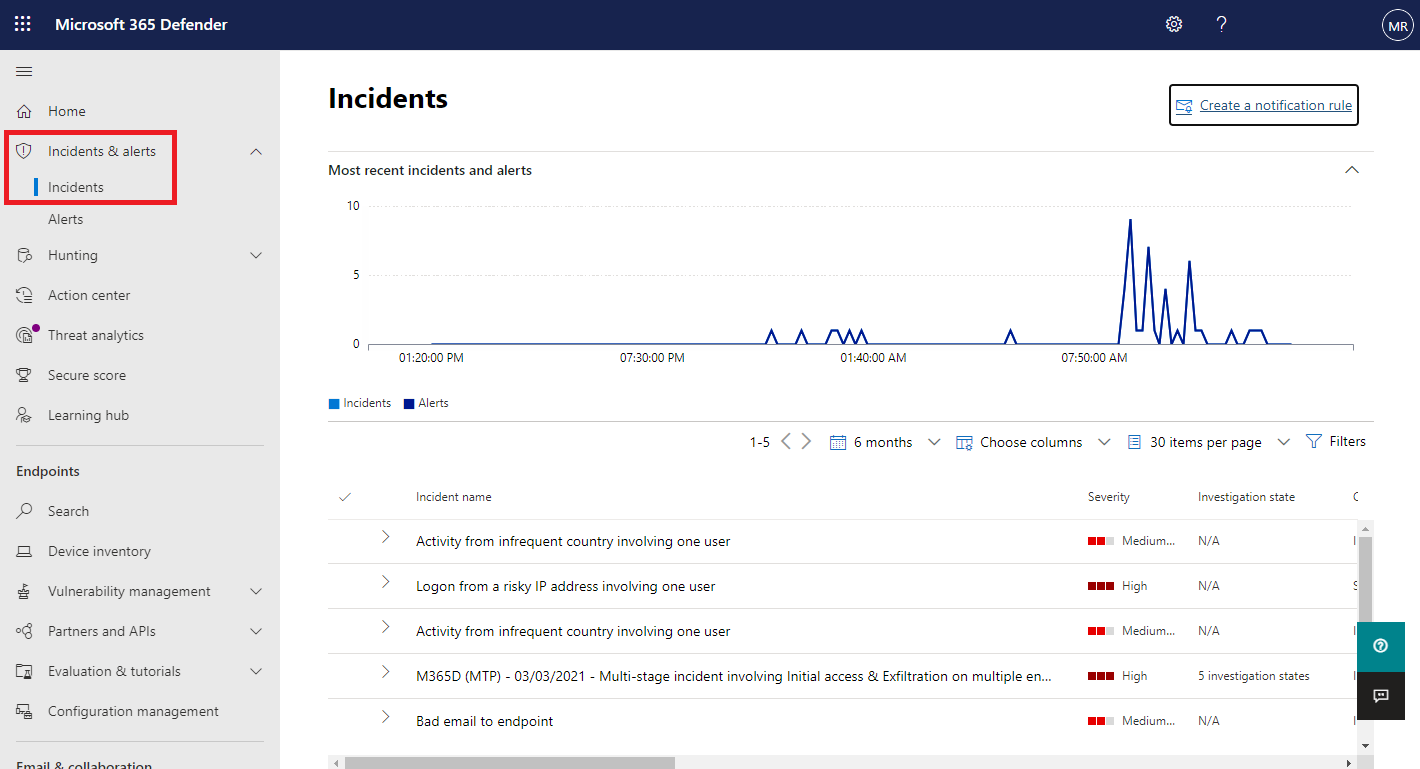
The Most recent incidents and alerts section shows a graph of the number of alerts received and incidents created in the last 24 hours.
To examine the list of incidents and prioritize their importance for assignment and investigation, you can:
- Configure customizable columns (select Choose columns) to give you visibility into different characteristics of the incident or the impacted entities. This helps you make an informed decision regarding the prioritization of incidents for analysis.
- Use filtering to focus on a specific scenario or threat. Applying filters on the incident queue can help determine which incidents require immediate attention.
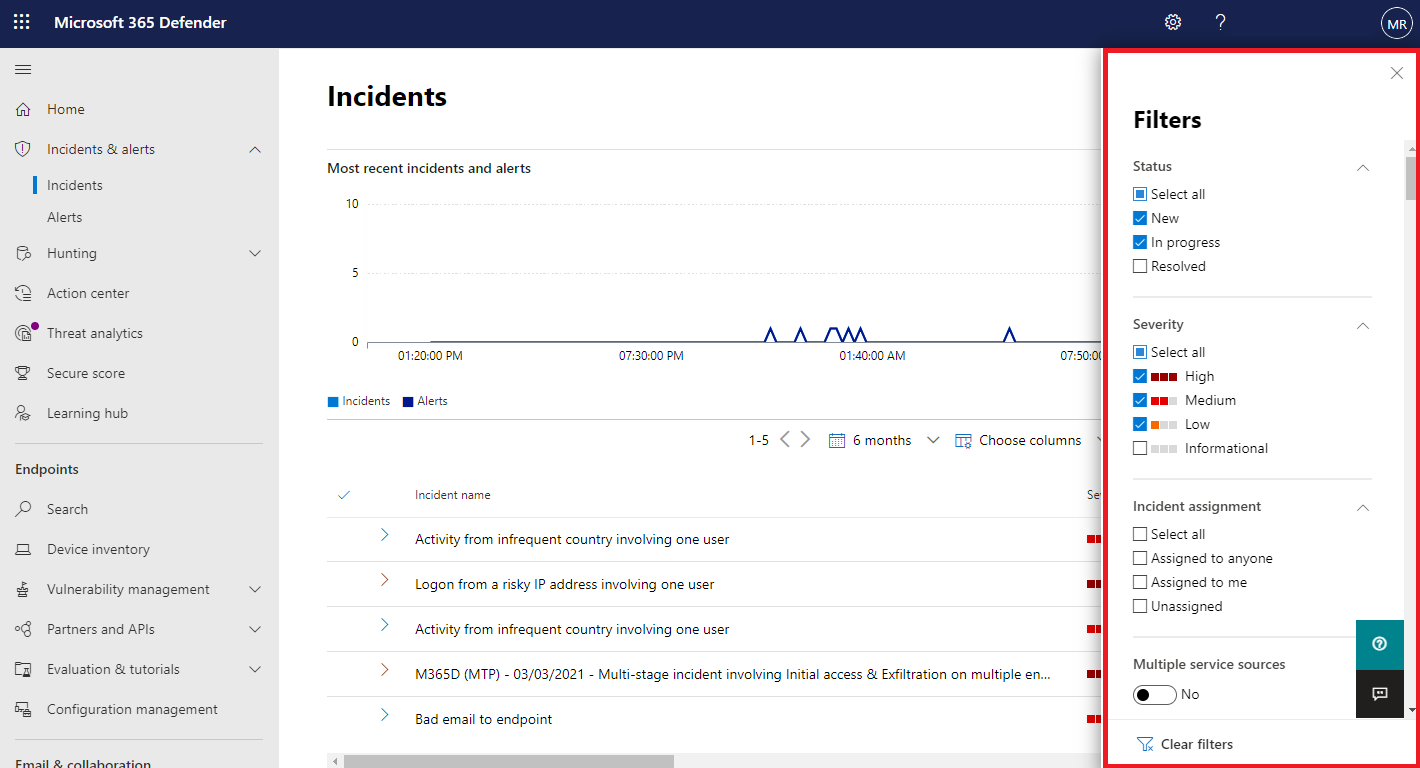
From the default incident queue, select Filters to see a Filters pane, from which you can specify a specific set of incidents. Here is an example.
For more information, see Prioritize incidents.
Manage incidents
You can manage incidents from the Manage incident pane for an incident. Here’s an example.
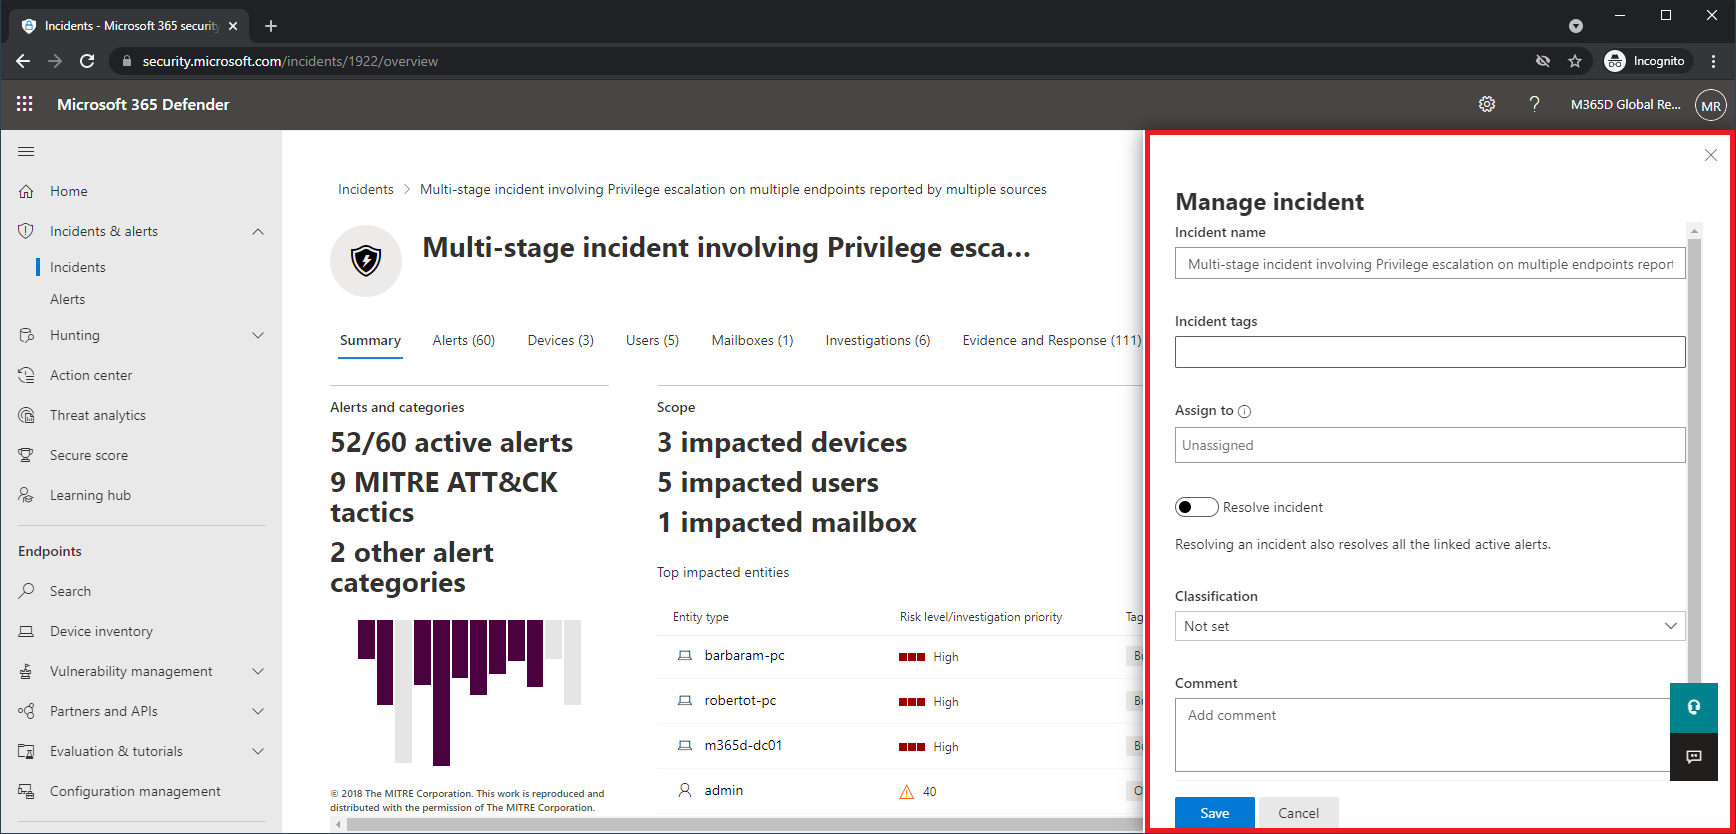
You can display this pane from the Manage incident link on the:
- Properties pane of an incident in the incident queue.
- Summary page of an incident.
Here are the ways you can manage your incidents:
- Edit the incident name
Change the automatically assigned name based on your security team best practices.
- Add incident tags
Add tags that your security team uses to classify incidents, which can be later filtered.
- Assign the incident to yourself
Assign it to your user account name, which can be later filtered.
- Resolve an incident
Close the incident after it has been remediated.
- Set its classification and determination
Classify and select the threat type when you resolve an incident.
- Add comments
Use comments for progress, notes, or other information based on your security team best practices. The full comment history is available from the Comments and history option in the details page of an incident.
For more information, see Manage incidents.
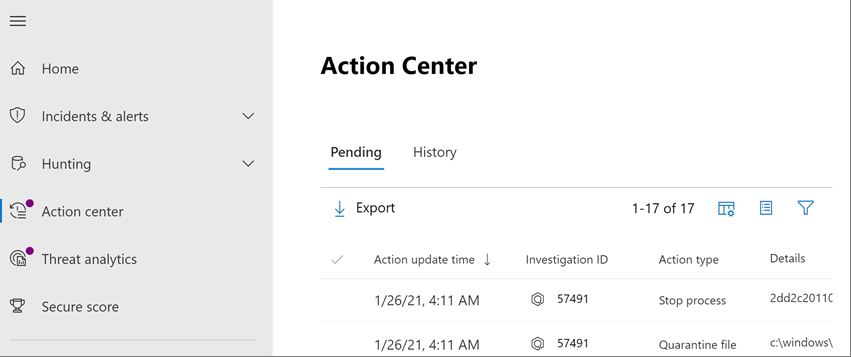
Examine automated investigation and response with the Action center
Depending on how automated investigation and response capabilities are configured for your organization, remediation actions are taken automatically or only upon approval by your security operations team. All actions, whether pending or completed, are listed in the Action center, which lists pending and completed remediation actions for your devices, email & collaboration content, and identities in one location.
Here’s an example.
From the Action center, you can select pending actions and then approve or reject them in the flyout pane. Here’s an example.
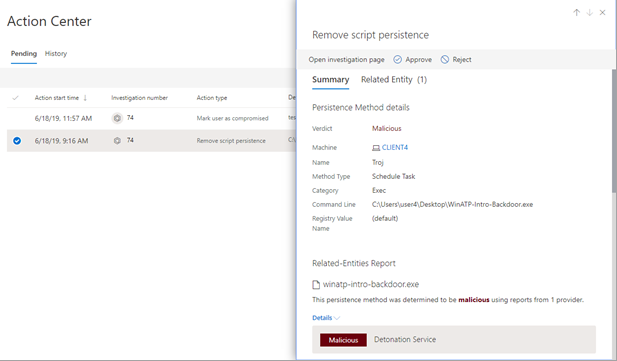
Approve (or reject) pending actions as soon as possible so that your automated investigations can proceed and complete in a timely manner.
For more information, see Automated investigation and response and Action center.
Advanced hunting
Note
Before we walk you through the advanced hunting simulation, watch the following video to understand advanced hunting concepts, see where you can find it in the portal, and know how it can help you in your security operations.
If the optional fileless PowerShell attack simulation were a real attack that had already reached the credential access stage, you can use advanced hunting at any point in the investigation to proactively search through events and records in the network using what you already know from the generated alerts and affected entities.
For instance, based on information in the User and IP address reconnaissance (SMB) alert, you can use the IdentityDirectoryEvents table to find all the SMB session enumeration events, or find more discovery activities in various other protocols in Microsoft Defender for Identity data using the IdentityQueryEvents table.
Hunting environment requirements
There’s a single internal mailbox and device required for this simulation. You’ll also need an external email account to send the test message.
- Verify that your tenant has enabled Microsoft 365 Defender.
- Identify a target mailbox to be used for receiving email.
- This mailbox must be monitored by Microsoft Defender for Office 365
- The device from requirement 3 needs to access this mailbox
- Configure a test device:
a. Make sure you are using Windows 10 version 1903 or later version.
b. Join the test device to the test domain.
c. Turn on Windows Defender Antivirus. If you are having trouble enabling Windows Defender Antivirus, see this troubleshooting topic.
Run the simulation
- From an external email account, send an email to the mailbox identified in step 2 of the hunting environment requirements section. Include an attachment that will be allowed through any existing email filter policies. This file does not need to be malicious or an executable. Suggested file types are .pdf, .exe (if allowed), or an Office document type such as a Word file.
- Open the sent email from the device configured as defined in step 3 of the hunting environment requirements section. Either open the attachment or save the file to the device.
Go hunting
- Open the Microsoft 365 Defender portal.
- From the navigation pane, select Hunting > Advanced hunting.
- Build a query that starts by gathering email events.
- Select Query > New.
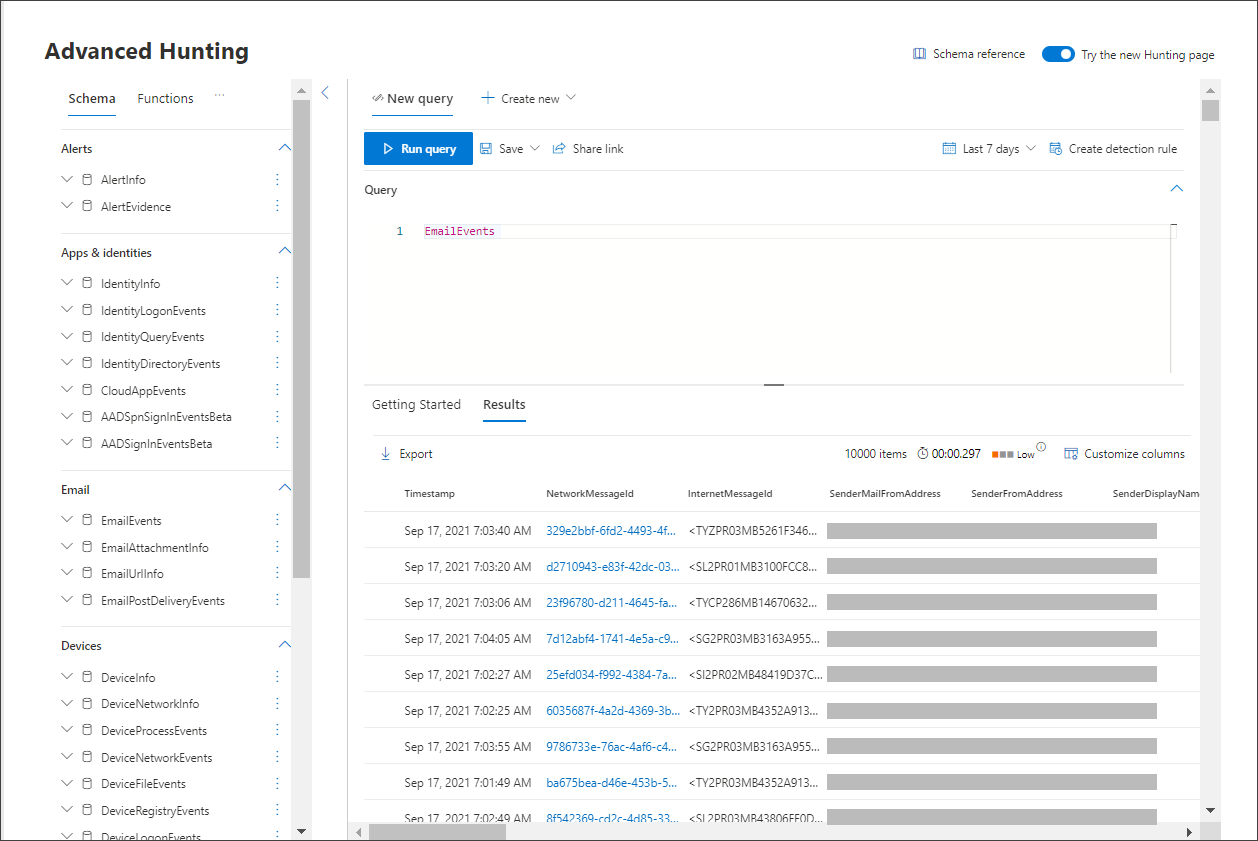
- In the Email groups under Advanced hunting, double-click EmailEvents. You should see this in the query window.
Console
EmailEvents - Change the time frame of the query to the last 24 hours. Assuming the email you sent when you ran the simulation above was in the past 24 hours, otherwise change the time frame as needed.
- Select Run query. You may have differing results depending on your pilot environment.
Note
See the next step for filtering options to limit data return.
Note
Advanced hunting displays query results as tabular data. You can also opt to view the data in other format types such as charts.
- Look at the results and see if you can identify the email you opened. It may take up to two hours for the message to show up in advanced hunting. To narrow down the results, you can add the where condition to your query to only look for emails that have “yahoo.com” as their SenderMailFromDomain. Here is an example.
Console
EmailEvents | where SenderMailFromDomain == "yahoo.com" - Click the resulting rows from the query so you can inspect the record.

- Now that you have verified that you can see the email, add a filter for the attachments. Focus on all emails with attachments in the environment. For this simulation, focus on inbound emails, not those that are being sent out from your environment. Remove any filters you have added to locate your message and add “| where AttachmentCount > 0 and EmailDirection == “Inbound””
The following query will show you the result with a shorter list than your initial query for all email events:
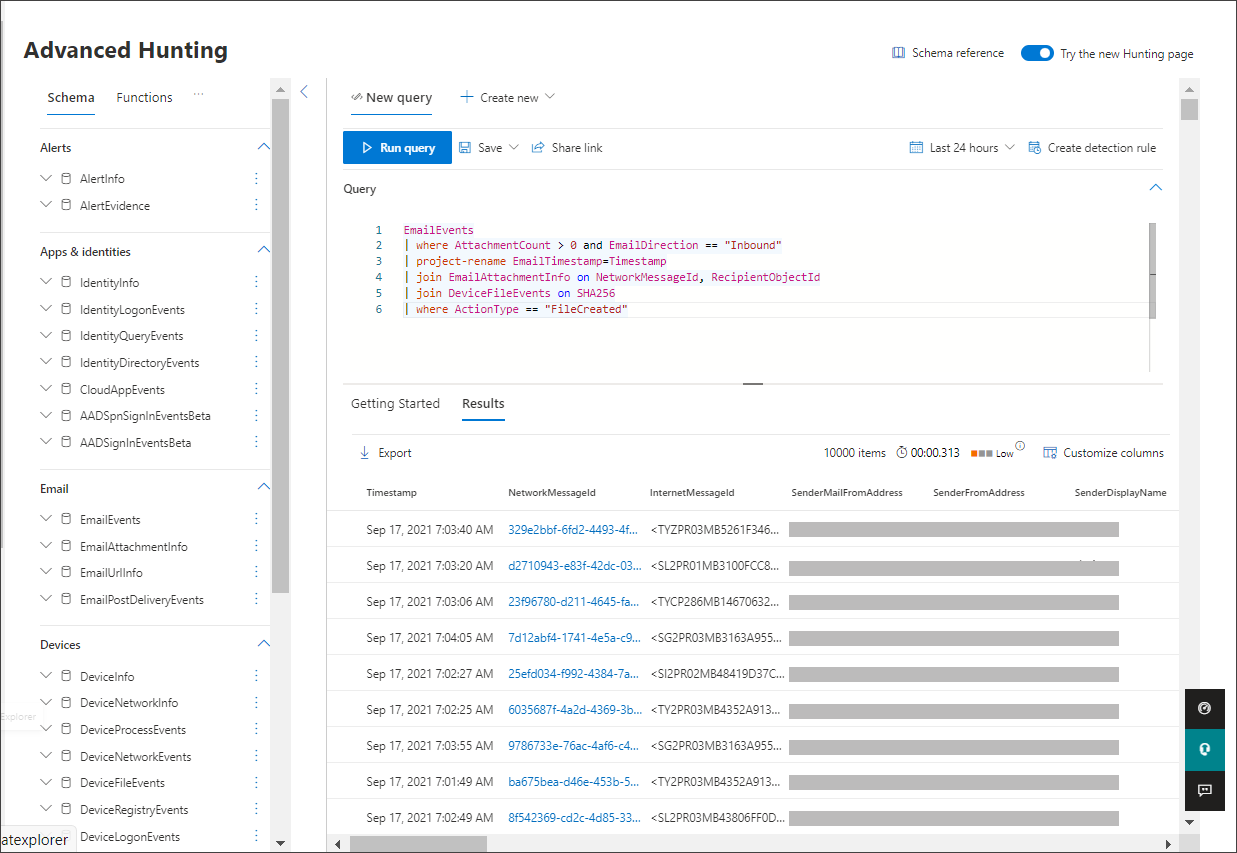
ConsoleEmailEvents | where AttachmentCount > 0 and EmailDirection == "Inbound" - Next, include the information about the attachment (such as: file name, hashes) to your result set. To do so, join the EmailAttachmentInfo table. The common fields to use for joining, in this case are NetworkMessageId and RecipientObjectId.
The following query also includes an additional line “| project-rename EmailTimestamp=Timestamp” that’ll help identify which timestamp was related to the email versus timestamps related to file actions that you’ll add in the next step.
ConsoleEmailEvents | where AttachmentCount > 0 and EmailDirection == "Inbound" | project-rename EmailTimestamp=Timestamp | join EmailAttachmentInfo on NetworkMessageId, RecipientObjectId - Next, use the SHA256 value from the EmailAttachmentInfo table to find DeviceFileEvents (file actions that happened on the endpoint) for that hash. The common field here will be the SHA256 hash for the attachment.
The resulting table now includes details from the endpoint (Microsoft Defender for Endpoint) such as device name, what action was done (in this case, filtered to only include FileCreated events), and where the file was stored. The account name associated with the process will also be included.
ConsoleEmailEvents | where AttachmentCount > 0 and EmailDirection == "Inbound" | project-rename EmailTimestamp=Timestamp | join EmailAttachmentInfo on NetworkMessageId, RecipientObjectId | join DeviceFileEvents on SHA256 | where ActionType == "FileCreated"You’ve now created a query that’ll identify all inbound emails where the user opened or saved the attachment. You can also refine this query to filter for specific sender domains, file sizes, file types, and so on.
- Functions are a special kind of join, which let you pull more TI data about a file like its prevalence, signer and issuer info, etc. To get more details on the file, use the FileProfile() function enrichment:
Console
EmailEvents | where AttachmentCount > 0 and EmailDirection == "Inbound" | project-rename EmailTimestamp=Timestamp | join EmailAttachmentInfo on NetworkMessageId, RecipientObjectId | join DeviceFileEvents on SHA256 | where ActionType == "FileCreated" | distinct SHA1 | invoke FileProfile()
Create a detection
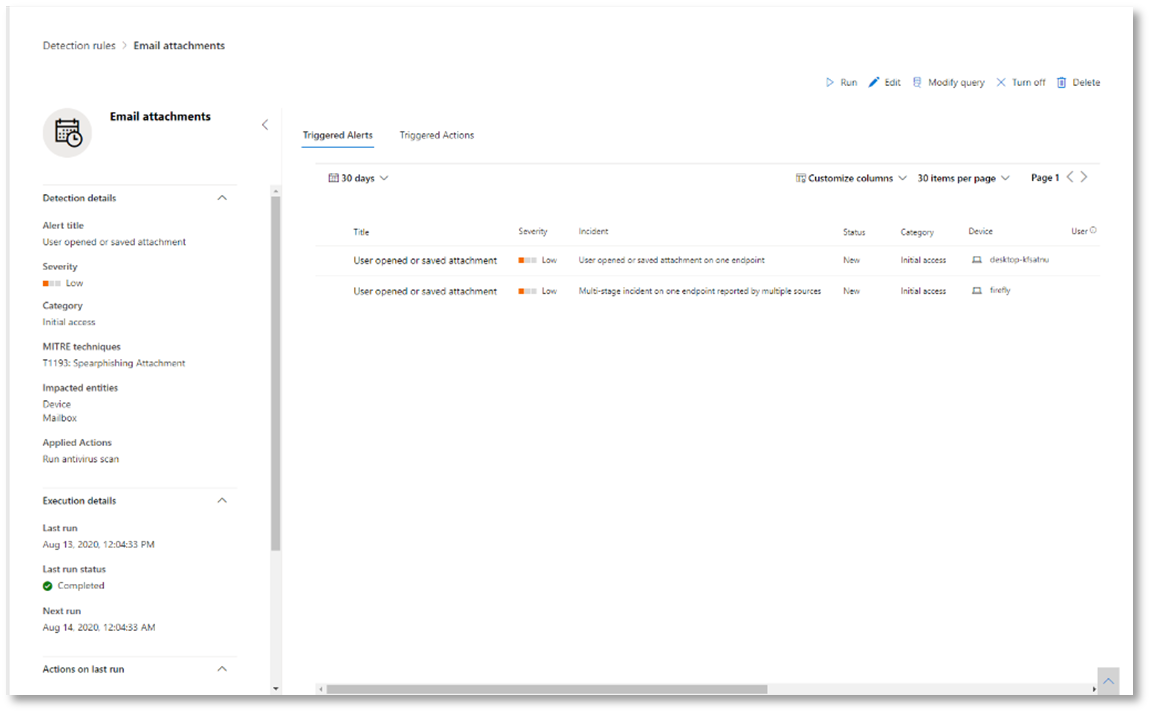
Once you have created a query that identifies information that you’d like to get alerted about if they happen in the future, you can create a custom detection from the query.
Custom detections will run the query according to the frequency you set, and the results of the queries will create security alerts, based on the impacted assets you choose. Those alerts will be correlated to incidents and can be triaged as any other security alert generated by one of the products.
- On the query page, remove lines 7 and 8 that were added in step 7 of the Go hunting instructions and click Create detection rule.
Note
If you click Create detection rule and you have syntax errors in your query, your detection rule won’t be saved. Double-check your query to ensure there’s no errors.
- Fill in the required fields with the information that will allow the security team to understand the alert, why it was generated, and what actions you expect them to take.
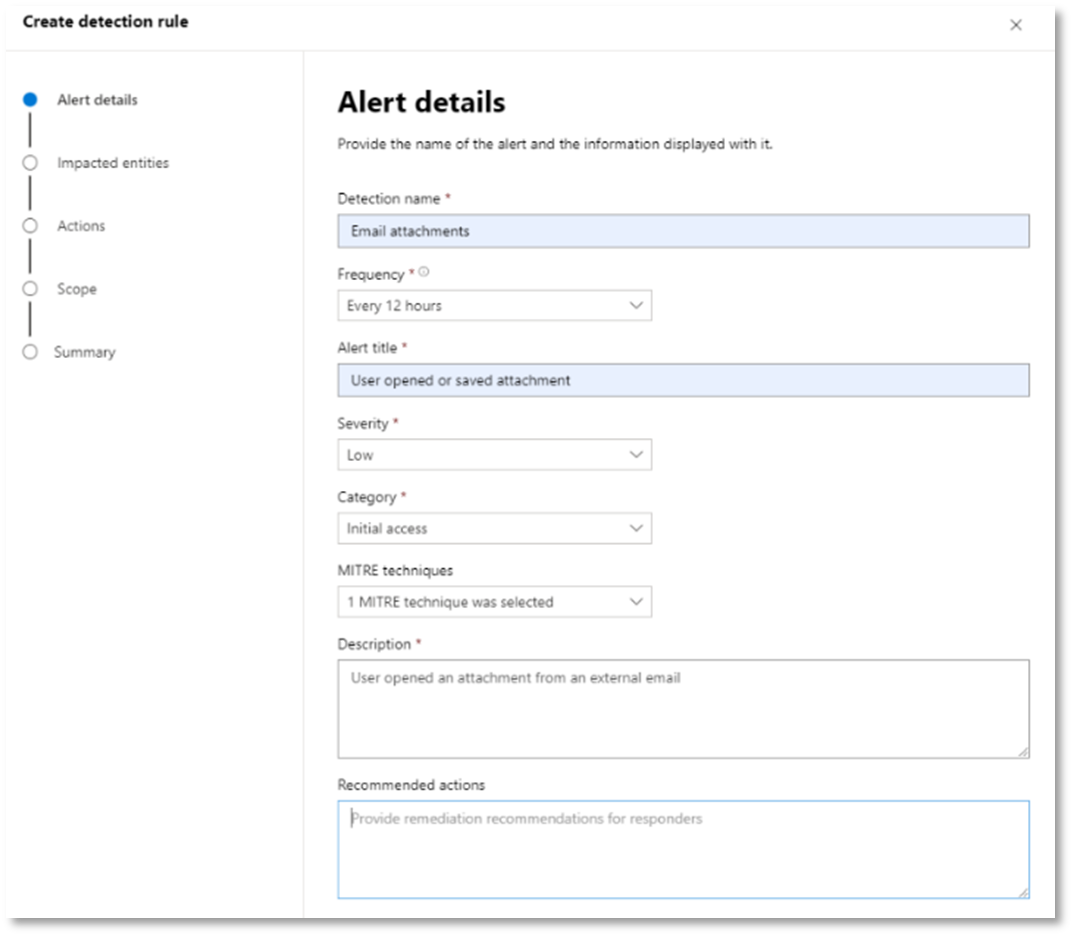
Ensure that you fill out the fields with clarity to help give the next user an informed decision about this detection rule alert
- Select what entities are impacted in this alert. In this case, select Device and Mailbox.

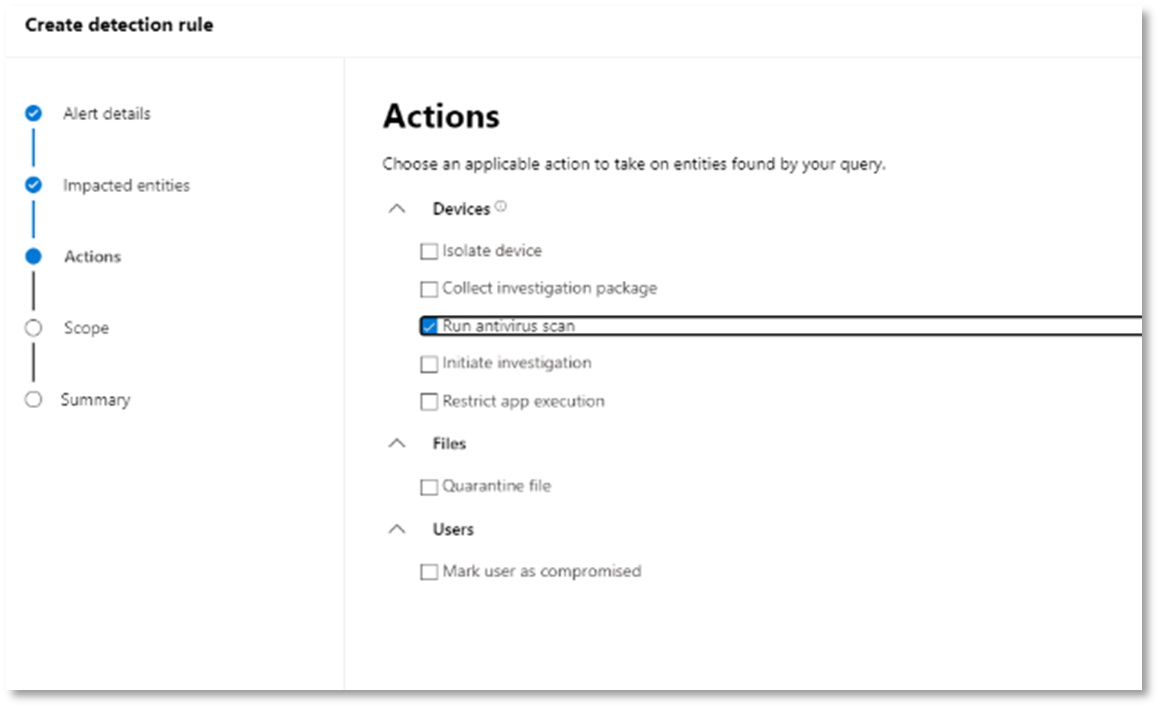
- Determine what actions should take place if the alert is triggered. In this case, run an antivirus scan, though other actions could be taken.
- Select the scope for the alert rule. Since this query involves devices, the device groups are relevant in this custom detection according to Microsoft Defender for Endpoint context. When creating a custom detection that does not include devices as impacted entities, scope does not apply.
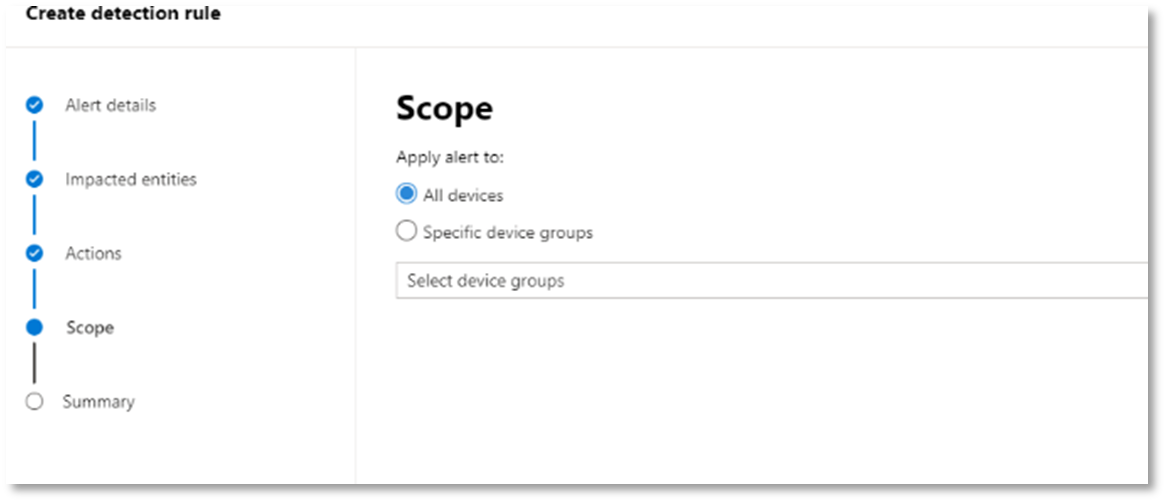
For this pilot, you might want to limit this rule to a subset of testing devices in your production environment.
- Select Create. Then, select Custom detection rules from the navigation panel.

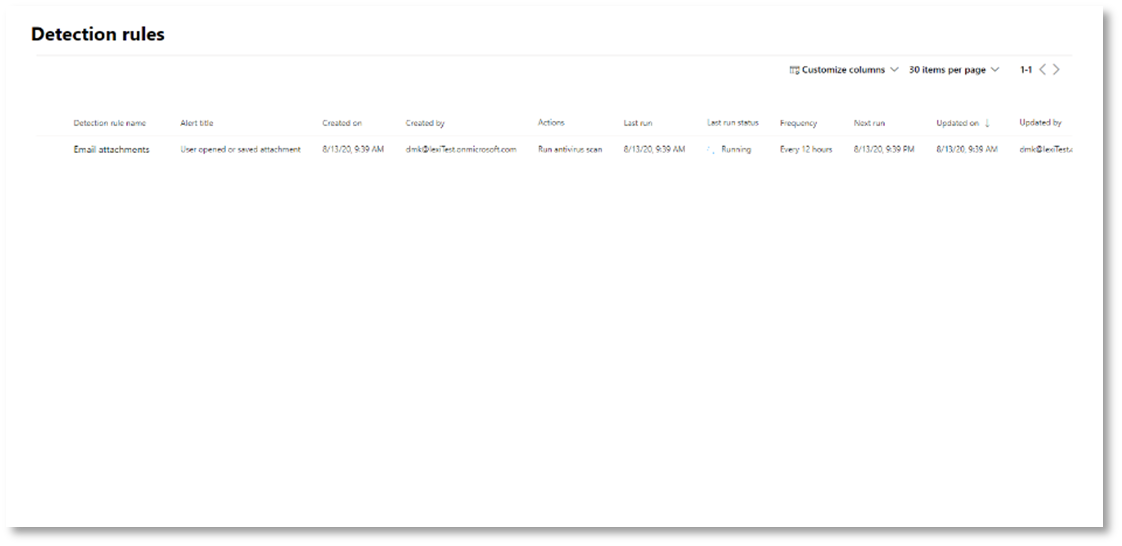
From this page, you can select the detection rule, which will open a details page.
Expert training on advanced hunting
Tracking the adversary is a webcast series for new security analysts and seasoned threat hunters. It guides you through the basics of advanced hunting all the way to creating your own sophisticated queries.
See Get expert training on advanced hunting to get started.
Navigation you may need
Create the Microsoft 365 Defender Evaluation Environment