
The Malwarebytes for Windows version 4 program interface is designed to be stripped down and simple to navigate. We intend to make configuring and using the program easy for you. The example below highlights each section of the Dashboard screen layout. The Dashboard acts as the main menu for the program.
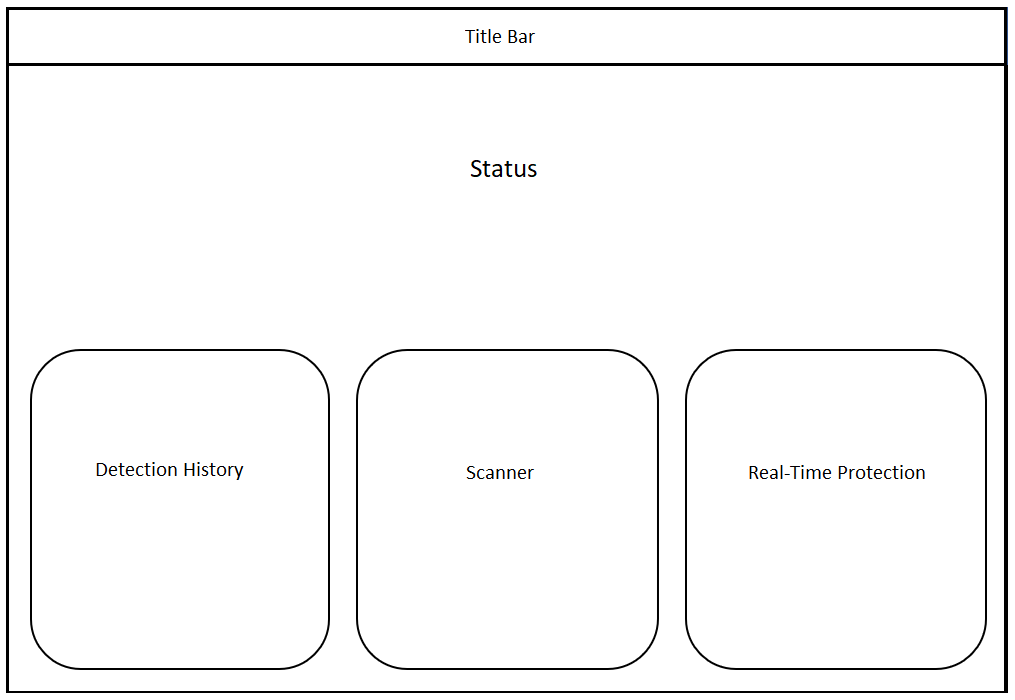
Title bar
The buttons displayed here vary depending on if you have activated Malwarebytes Premium, or have the Trial or Free version of the app. The upper-left corner of the app shows the Malwarebytes logo and the version you have.
- If you have Malwarebytes Premium, you see the following button in the Title bar:

Clicking the My Account button takes you to the Account tab of the Settings page where you can view your Premium subscription information. For more information, see Account settings in Malwarebytes for Windows v4. - If you have the Malwarebytes Trial or Malwarebytes Free version, you see the following button in the Title bar:

If you click the Activate license button, the activation screen opens so you can type in your license key and activate Malwarebytes Premium features. - You see the following buttons in the Title bar in all version of Malwarebytes:
- If you click the Notification
 bell icon, you are presented with the most recent Malwarebytes notifications. Click an item to expand the details.
 - If you click the the Settings
 gear icon, the menu expands options to configure Malwarebytes protection, or view your account and program version details.
 - If you click the Help
 question mark icon, the menu expands to show web links to reach the Malwarebytes Support site, the Malwarebytes for Windows guide, and the Malwarebytes Labs blog. From the Help menu, you can also download and run the Malwarebytes Support Tool to investigate technical issues.
- If you click the Notification
Status
The center of the screen provides current program status and an Upgrade to Premium button if you are using the Trial or Free versions. This area will warn you to take action in the event that threats are detected, or if a Real-Time Protection layer is turned off. If no action is needed, this area lets you know that your device is protected.
Detection History
The Detection History card shows how many threats were quarantined from your last scan, and how many threats are quarantined in total. Click it to expand the Detection History menu to view the following tabs:
- Quarantine: Click this tab to view a list of all detected and neutralized threats found by a Malwarebytes scan. Here you can check the boxes next to items you want removed from your device, then click Delete. If you see items you want to keep on your device, check the boxes next to these items and click Restore.
- Allow List: Click this tab to view a list of programs, websites, and IP addresses you have marked for Malwarebytes to exclude from scans, also known as allow list. If you want to add an item to the Allow List, click the Add button and follow the on screen instructions.
- History: Click this tab to view a list of threats detected by Malwarebytes, their filenames, locations, times found, and any actions taken on the detection.
Scanner
The Scanner card shows the time for the next scheduled scan, if you are using the Premium or Trial versions. Any version of Malwarebytes shows a blue Scan button in this card. Click it to initiate a Threat Scan on your device. You can instead click anywhere else on this card to expand the Scanner menu. The expanded menu shows the following tabs:
- Scanner: Click this tab to view details on your last scan, configure advanced scan options, and initiate a scan.
- Scan Scheduler: Click this tab to view your scheduled scan and when they will initiate. Click the Schedule scan button and follow the on screen instructions to add a new scheduled scan and configure the start times and frequency. Only Malwarebytes Premium and Trial users can schedule scans.
- Reports: Click this tab to view a list of previous scans and the times when they executed. Hover your cursor over the Scan Report entry to see options to view more details, download a text file version, or delete.
Real-Time Protection
The Real-Time Protection card shows switches for each of the four protection layers in Malwarebytes. You can turn any of these layers off, but we recommend leaving all of them on to stay protected. The Real-Time Protection layers are only available to Malwarebytes Premium and Trial users. Click the card to expand the Real-Time Protection menu. The expanded menu shows the following options:
- Items stopped in the last 30 days: This area of the Real-Time Protection menu shows the total number of threats found by Malwarebytes in the last 30 days. You can click Malicious sites, Malware & PUPs, Ransomware, or Exploits to view only threats found of that type. You can also toggle this view by clicking Global if you want to see the total number of detections Malwarebytes found around the world in the last 30 days.
- Protection layers: This area offers the same Real-Time Protection switches found on the Dashboard view of the Real-Time Protection card. Click the small information icon next to each protection layer name to view more information how that layer protects your device.
- Security news: This area highlights the latest security blog from Malwarebytes Labs. Click View more to open the Malwarebytes Labs website in your browser.
Source : Official Malwarebytes Brand
Editor by : BEST Antivirus KBS Team