
Malwarebytes OneView lets you schedule Security Summary reporting for you and other OneView users. You can add, edit, pause, and delete scheduled reports. This article provides an overview of the various options, and how to add a new scheduled report.
Scheduled Reports overview
In OneView, click Reports > Scheduled Reports tab to view all listed scheduled reports. Here you can add new report schedules, use the magnifying glass to search for existing schedules, and view schedule details.
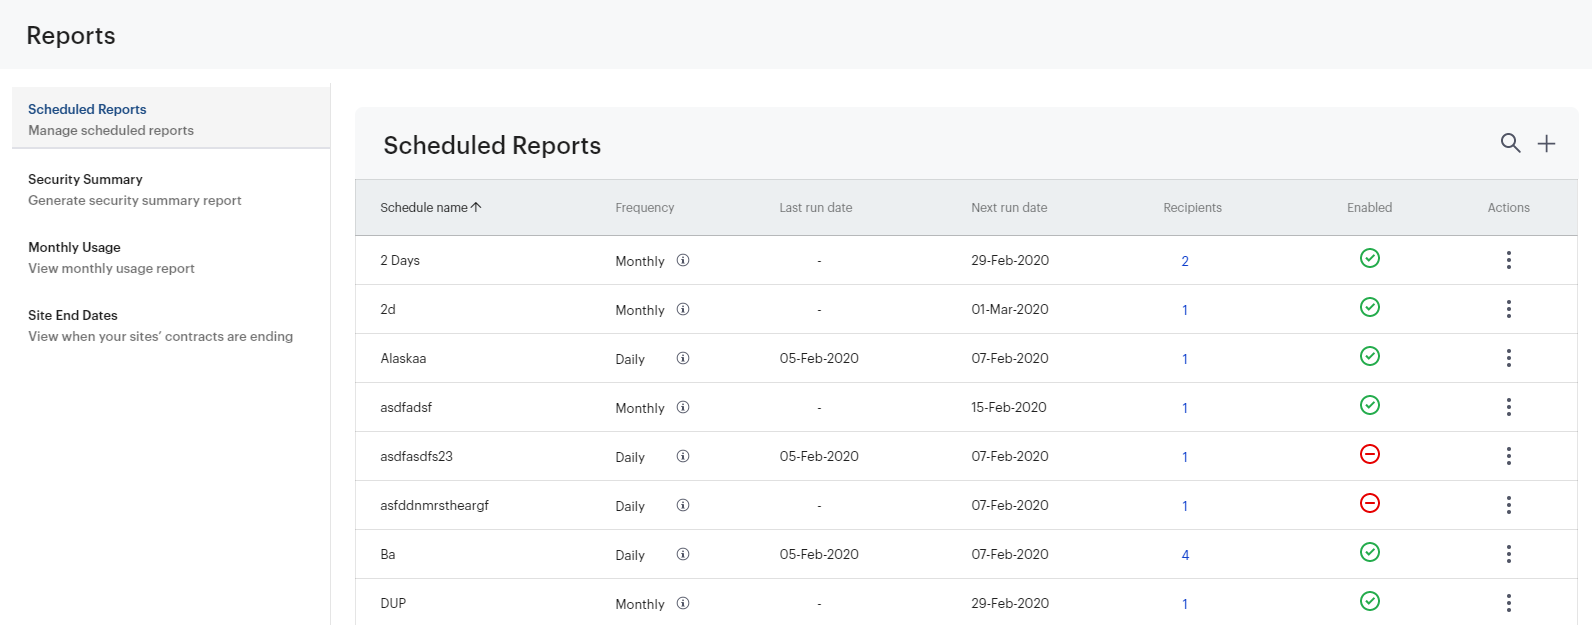
All of your report schedules display as line items with several columns of information. These columns are:
- Schedule name: Shows the name of the scheduled report. Click the Schedule name header to sort your entries in alphabetical or reverse alphabetical order.
- Frequency: Indicates how frequently reports are emailed to OneView users. Shows either Daily, Weekly, or Monthly. Click the information ( i ) icon to the right to reveal more information on the reporting dates.
- Last run date: Shows the date of the last time OneView emailed a report for that schedule. No date shows if the report has not been sent yet.
- Next run date: Shows the next time OneView is scheduled to email a report to users.
- Recipients: This number indicates how many OneView users will receive a report on the next run date. Click the number to reveal the email address of each recipient for that schedule.
- Enabled: This indicates whether the scheduled report is active or paused. A green check mark indicates that the report will email recipients as expected. A red minus indicates that the schedule is stopped until Disable is changed back to Enable from the Actions drop-down.
- Actions: Click the kebab ( ⫶ ) drop-down menu to reveal options for that schedule. These are:
- Edit: This opens the Edit scheduled report window where you can make and submit changes for a schedule. The specific options are described in the section below.
- Disable/Enable: This switches the schedule’s status between enabled or disabled.
- Delete: Click this to completely remove a schedule from the Scheduled Reports page. You will be asked to confirm your decision after clicking this action.
- Run now: Click this if you want OneView to email the recipients the report immediately.
The next section explains how to schedule and configure a report.
Schedule a report in OneView
- From the sidebar, click Reports.
- Select the Scheduled Reports tab.
- Toward the top-right of the screen, click the plus sign ( + ) to create a new report schedule.
- In the Add scheduled report window, complete the following fields:
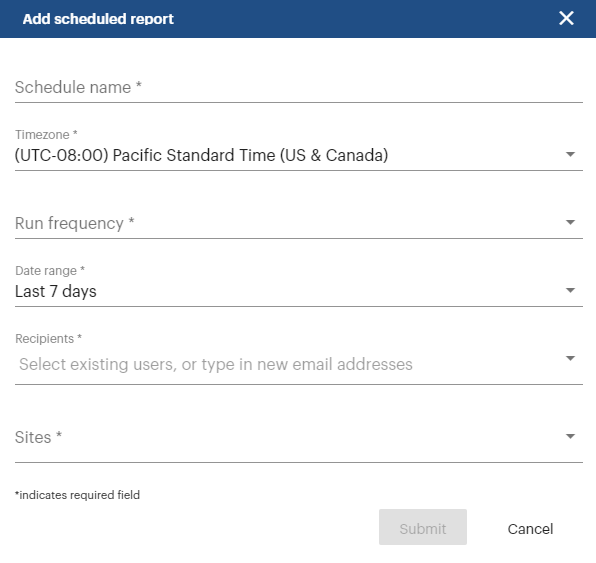
- Schedule name: Type a name for the schedule.
- Timezone: Select the timezone for this report schedule.
- Run frequency: Choose whether OneView emails the report Daily, Weekly, or Monthly.
- Date range: Choose the range of data this report includes. Options are the last 7, 30, 60, or 90 days.
- Recipients: Select existing OneView users, or type in a new email address. Report emails will send to the selected people.
- Sites: Select one or more customer sites to generate the report on.
- Click Submit when finished.
Source : Official Malwarebytes Brand
Editor by : BEST Antivirus KBS Team
(Visited 14 times, 1 visits today)