
NOTICE – On August 4 2021, Malwarebytes Endpoint Security reached its End of Life. For more information, see the Malwarebytes Endpoint Security End of Life notice. To upgrade to a supported version of Malwarebytes, see Malwarebytes Endpoint Protection or Malwarebytes for Teams.
Malwarebytes offers an on-premises managed solution, Malwarebytes Endpoint Security, and our cloud-managed solution, Malwarebytes Endpoint Protection. By upgrading to Malwarebytes Endpoint Protection, you’ll get the advantages of centralized management through our Malwarebytes Nebula platform.
This article walks system administrators through best practices for transitioning your organization’s environment from Malwarebytes Endpoint Security to Malwarebytes Endpoint Protection. We recommend you setup your environment by following each ordered step:
- Policies
- Exclusions
- Add endpoint groups
- Add endpoints
- Scheduled endpoint scans
- Users
- Email notifications
- Syslog
- Network proxy
Refer to our Malwarebytes Endpoint Security and Malwarebytes Endpoint Protection feature comparison checklist if you wish to see comparison charts for Policy and Admin features found in Malwarebytes Endpoint Security, and the equivalent or similar features found in Malwarebytes Endpoint Protection.
If you prefer a video presentation on migration, see Video: Migrate Malwarebytes Endpoint Security to Malwarebytes Nebula platform More in-depth product training on both Malwarebytes Endpoint Protection and Malwarebytes Endpoint Detection and Response is available via Malwarebytes Academy. Learn more and wp-signup.php for Malwarebytes Academy here.
For further technical information on the features and functions available with Malwarebytes Endpoint Protection, see the Malwarebytes Nebula platform Administrator Guide.
1. Policies
A policy defines the security settings for the endpoint (e.g., executing a scheduled scan, type of scan, applying Real-Time Protection, or enabling Anomaly Detection Machine Learning.) See below for instructions on noting your Malwarebytes Endpoint Security policy configurations, and adding those to new policies with Malwarebytes Endpoint Protection.
Note policy configurations in Malwarebytes Management Console
- Select Policy on the left pane of the Malwarebytes Management Console app window.
- Double-click any policies you wish to move to Malwarebytes Endpoint Protection and note the following configurations for each:
- General
- Protection
- Scanner
- Scheduler
- Updater
- Communication
- Anti-Exploit
- Anti-Ransomware (with Exclusion List)
- Login to the Malwarebytes Nebula platform.
- Click Add to create a new policy for each policy you wish to migrate from Malwarebytes Endpoint Security to Malwarebytes Endpoint Protection.
Detailed policy mapping found in Malwarebytes Endpoint Security and Malwarebytes Endpoint Protection feature comparison checklist.
2. Exclusions
Use one of the following two methods to migrate your exclusions from Malwarebytes Endpoint Security to Malwarebytes Endpoint Protection.
Migrate exclusions with Malwarebytes Cloud Excel Add-In
Use the Malwarebytes community utility Malwarebytes Cloud Excel Add-In to automate the conversion.
- Once the MSI file is downloaded, open Excel and go to Malwarebytes > Misc Functions > Load Exclusions.
- Select Import from Malwarebytes Endpoint Security.
Manually migrate exclusions
In Malwarebytes Endpoint Security, exclusions are established per policy. With Malwarebytes Endpoint Protection, exclusions are applied on a global basis.
- Take note of each exclusion found in the following policy tabs of Malwarebytes Endpoint Security:
- Ignore List – Malwarebytes Anti-Malware
- Anti-Exploit Exclusion List
- Anti-Ransomware (with Exclusion List)
- Manually add those exclusions to your Malwarebytes Nebula console under Settings > Exclusions > Add.
3. Add endpoint groups
Use one of the following three methods for creating Endpoint Groups.
Sync Active Directory
The Malwarebytes Discovery and Deployment Tool can synchronize the Active Directory structure with Malwarebytes Endpoint Protection groups. For more information, see the Malwarebytes Discovery and Deployment Tool Handbook.
- Open Malwarebytes Discovery and Deployment Tool and select Active Directory Import.
- Select all Organizational Units you wish to import to Malwarebytes Endpoint Protection.
- All installed endpoints are automatically placed into the Active Directory group structure created by the sync process.
Add endpoint groups
In your Malwarebytes Nebula console, create new groups and select policies desired for each new group. Go to Settings > Groups > New.
4. Add endpoints
Use one of the following two methods to add endpoints to Malwarebytes Endpoint Protection.
Use a software distribution method
After installing the Malwarebytes Endpoint Agent, the endpoints show up in the Malwarebytes Nebula console in the Default Group. You can then manually move endpoints to another group. Utilize the following command line options to automatically assign endpoints to groups during the installation process.
- Automatically assign endpoints to a group during installation via command line option by specifying the corresponding Group ID. In your Malwarebytes Nebula console, go to Settings > Groups and create a new group structure.
- Find the Group ID. Go to Downloads, and click the Specify group assignment link.
- Windows installer usage: Setup.MBEndpointAgent.Full.exe GROUP=”<Group ID>”
- MacOS installer usage: sudo launchctl setenv MALWAREBYTES_GROUP <GroupID> ; sudo -E /usr/sbin/installer -pkg Setup.MBEndpointAgent.pkg -target /
Use Malwarebytes Discovery and Deployment Tool
- Download the Malwarebytes Discovery and Deployment Tool. Go to Downloads. In the Discovery and Deployment Tool section, click Download.
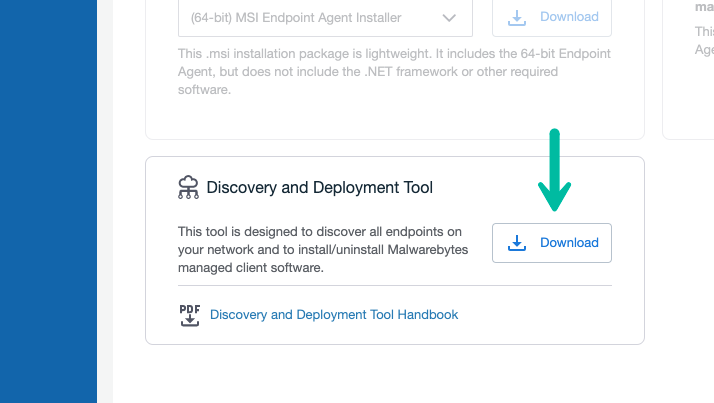
- See Malwarebytes Nebula platform Administrator Guide for detailed install and use information.
- All endpoints show up in the Malwarebytes Nebula platform in the Default Group. Manually move endpoints to other groups if desired.
5. Scheduled endpoint scans
- Review and document schedules in Malwarebytes Endpoint Security. Include date/time, functions performed, and groups applied to schedules.
- Enter information into Malwarebytes Nebula to create new scheduled scans.
- Create a spreadsheet that helps map Malwarebytes Endpoint Security settings to Malwarebytes Endpoint Protection.
6. Users
- Gather information on existing Users (also known as administrators) from Malwarebytes Endpoint Security.
- Create new users in the Malwarebytes Nebula console. Go to Settings > Users > New.
- Two user types available in Malwarebytes Endpoint Security: Admin and Users. Admins can define what features are read only and read/write.
- Three user types available in Malwarebytes Endpoint Protection: Super Admin (equal to Admin), Administrator (access to everything within the Malwarebytes Nebula console except for editing global settings and can be restricted to certain endpoint groups), Read Only
7. Email notifications
Each user may configure their own preferences for notifications. There is no global setting to enable all users to receive the same notifications. There is no need to configure an SMTP server.
In the upper right corner of the screen, go to User Name > Profile > Notifications and check the desired notifications.
8. Syslog
- In the Malwarebytes Nebula console, select Settings > Syslog Logging.
- Select one ‘always on’ endpoint that resides within the local area network that has access to the Syslog Server.
- Select Add and enter the requested information to match the Syslog Server.
9. Network proxy
Use one of the following two methods to add a network proxy.
Add network proxy via command line option during installation
msiexec /quiet /i Setup.MBEndpointAgent.msi NEBULA_PROXY_SERVER=http://<IP> NEBULA_PROXY_PORT=<port> GROUP=<group_ID>
Use Malwarebytes Discovery and Deployment Tool
A Proxy Settings button is at the lower right corner of the login screen, needed when a proxy server is required to access the Internet. Click Proxy Settings to enter proxy specifications. No settings are enabled until Use Proxy is checked, and settings are ignored if Use Proxy is unchecked.
After installation via Command line on each endpoint
MBCloudEA.exe -proxy.server <IP> -proxy.port <port> -proxy.user <domain\user> -proxy.password <password>
Source : Official Malwarebytes Brand
Editor by : BEST Antivirus KBS Team