

Details
Solution
What is Policy Manager?
The ESET Remote Administrator (ERA) Policy Manager allows administrators to create policy configurations (settings, rules, reporting, etc.) and apply them to individual users, sub-groups or entire networks as needed.
- Policies are deployed through a hierarchy, where a child policy is forced to inherit settings from a parent policy.
- By default, if there is a conflict between a setting in a parent policy and the same setting in a child policy, the child policy’s setting will take effect for all clients assigned to that child policy.
- Policies are similar to Configuration tasks, except that they are not one-time tasks and they are consistently applied to the same group of workstation.
- Policies provide continuous maintenance of certain configuration settings for ESET products by forcing these settings to clients each time that they check in to ERA.
Each policy has two basic attributes which define how active configuration parameters are adopted by child policies (listed in the Policy attributes & actions section):
- Force over any children policy: Forces all active parameters to inherited policies. If the child policy differs, the merged policy will adopt all active parameters from the parent policy.
- Down replicable policy: Activates replication to child policies. For example, a policy with this attribute can serve as a default policy for lower servers and can also be assigned to clients connected to lower servers.
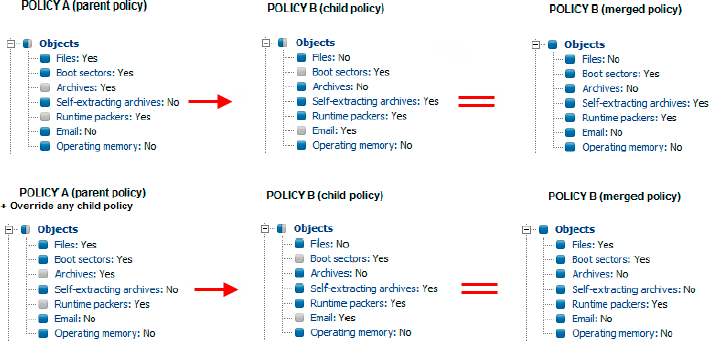
Figure 1-1
Click the image to view larger in new window
How do I use Policy Manager?
The primary functions of Policy Manager include creating, editing and removing policies.
- Open Policy Manager by clicking Tools → Policy Manager.
To create a new policy:
- Click Add New Policy.

Figure 1-2
Click the image to view larger in new window - Type a name into the Policy name field.
- Select a parent policy using the Parent policy drop-down menu.
- Select an initial Policy configuration and click OK.
- Create empty policy configuration – Create a blank template with all settings set to their defaults and no items marked.
- Copy merged policy configuration from policy – Copy all of the existing configuration and marked items from the policy you select in the corresponding drop-down menu.
- Copy policy configuration from .xml file – Create a new policy using the configuration from an .xml file. All settings configured in the .xml file will be marked in the new policy.
- Create with Firewall Rules Merge Wizard – Create a new policy using the results of the Firewall Rules Merge Wizard. Only the firewall rules portion of the policy will be marked, all other items will be default and unmarked.
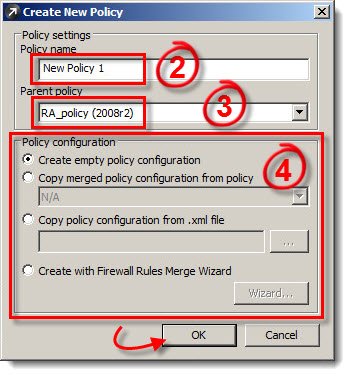
Figure 1-3
To change an existing policy:
- Select it and click Edit.
- Make your desired changes and then click Console → Yes to save them and exit ESET Configuration Editor.
To remove a policy:
- Select it and click Delete Policy.
- Select a New policy for primary clients with the currently deleted policy using the drop-down menu and click OK.

Figure 1-4
Click the image to view larger in new window
To remove a policy and all of its child policies:
- Select it and click the down arrow next to Delete Policy.
- Select Delete Policy Branch.
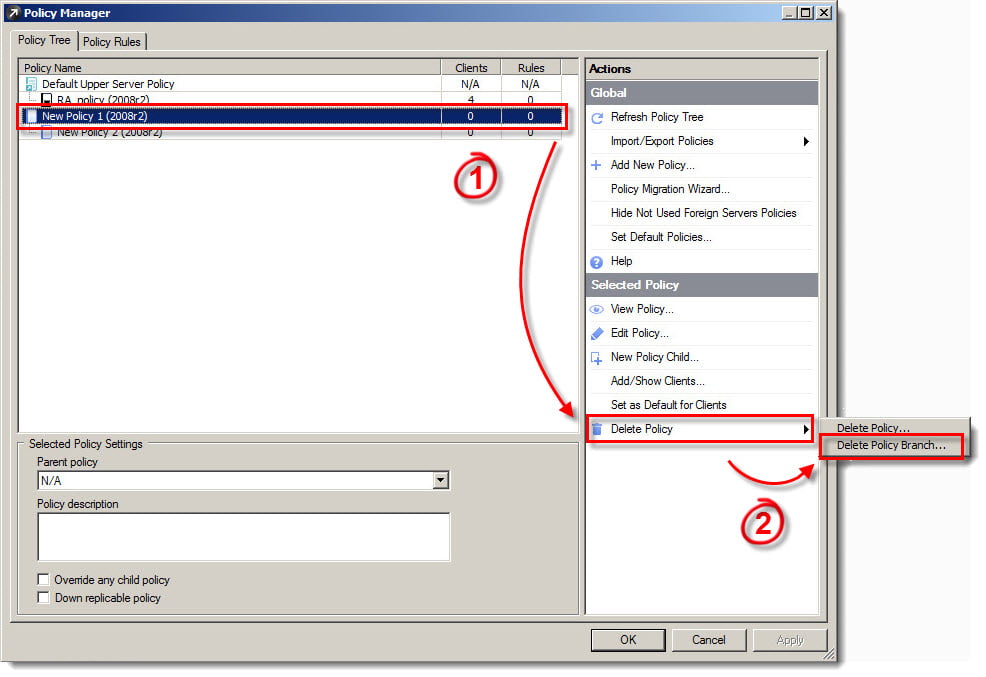
Figure 1-5
Click the image to view larger in new window
- Select a New policy for primary clients with the currently deleted policy using the drop-down menu and click OK.
How does Policy Manager Configure Clients?
- Every client that connects to ERA is assigned a policy.
- Clients will only receive settings from the policy to which they are assigned.
- The Actual Policy Name column in the Clients tab of ESET Remote Administrator Console (ERAC) will display the name of the policy that is assigned to a given client.
- New clients that are not assigned a specific policy will receive settings from the Default policy for primary clients.
How do clients receive policy updates?
When a policy is modified, a client assigned to that policy will adjust its configuration for any item in the policy that is marked. Items that are marked will be denoted by a blue icon to the left of the configuration setting. Any item that is not marked will be ignored by the client, and the client will retain whatever setting it already has for that respective item.
- Clients will receive changes to their configuration when they check in to the ESET Remote Administrator Server (ERAS). If a client does not check in to the ERAS, it will not receive any changes made using Policy Manager.
- A client will only receive changes made to the section of the policy that corresponds to the ESET product installed on that client. For example, all modifications to a client with ESET NOD32 Antivirus Business Edition version 4 must be made in the Windows product line v3 and v4 section, whereas modifications to ESET endpoint products must be made in the Windows desktop v5 section.
- If ESET File Security or ESET Mail Security version 4.5 or later is installed on a client, that client will receive modifications made in the Windows server v4.5 section, however all earlier versions of ESET File Security and ESET Mail Security will receive modifications made in the Windows product line v3 and v4 section.
Time-limited policy rules
ERA 5.3 allows you to create time-limited policy rules in order to have the rules applied within desired time range.
- In the Policy Manager switch to the Policy Rules tab
- Create a new rule by clicking New Rule → Create new… or select an existing rule and then click Edit Client Filter Parameters… in the right-side menu
- Click Edit next to the Client filter parameters field in case you created a new rule in the previous step and the Rule Editor would show up.
- In the Rule Editor scroll down to Server Local Time IN (specify) and check its checkbox
- In the Parameters field click the (specify) link to open the Rule Condition window
- From the drop-down menu select the desired day (default value of the drop-down menu is “Every day”) and set the start and end time when the rule shall be applied and click Add. Repeat this step for every single day you wish the rule to be applied.
- Click OK in all open windows related to editing the policies. When the application asks you whether to save the policy rule changes you made or not, click Yes.
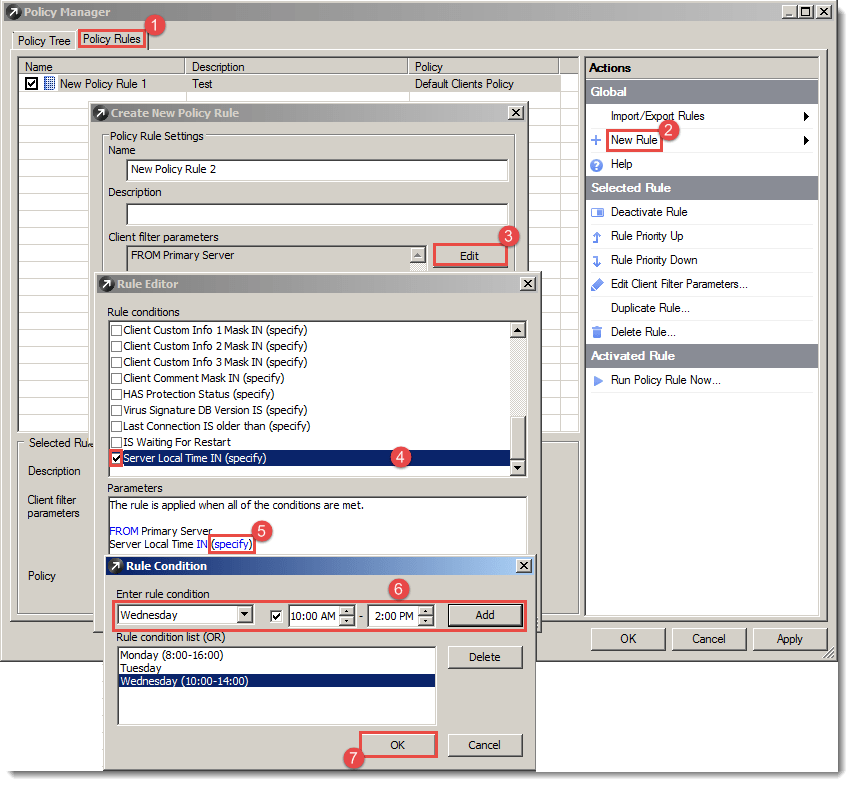
Figure 1-6
Click the image to view larger in new window
Troubleshooting
To examine the current configuration of a client and verify whether changes you are making in Policy Manager are taking effect, right-click a client in the Clients tab of the ERAC and then select Configuration → View from the context menu.
If changes made in Policy Manager do not appear to be taking effect, verify the following:
- The client(s) you want to modify have checked in to ERA since you saved policy modifications
- The Actual Policy Name field displays the correct policy to which changes have been made
- All modifications have been made in the section of the policy that corresponds to the ESET product installed on the client(s)
- The configuration items you want to adjust are marked in the correct policy.