

Issue
- You do not have an appropriate database for your ESET PROTECT Server installation
- You want to set up a dedicated database user for MS SQL or MySQL
Details
The creation of an Administrator or root account is required as part of MS SQL or MySQL installation. It is not recommended to use sa / root (database administrator) account for ESET PROTECT Server to connect the database. You should create a dedicated database user as well as a dedicated database.
Solution
- Create a database and user for ESET PROTECT in MS SQL
- Create a database and user for ESET PROTECT in MySQL
Create a database and user for ESET PROTECT in MS SQL
Prerequisites:
- You must have administrative access to the operating system.
- A supported MS SQL Server must be installed and properly configured on Windows (in this example, SQL Server 2019 is used).
- Microsoft SQL Server Management Studio must be installed.
- You must have an administrative account in MS SQL and in Microsoft SQL Server Management Studio.
Create a database:
- Open the MS SQL Server Management Studio and log in with your Administrator account.
- In Object Explorer right-click Databases and select New Database… from the context menu.
- Type the database name in the Database name text box. You will need this name during the ESET PROTECT installation. For example, you can use the default ESET PROTECT database name
era_db. - Click OK and continue to the next section to assign a new user to your database.
Create and assign new user:
- Open MS SQL Server Management Studio and log in with your Administrator account.
- In Object Explorer, right-click Security → New → Login…
- Type the username of your new user in the Login name field. For example, you can use the default ESET PROTECT database username
era_user. - Select SQL Server authentication.
- Set your new password and type it in the Password and Confirm password fields. You can also set other properties here, but it is not required.
- Select User Mapping and select the check box next to the database you created. Your username should appear in the column User next to the database you selected.
- Select the check box next to db_owner in the Database role membership section. Click OK to save your changes.

Figure 1-1
Create a database and user for ESET PROTECT in MySQL
Prerequisites:
- You must have administrative access to the operating system.
- A supported MySQL Server must be installed and properly configured on Windows.
- You must have an administrator account in MySQL.
- In this article, we use HeidiSQL as our administration tool. You can use a different tool or the command line to achieve the same results, however some steps may differ according to the tool you use.
Create a database:
- Open your MySQL administration tool and log in to the local database using the root account and password. Set the Hostname as 127.0.0.1.
- Click Open to open your session. Right-click the database root and select Create new → Database from the context menu.
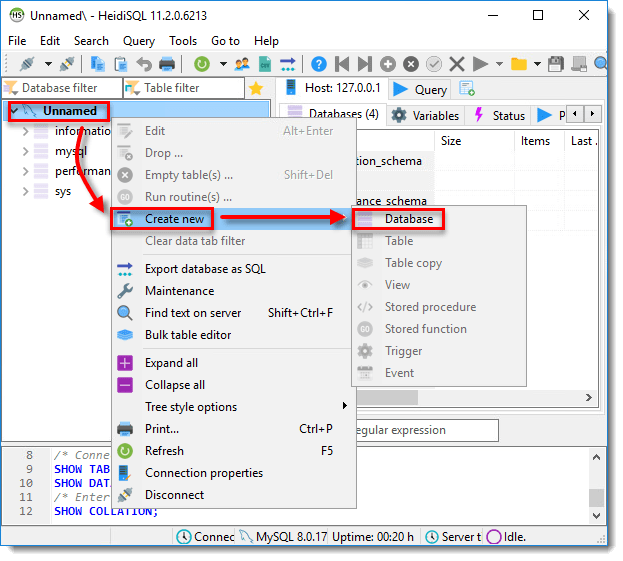
Figure 2-1
- Enter a name for your database. For example, you can use the default ESET PROTECT database name
era_db. Click OK.
Create and assign new user:
- Open your MySQL administration tool and log in to the local database using a root account.
- Set the Hostname to 127.0.0.1.
- Click Tools → User manager.
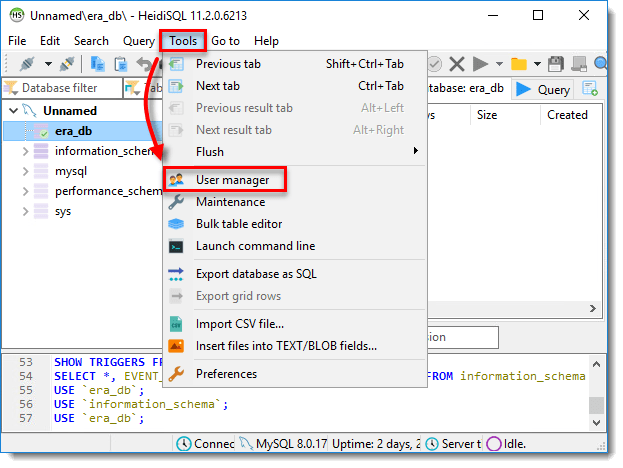
Figure 2-2
- Click Add and provide the details about the new database user:
- Type name of new user into the Username field. For example, you can use the default ESET PROTECT database username
era_user. - Set the From host value to Access from everywhere (%).
- Set a secure password in the Password and Repeat password text boxes.
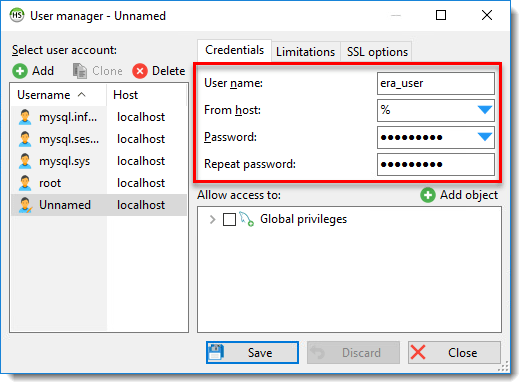
Figure 2-3
- Type name of new user into the Username field. For example, you can use the default ESET PROTECT database username
- Click Add object, select the database you created earlier, and then click OK.
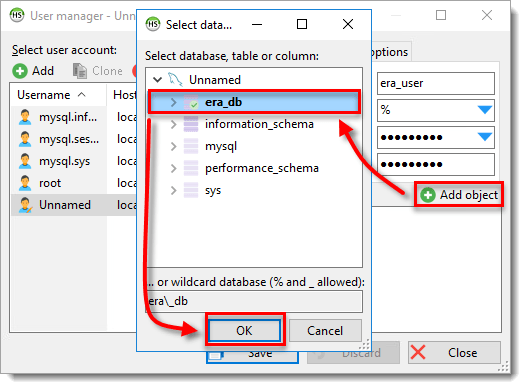
Figure 2-4
- Under Allow access to, select the new database and mark the following properties:
- EXECUTE
- SELECT
- ALTER
- ALTER ROUTINE
- CREATE
- CREATE ROUTINE
- CREATE TEMPORARY TABLES
- CREATE VIEW
- DELETE
- DROP
- INDEX
- INSERT
- TRIGGER
- UPDATE
- LOCK TABLES
Click Save to confim the user settings.

Figure 2-5
- Click Clone. For the newly copied user, change the value of From host to Access from server location only (localhost) and then click Save.

Figure 2-6
In the end, you have two users with the same name – a user with access from anywhere and a user with localhost access only.
Last Updated: Jul 28, 2021
(Visited 47 times, 1 visits today)