

Issue
- Use Apache HTTP Proxy to distribute detection engine and program module updates to client workstations and reduce internet traffic generated by your network.
- Use Apache HTTP Proxy to distribute ESET product installation packages to the ESET Remote Administrator Agent (ERA Agent).
- Apache HTTP Proxy replaces the mirror server functionality from version 5.x of ESET Remote Administrator. Mirror Tool is available in ERA 6.x as an alternative, especially for offline environments.
- Install using
- ERA All-in-one installer
- Install manually
- Configure policy settings for client computers
Details
Install Apache HTTP Proxy on your network to automatically distribute detection engine updates and program component updates to client workstations. This arrangement allows for an additional layer of security—clients that are protected by a firewall and/or cannot download updates directly from ESET servers can download normal updates from a protected server configured to communicate securely with ESET servers. This arrangement limits exposure to threats for client workstations. For client computers on your network to receive updates from Apache HTTP Proxy, their update settings must be edited.
It is recommended to install Apache HTTP Proxy when more than 37 workstations are managed on your network by ESET Remote Administrator.
Currently, setting up Apache HTTP Proxy is the primary method for caching detection engine update files. Users who attempt to set up a local repository on the ESET Remote Administrator Server may receive the following error:
- “Error: CRepositoryModule [Thread d4c]: GetFile: Object ‘https://plgli2sm01/Repo//info.meta’not found”.
Until this option is supported in a future version of ESET Remote Administrator, the instructions in this article are recommended.
Solution
Install Apache HTTP Proxy using All-in-one installer
- Visit the ESET Remote Administrator Download Page and download the appropriate All-in-one installer for your system architecture and save it in your preferred location.
- Double-click the installer file to run the All-in-one installer.
- Select Install/Upgrade Apache HTTP Proxy (mirror replacement) and click Next.
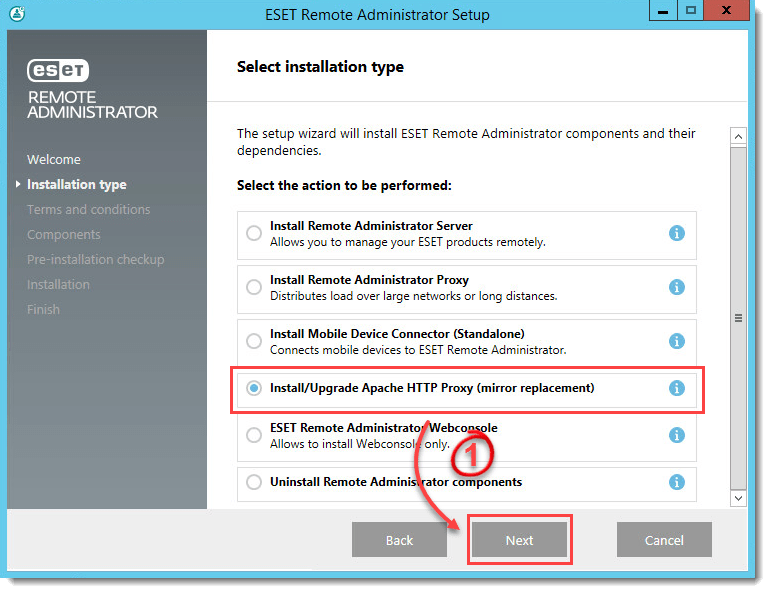
Figure 1-1
- Click Next if you agree to the terms of the license agreement.
- Click Install. The message “Apache HTTP Proxy installation was successful” will be displayed. Click Finish to close the installer.

Figure 1-2
- Configure policy settings for client computers.
Install Apache HTTP Proxy manually
Click to jump to the instructions to manually upgrade Apache HTTP Proxy
- On the server where you want to install Apache HTTP Proxy, click the link below to download the Apache HTTP Proxy installer file:Download Apache HTTP Proxy
- Use a tool such as WinZip or 7Zip to extract the .zip file that you downloaded in step 1 to the directory C:\Program Files\Apache HTTP Proxy.
- Open an administrative command prompt and execute the following commands in the order shown below to install Apache HTTP Proxy:
CD C:\Program Files\Apache HTTP Proxy\bin
httpd.exe -k install -n ApacheHttpProxy
- Navigate to C:Program FilesApache HTTP Proxyconf, locate the httpd.conf file and open it using a text editor such as Notepad.
When upgrading, the originalhttpd.confconfiguration cannot be applied because of the presence of new settings. To apply custom changes (if any), open your original, backed-uphttpd.conffile and append the custom changes to the newhttpd.confmanually. - At the bottom of the .conf file, add the following lines:
ServerRoot "C:\Program Files\Apache HTTP Proxy"
DocumentRoot "C:\Program Files\Apache HTTP Proxy\htdocs"
Options Indexes FollowSymLinks
AllowOverride None
Require all granted
CacheRoot "C:\Program Files\Apache HTTP Proxy\cache"
- Open an administrative command prompt and execute the following command to start the Apache HTTP Proxy service.
sc start ApacheHttpProxy
- To verify that the Apache HTTP Proxy service is running, press the Windows key
 + R on your keyboard, type Services.msc and make sure that the ApacheHttpProxy service is started. Select the service and click Stop before you continue to the next step.

Figure 2-1
Click the image to view larger in new window
- If you want to configure a username and password, navigate back to C:\Program Files\Apache HTTP Proxy\conf, open
httpd.confusing a text editor such as Notepad, and then follow the steps below to configure a username and password for Apache HTTP Proxy.-
- Verify the presence of the following modules loaded in httpd.conf:
LoadModule authn_core_module modules/mod_authn_core.dll

LoadModule authn_file_module modules/mod_authn_file.dll

LoadModule authz_groupfile_module modules/mod_authz_groupfile.dll

LoadModule auth_basic_module modules/mod_auth_basic.dll
- Verify the presence of the following modules loaded in httpd.conf:
-
- Add the following lines to httpd.conf under :
AuthType Basic

AuthName "Password Required"

AuthUserFile password.file

AuthGroupFile group.file

Require group usergroup
- Add the following lines to httpd.conf under :
-
- Open an administrative command prompt and execute the following commands to define your password for Apache HTTP Proxy:
CD C:\Program Files\Apache HTTP Proxy\bin
htpasswd.exe -c ..\password.file usernameYou will be prompted to define the password that you want to use for Apache HTTP Proxy. Type your new password into the command prompt and press Enter.
- Open an administrative command prompt and execute the following commands to define your password for Apache HTTP Proxy:
-
- In the folder
C:\Program Files\Apache HTTP Proxy, create a new text file named group.file with the following contents:usergroup:username
- In the folder
-
- Press the Windows key + R on your keyboard, type
Services.msc,select the ApacheHttpProxy service and click Start. - Test the connection to HTTP Proxy by accessing the following URL in your browser:
http://localhost:3128/index.html
When troubleshooting, see the following file to find errors:
C:\Program Files\Apache HTTP Proxy\logs\error.log
- Create a policy that will configure client computers and ESET Remote Administrator Agent to download updates and other files from Apache HTTP Proxy.
Manual upgrade of Apache HTTP Proxy
- Back up the following files:
- C:\Program Files\Apache HTTP Proxy\conf\httpd.conf
- C:\Program Files\Apache HTTP Proxy\password.file
- C:\Program Files\Apache HTTP Proxy\group.file
- Stop the ApacheHttpProxy service by opening an administrative command prompt and executing the following command:
sc stop ApacheHttpProxy - Download the Apache HTTP Proxy installer file and extract its content to the directory of C:\Program Files\Apache HTTP Proxy\ overwriting the existing files.
- Navigate to C:\Program Files\Apache HTTP Proxy\conf\, right-click httpd.conf, from the context menu select Open with→Notepad.
- Add the following code at the bottom of that .conf file:
ServerRoot "C:\Program Files\Apache HTTP Proxy"DocumentRoot "C:\Program Files\Apache HTTP Proxy\htdocs"Options Indexes FollowSymLinksAllowOverride NoneRequire all grantedCacheRoot "C:\Program Files\Apache HTTP Proxy\cache" - If you set username / password authentication to access your Apache HTTP Proxy earlier (step number 8 in the installation section above), then replace the following block of code:
Deny from allwith the following (it can be found in your backed-up httpd.conf file):
AuthType Basic

AuthName "Password Required"

AuthUserFile password.file

AuthGroupFile group.file

Require group usergroup

Order deny,allow

Deny from all

Allow from all
- If you had any other custom modifications in the httpd.conf file of your previous installation of Apache HTTP Proxy, then you can copy over those modifications from the backed-up httpd.conf file to the new (upgraded) httpd.conf file.
- Save the changes and Start the the ApacheHttpProxy service by executing the following command in an administrative command prompt:
sc start ApacheHttpProxy
- Test the connection to HTTP Proxy by accessing the following URL in your browser:
- Configure policy settings for client computers.
Configure policy settings for client computers
- Open ESET Remote Administrator Web Console (ERA Web Console) in your web browser and log in.
- Click Admin
 → Policies → New Policy.

Figure 3-1
- Type a name for your new policy into the Name field. Optionally, you can type a description into the appropriate field.
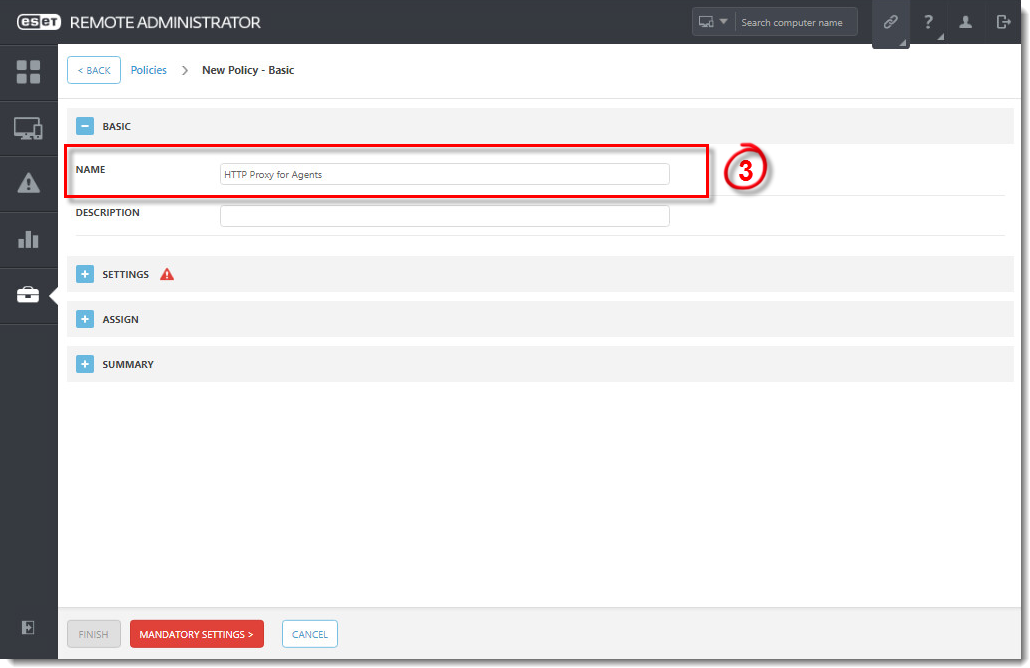
Figure 3-2
- Expand Settings and select ESET Remote Administrator Agent from the drop-down menu.

Figure 3-3
- Expand Advanced Settings, enable Use proxy server under HTTP Proxy and then type the IP address or fully qualified domain name (FQDN) of the server where Apache HTTP proxy is installed into the Host field. Type the username and password that you configured above (Method II. step 8) into the appropriate fields.
- Click Finish.
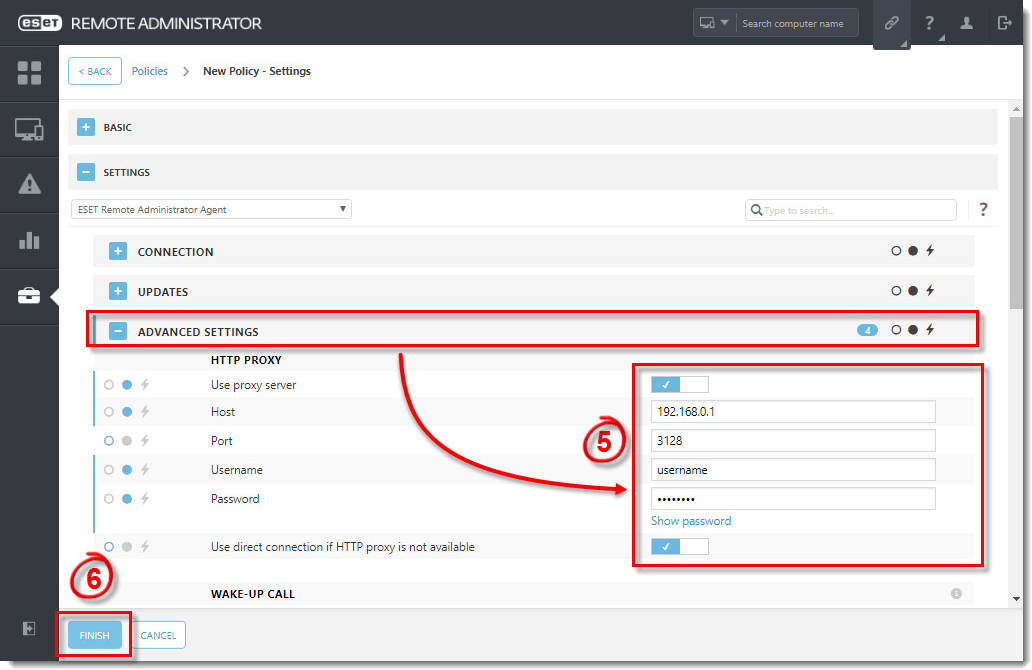
Figure 3-4
- Select the policy that you just created and click Assign Groups.
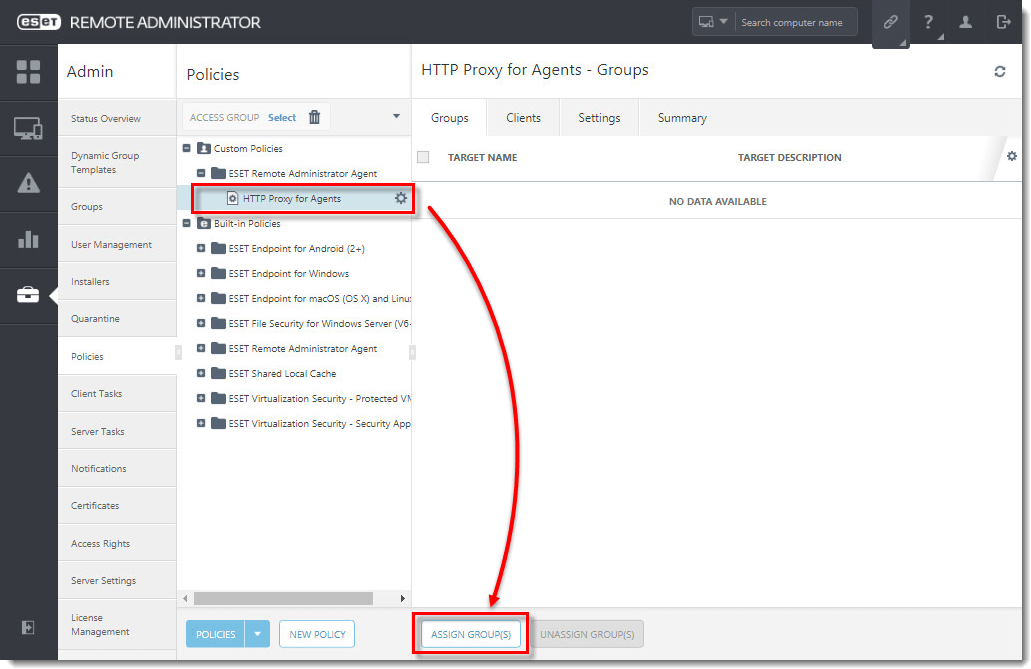
Figure 3-5
- Select All (or select the groups that you want to receive updates from Apache HTTP Proxy) and click OK.
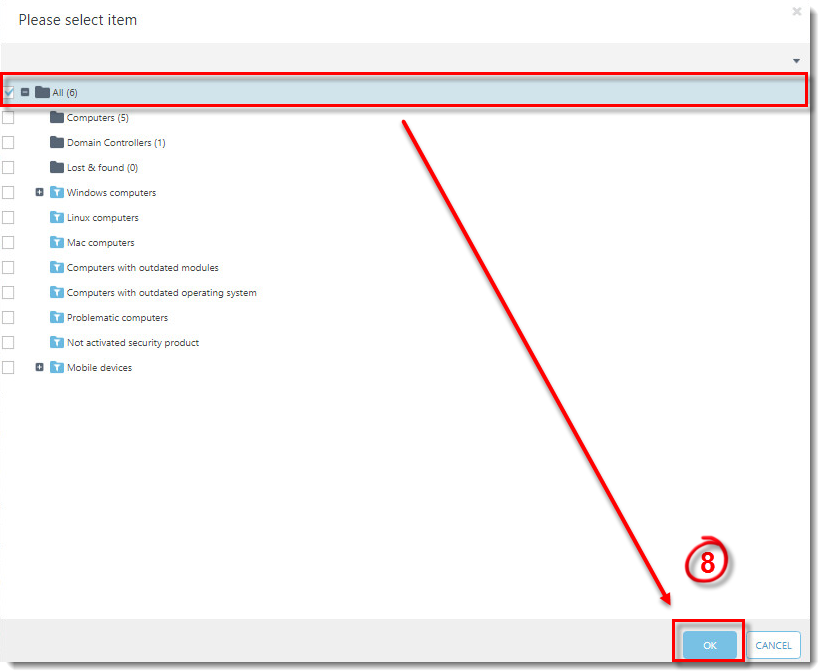
Figure 3-6
- Repeat steps 1-3 and then expand Settings and select ESET Endpoint for Windows or ESET Endpoint for macOS (OS X) and Linux (depending on which products are installed on your client computers).
- Click Tools → Proxy Server and configure the proxy settings.
- Click Finish.
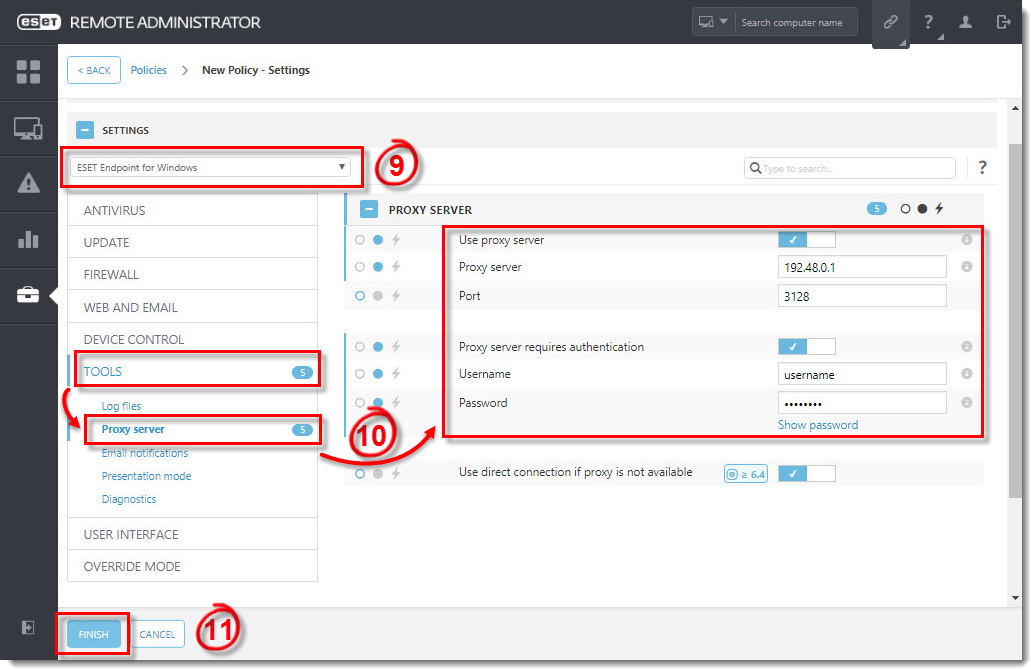
Figure 3-7