

Issue
- ESET Remote Administrator Web Console (ERA Web Console) does not load
- You receive the message “Cannot access page”
- You need to reinstall Apache Tomcat 7
Solution
If ESET Remote Administrator Web Console (ERA Web Console) will not start, or if the login screen appears to load constantly without opening, follow the instructions below. Start with part I and only continue to the next part if the issue is not resolved.
I. Restart the services for ESET Remote Administrator Server and Apache Tomcat
- Try using a different browser to access ESET Remote Administrator Web Console. If you are using Internet Explorer, make sure you have the latest version.
- Restart the ERA Server service.
- Restart the Apache Tomcat service.
- Attempt to open the ESET Remote Administrator Web Console (6.x).
If the ERA Web Console login screen does not load successfully, continue to part II.
II. Check for port conflicts
- Press the
 Windows key + R, type cmd into the field and click OK to open a command prompt. Type the following command:
netstat –aobn

Figure 2-1
- Verify that Tomcat7.exe is listening on port 443 or 8443. How do I change the port used by the ESET Remote Administrator Web Console? (6.x)
- Attempt to open the ESET Remote Administrator Web Console (6.x).
If the ERA Web Console login screen does not load successfully, continue to part III.
III. Uninstall and Reinstall Apache Tomcat 7 and generate a new keystore
To uninstall Apache Tomcat:
- Click Start → Control Panel → Uninstall a program.
- Select Apache Tomcat 7.0 Tomcat7 (remove only) and click Uninstall/Change.
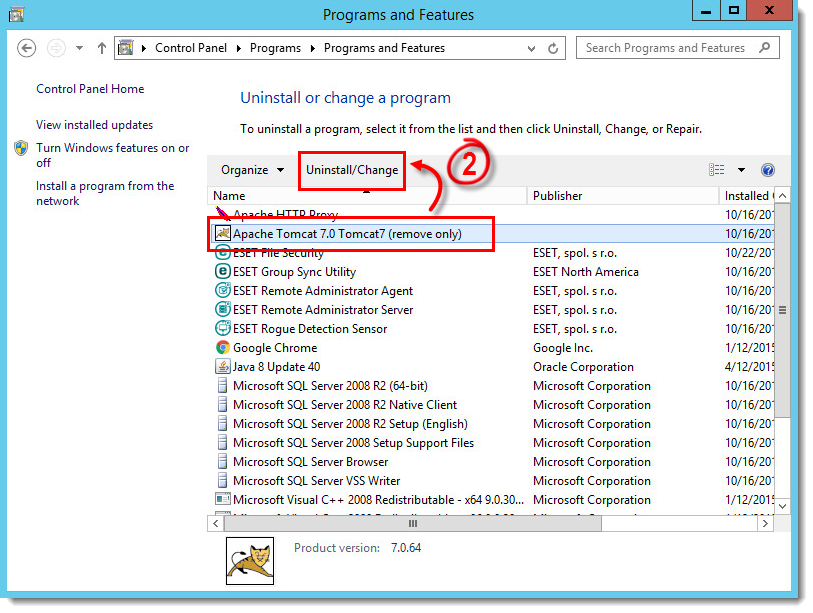
Figure 3-1
To reinstall Apache Tomcat:
- Reinstall Apache Tomcat 7 by navigating to the original location to which you downloaded the ESET Remote Administrator Setup package (in this example,
C:\Desktopx64). - Open the installers folder and double-click apache-tomcat-7.0.xx (exe).

Figure 3-2
- Follow the instructions in the setup wizard to install Apache Tomcat.
- In the Choose Components screen, choose Normal or Minimal.
- In the Configuration options screen, click Next.
- Navigate to the Java Runtime (JRE) installer saved on your system (you must use Java SE 6.0 or later) and click Next.
- Choose your desired installation folder and click Install.
- Navigate to the
binfolder in the currentJavadirectory (for example,C:Program Files (x86)Javajre1.8.0_91in>) in the command line and run the following command after substituting your values for bin folder, password and certificate information. (See the Important note below for more information)keytool.exe -genkey -alias "tomcat" -keyalg RSA -keysize 4096 -validity 3650 -keystore "C:\Program Files (x86)\Apache Software Foundation\Tomcat 7.0\tomcat.keystore" -storepass "yourpassword" -keypass "yourpassword" -dname "CN=Unknown, OU=Unknown, O=Unknown, L=Unknown, ST=Unknown, C=Unknown" - Open the server.xml file located at the following path:
C:\Program Files(x86)\Apache Software Foundation\Tomcat 7.0\conf\server.xml - Search or scroll until you find and edit the area for connector ports by pasting the following code in server.xml:
443" />

443" maxHttpHeaderSize="8192" maxThreads="150" minSpareThreads="25" maxSpareThreads="75" enableLookups="false"
disableUploadTimeout="true" acceptCount="100" scheme="https" secure="true" SSLEnabled="true" clientAuth="false" sslProtocol="TLS"
keyAlias="tomcat" keystoreFile="C:\YOUR_LOCATION_OF_KEYSTORE\tomcat.keystore" keystorePass="YOURPASSWORD"/>
- In the following location, create a new folder and name it era:
C:\Program Files(x86)\Apache Software Foundation\Tomcat 7.0\webapps - Change the file name era.war (from the era installer folder) to era.zip.
- Extract the era.zip files to the following location:
C:\Program Files(x86)\Apache Software Foundation\Tomcat 7.0\webapps\era - Start the Apache Tomcat service.
- Set the Apache startup type service to Automatic.
- Attempt to open the ESET Remote Administrator Web Console.
If the ERA Web Console login screen does not load successfully, visit the Related links below or contact ESET technical support.