

Solution
Introduction
This article describes how to configure a Cisco® ASA SSL VPN device to authenticate users against an ESA Server. Before proceeding, verify that you’ve installed the RADIUS Server component of ESET Secure Authentication and can access the RADIUS service that allows external systems to authenticate users.
Before your Cisco® ASA SSL VPN device can use the ESA Server to authenticate users via RADIUS, it must be set up as a RADIUS client on the ESA Server. Next, your server running the ESA RADIUS service must be setup as a RADIUS Server on the Cisco® ASA SSL VPN device. Once these configurations have been specified, you can start logging into your Cisco® ASA SSL VPN device using ESA OTPs.
Step I – RADIUS client configuration
To allow the Cisco® ASA SSL VPN device to communicate with your ESA Server, you must configure the Cisco® ASA SSL VPN device as a RADIUS client on your ESA Server:
- Log in to ESA Web Console.
- Navigate to Components > RADIUS and locate the hostname of the server running the ESA RADIUS service.
- Click the hostname, then click Create New Radius Client.
- In the Basic Settings section:
- Give the RADIUS client a memorable name for easy reference.
- Configure the IP Address and Shared Secret for the Client so that they correspond to the configuration of your VPN appliance. The IP address is the internal IP address of your appliance. If your appliance communicates via IPv6, use that IP address along with the related scope ID (interface ID).
- The shared secret is the RADIUS shared secret for the external authenticator that you will configure on your appliance.
- In the Authentication section apply the settings shown in Figure 1-1 below.
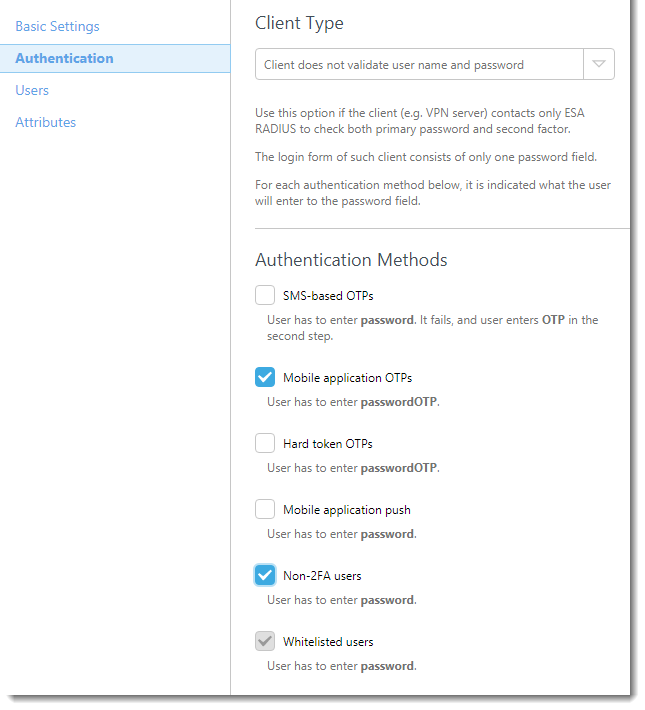
Figure 1-1
ESA has now been configured to communicate with the Cisco® ASA SSL VPN device. You must now configure the Cisco® ASA SSL VPN device to communicate with the ESA Server.
Step II – Configure your Cisco® ASA device
Follow the steps below:
- Log into your Adaptime Services Device Manager.
- Navigate to Configuration → Remote Access VPN.
- Click Clientless SSL VPN → Connection Profiles and ensure that the check box below Allow access is selected on the relevant interface (see Figure 2-1, step 1).
- Click Add under Connection Profiles (see Figure 2-1, step 2).
- Navigate to the Basic tab of the Add Clientless Remote Access Connection Profile window.
- Type a name for your connection profile (for example, ESA).
- Ensure that the authentication method is set to AAA only.
- Click Manage in the Authentication section and define a new service group:
- Click Add under AAA Service Groups.
- Enter a name for the new group (for example, ESA-RADIUS), ensure that the protocol is set to to RADIUS and click OK.
- Select your Server Group and click Add in the Servers in selected group panel.
- Set the following parameters to the values shown below (see Figure 2-2):
- Interface Name: The ASA interface on which your ESA RADIUS server may be reached
- Server Name or IP Address: The hostname/IP address of your ESA RADIUS server
- Timeout: 30 seconds
- Server Authentication Port: 1812
- Server Account Port: N/A since ESA does not support RADIUS accountint, but set to 1813
- Retry Interval: 10 seconds
- Server Secret Key: Your RADIUS server shared secret (see Figure 1-1)
- Microsoft CHAPv2 Capable: Not selected
- Click OK
- Click OK
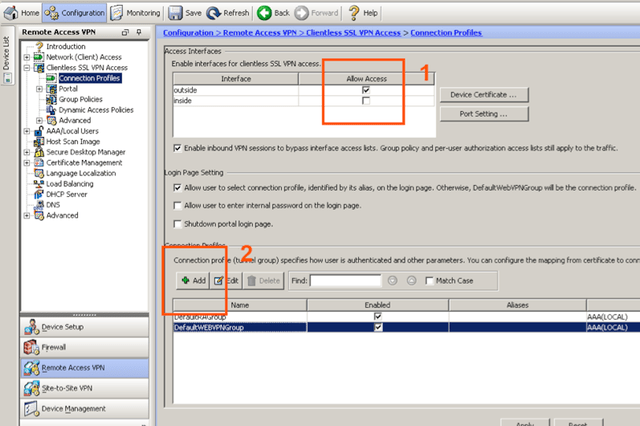
Figure 2-1
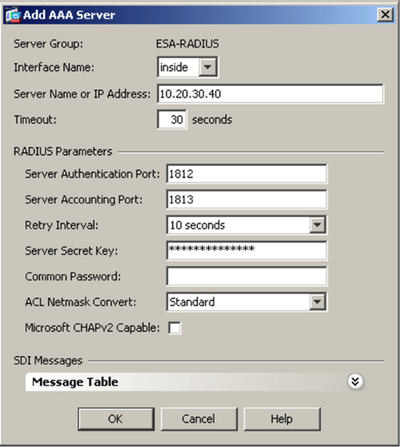
Figure 2-2
Step III – Test the connection
To test the newly configured connection:
- Connect to your ASA VPN using an account with Mobile Application 2FA using ESA enabled. When prompted for a password, append the OTP generated by the Mobile Application to your AD password. For example, if the user has an AD password of Esa123 and an OTP of 999111, type Esa123999111.
Troubleshooting
If you are unable to authenticate via the ESA RADIUS server, ensure you have performed the following steps:
- Run a smoke test against your RADIUS server, as per Verifying ESA RADIUS Functionality.
- If no faults were fixed and you are still unable to connect, revert to an existing sign-in configuration (that does not use 2FA) and verify that you are able to connect
- If you are still able to connect using the old settings, restore the new settings and verify that there is no firewall blocking UDP 1812 between you VPN device and your RADIUS server
- If you are still unable to connect, contact ESET technical support.
Editor by : BEST Antivirus KBS Team