

Issue
- Create multiple firewall profiles for use on different networks (for example, public Wi-Fi or corporate LAN)
- Automatically switch between profiles when you enter or leave a trusted network, subnet or
- Enable automatic switching for Personal firewall settings
Details
In ESET Endpoint Security, you can define firewall rules and exceptions that are specific to a firewall profile. Used in combination with the Zone and Rule editor, this allows you to have ESET Endpoint Security automatically switch to a more or less secure profile when traveling between multiple networks.
For example, if you travel to and from work and access public networks while out of the office, but do not require the use of certain rules while at your office, you can create profiles for office and public use. When ESET Endpoint Security detects the IP address from your office network, it will only enforce the rules included in your office profile. When you access a public network with a different IP address, ESET Endpoint Security will automatically switch to your public profile and enforce the rules that you have in place for that profile.
Solution
- Define your zone
- Create your Personal firewall profile
I. Define your zone
- Open ESET Endpoint Security. How do I open my ESET Product?
- Click Setup → Network → Configure rules and zones.
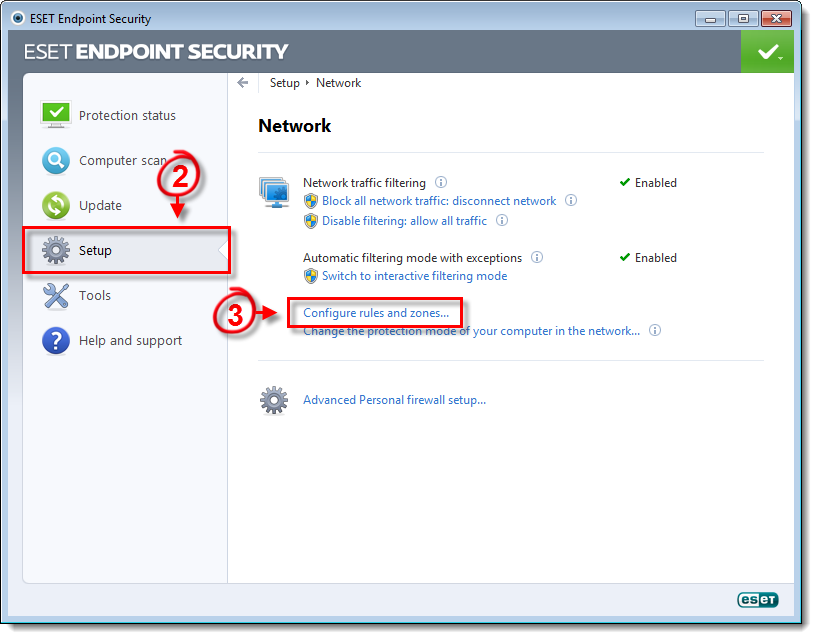
Figure 1-1
Click the image to view larger in new window
- Click the Zones tab, click New and type a name for this zone into the Name field.

Figure 1-2
Click the image to view larger in new window
- Click the Zone authentication tab and select the check box next to IP addresses/Subnets in the zone will become valid after successful authentication in the network (see Figure 1-3).
- Make sure that By local network configuration is selected under Authentication type and then click Setup.

Figure 1-3
- If multiple networks are available (for example, wireless and wired connections), select the network you want to create a zone for from the Adapter configuration to fulfill drop-down menu. Click Populate with selected connection settings to automatically detect the settings from your current connection, or define your settings manually if you want to use a custom configuration and then click OK.

Figure 1-4
Click the image to view larger in new window
- Click OK again to close the Zone setup window. Your new Zone will be displayed in the Zones tab. Click OK to save your changes and close the Zone and rule setup window.
- To add additional zones, repeat steps 2-7 above. Continue to Part II to create your Personal firewall profile
II. Create your Personal firewall profile
- Open the main program window by double-clicking the ESET icon
 in your Windows notification area or by clicking Start → All Programs → ESET → ESET Endpoint Security.
 - Click Setup → Network.
- Click Advanced Personal firewall setup.

Figure 2-1
Click the image to view larger in new window
- Click Profiles under the Firewall user profiles section and then click Add in the dialog window.
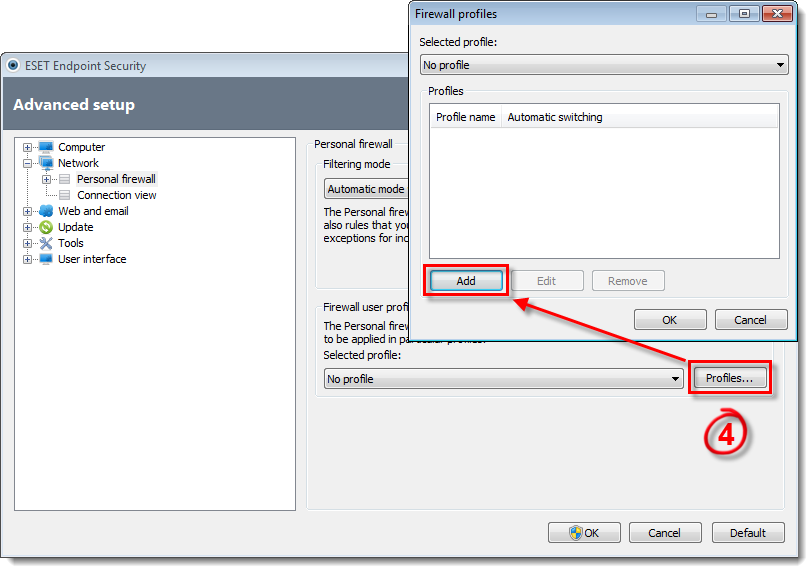
Figure 2-2
Click the image to view larger in new window
- Type a name for your new profile into the Profile name field.
- Select the radio button next to If this zone is authenticated and use the drop-down menu to select the trusted zone that you created in part I. Click OK.
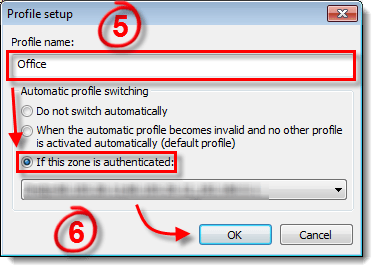
Figure 2-3
- Select your new profile from the Selected profile drop-down menu to associate it with the trusted zone that you selected. Click OK.
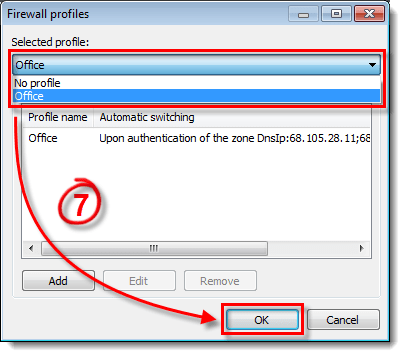
Figure 2-4
- Select Interactive mode from the Filtering mode drop-down menu and click OK to close Advanced setup.
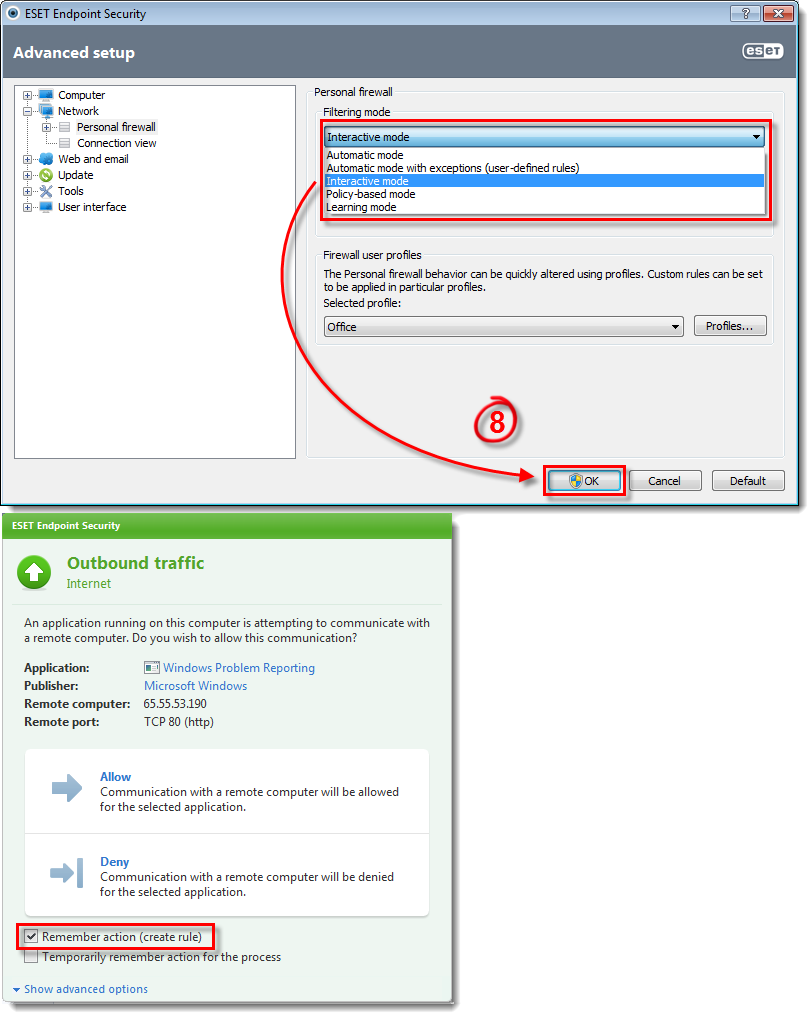
Figure 2-5
Click the image to view larger in new window
Any time that a new communication is intercepted by the Personal firewall, you will be prompted to allow or deny it. Select the check box next to Remember action (create rule) to have ESET Endpoint Security create a new Personal firewall rule for the profile based on your decision.
- When you have created the rules that you want to use with this profile, click Setup → Network → Switch to automatic filtering mode with exceptions. When your network settings change to match those you specified in part 1, you will receive a notification that your Personal firewall profile has changed and the rules that you have created for this profile will be applied. To add additional profiles, repeat steps 2-8 above.

Figure 2-6

Figure 2-7
Click the image to view larger in new window