

This article will help you to install a G DATA client application on a Linux or Mac client.
There are two ways to install the G DATA Security Client for Linux or Mac; eitherremotely from the G DATA Administrator, or locally via an installation script
A. How to install the client for Linux or Mac remotely
To allow the remote installation of the client, a couple of prerequisites has to be met:
– A root password must be set for the operating system.
– There needs to be an SSH server installed and running.
– The SSH server needs to allow password-based authentication and root logins.
If it isn’t the case yet, open the SSH daemon configuration file (typically /etc/ssh/sshd_config) and set PermitRootLogin and PasswordAuthentication to yes.
– DNS name resolution must be functioning for both the ManagementServer and the client.
Now you can install the client as follows:
Step 1. Open G DATA Administrator. Right click on any group of clients in the menu on the left side and choose “Enable client“.
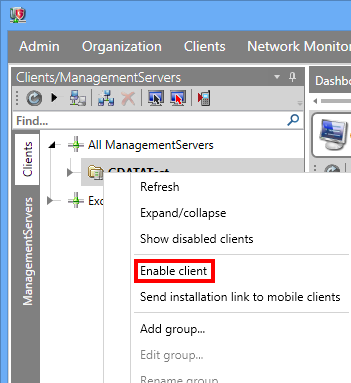
Step 2. Enter the hostname or IP address of the client you wish to add. Click OK.

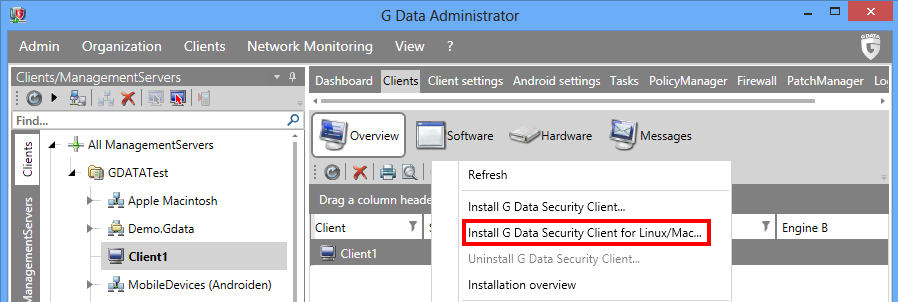
Step 3. The new client will appear in the list of clients on the left side.
Click on it. Now go to Clients then Overview.
Step 4. In the Overview tab, right click on the client then choose “Install G DATA Security Client for Linux/Mac“.
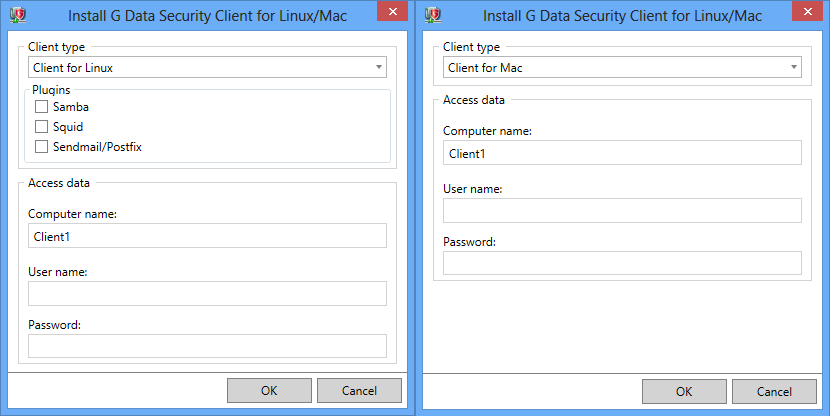
Step 5. Select one of two client types: Client for Linux or Client for Mac.
For Linux, additional modules can be installed.
To get an overview of these different modules, check the following section of our Reference Guide: 4.8.3.3. Additional modules.
Click here to download the latest version of our Reference Guide
Now enter the User name and Password for an account with root permissions on the client, then click OK.
Step 6. Wait for the client to be installed.

B. How to install the client for Linux or Mac locally via an installation script
Step 1. First you’ll have to download the repositories needed for the client installation on the ManagementServer side.
Open a web browser on the ManagementServer, and enter the following link:
“https://localhost/gdata/mms/api/linux/query?Distribution”
Where:
Distribution is the name of the Linux or Mac distribution
For Mac this value has to be Darwin
For Linux it has to be one of the following values:
| CentOS6 | CentOS7 | Debian6 | Debian7 | Debian8 | Fedora19 |
| Fedora20 | Fedora21 | Fedora22 | Fedora23 | openSUSE11.4 | openSUSE12.2 |
| openSUSE12.3 | openSUSE13.1 | openSUSE13.2 | openSUSE42.1 | SUSE10 | SUSE11 |
| SUSE12 | Ubuntu10.04 | Ubuntu12.04 | Ubuntu14.04 | Ubuntu16.04 |
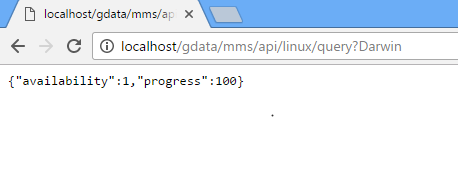
You will see one of the following messages:
{“availability”:2,”progress”:X} : This means that the repositories are being downloaded
{“availability”:3,”progress”:0} : This means that the distribution is not supported
Wait and refresh the page until the message becomes the following:
{“availability”:1,”progress”:100} : This means that the repositories are available on the server
Note: If you have changed the default HTTPS port for clients, you will have to specify this same port in the link.
This port can be changed by altering the value “ClientHttpsPort” in the file “Config.xml” (by default in C:\Program Files (x86)\G DATA\G DATA AntiVirus ManagementServer).
For example, if you have changed the port to 8443, the link should be: “https://localhost:8443/gdata/mms/api/linux/query?Distribution“
If there is an issue with the download of the repositories, proceed as follows:
Delete the content of the following folder:
C:\ProgramData\G DATA\AntiVirus ManagementServer\LinuxRepo
Restart the service G DATA ManagementServer or reboot the computer.
Try to download the repositories again.
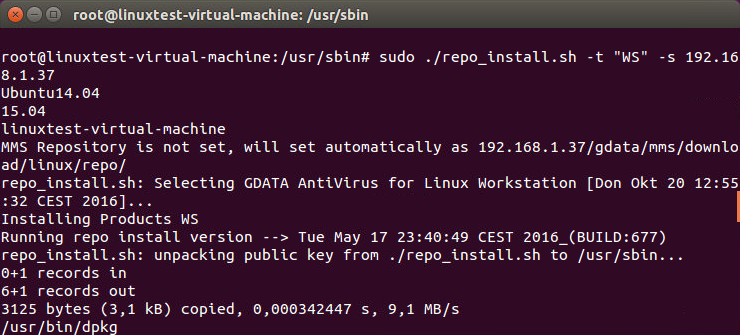
Step 2. On the Linux or Mac client, open a command prompt and elevate the user privileges by entering the command “su” then the root password.

Step 3. Download the installation script from the ManagementServer via the following command:
For Linux:
“wget http://server_name_or_ip/gdata/mms/download/linux/repo/reposrc/repo_install.sh”
For Mac:
“curl -O http://server_name_or_ip/gdata/mms/download/linux/repo/reposrc/repo_install.sh”
Where:
server_name_or_ip is the hostname or ipaddress of the ManagementServer

Step 4. Add the permission to execute the installer with the command “chmod +x repo_install.sh”.

Step 5. Start the installation with the following command:
“sudo ./repo_install.sh -t product -s server_name_or_ip”
Where:
product can have the following values:
“WS”: The basic G DATA Security Client for Linux or Mac
For Linux only:
“SMB”: Fileserver client for Samba shares
“AMAVIS”: Mail client for Sendmail/Postfix servers
“WEB”: Module for Squid web proxy
“ALL”: All of the above modules
server_name_or_ip is the hostname or ip address of the ManagementServer
e.g.: sudo ./repo_install.sh -t “WS” -s 192.168.1.37
Step 6. Wait until the installation is carried out.

Step 7. The client will appear shortly on the ManagementServer.
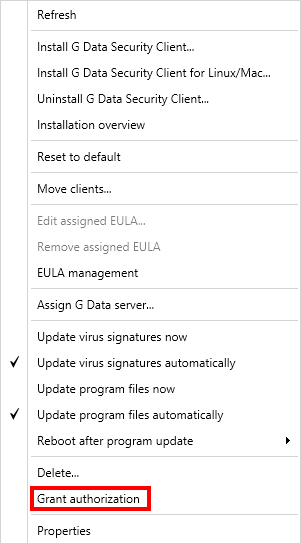
Step 8. In order to prevent unauthorized access to the ManagementServer, locally installed clients must be authorized.
From the G DATA Administrator, go to Clients > Oveview then select the freshly installed Linux or Mac client.
Right click on it and choose Grant authorization.
Step 9. (Only if you have installed one of the additional modules for Linux)
After the client has been installed, some additional tasks may have to be carried out depending on which extra modules you have installed.
To get more information about these tasks, check the following section of our Reference Guide: 4.8.3.3. Additional modules.