
Steps to be followed:
1: Login to K7 Security UTM, Click on Configuration
2: Click on the VPN Navigate to SSL-VPN Server
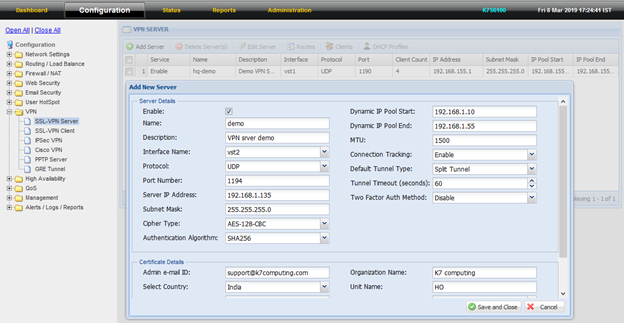
3: Click On Add server Give description
4: Select the interface name for eg : VST1
5: Select the protocol where the VPN access via UDP /TCP and provide the port number For Eg default port number 1194.
6: Provide the server IP and subnet mask and dynamic start IP and end IP.
Note: It should be different from local LAN segment.
7: Select the Cipher Type default use: AES-128-CBC
8: Select the Authentication algorithm Default: SHA1
9: Mention the MTU value Default value: 1500
10: Select tunnel Type default value: Split Tunnel.
11: Under certificate details please fill the required fields.
12: Navigate Save > Restart Services.
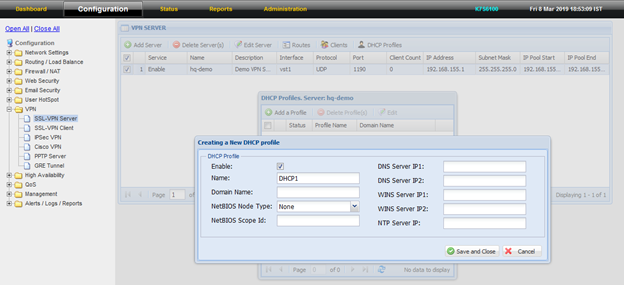
13: Click on the VPN Navigate to SSL-VPN Server – Select the server and click on DHCP Profiles.
14: Click on the VPN Navigate to SSL-VPN Server – Select the server and click on Routes.
15: Under the Add New Router please provide required fields (Network IP and subnet mask).
Note: this Lan IP address of the firewall to access through VPN Client.
16: Select the Push this route to the client.

17: Click on the VPN Navigate to SSL-VPN Server – Select the server and click on Clients-> Add client
18: Under Client details please fill the required fields.

19: Click on the VPN Navigate to SSL-VPN Server – Select the server and click on Clients-> after selecting respective client, click on routes above.
20: Select the Route Type subnet behind Client and Select Add server routing table.
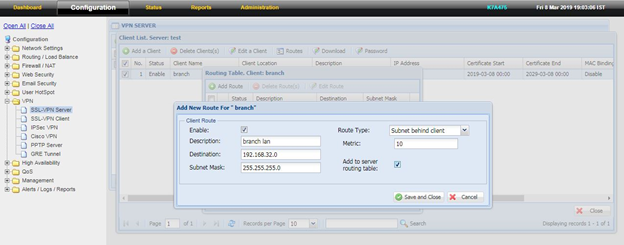
21: After making the necessary configuration, Click Save and close.
Note: If the issue persists or you need any assistance, you may raise ticket at Submit a Ticket and Our Support Team will get in touch with you shortly to assist you.