
Tip
Want to experience Defender for Endpoint? Sign up for a free trial.
Prevent further propagation of an attack in your organization by banning potentially malicious files or suspected malware. If you know a potentially malicious portable executable (PE) file, you can block it. This operation will prevent it from being read, written, or executed on devices in your organization.
There are three ways you can create indicators for files:
- By creating an indicator through the settings page
- By creating a contextual indicator using the add indicator button from the file details page
- By creating an indicator through the Indicator API
Before you begin
It’s important to understand the following prerequisites prior to creating indicators for files:
- This feature is available if your organization uses Microsoft Defender Antivirus (in active mode) and Cloud-based protection is enabled. For more information, see Manage cloud-based protection.
- The Antimalware client version must be 4.18.1901.x or later. See Monthly platform and engine versions
- Supported on devices with Windows 10, version 1703 or later, Windows Server 2019, Windows Server 2016, Windows Server 2012 R2, and Windows Server 2022.
Note
Windows Server 2016 and Windows Server 2012 R2 will need to be onboarded using the instructions in Onboard Windows servers for this feature to work.
- To start blocking files, you first need to turn on the ”block or allow” feature in Settings.
This feature is designed to prevent suspected malware (or potentially malicious files) from being downloaded from the web. It currently supports portable executable (PE) files, including .exe and .dll files. The coverage will be extended over time.
Create an indicator for files from the settings page
- In the navigation pane, select Settings > Endpoints > Indicators (under Rules).
- Select the File hashes tab.
- Select Add indicator.
- Specify the following details:
- Indicator – Specify the entity details and define the expiration of the indicator.
- Action – Specify the action to be taken and provide a description.
- Scope – Define the scope of the device group.
- Review the details in the Summary tab, then select Save.
Create a contextual indicator from the file details page
One of the options when taking response actions on a file is adding an indicator for the file. When you add an indicator hash for a file, you can choose to raise an alert and block the file whenever a device in your organization attempts to run it.
Files automatically blocked by an indicator won’t show up in the file’s Action center, but the alerts will still be visible in the Alerts queue.
Public Preview: Alerting on file blocking actions
Important
Information in this section (Public Preview for Automated investigation and remediation engine) relates to prerelease product which might be substantially modified before it’s commercially released. Microsoft makes no warranties, express or implied, with respect to the information provided here.
The current supported actions for file IOC are allow, audit and block and remediate. After choosing to block a file, you can choose whether triggering an alert is needed. In this way you will be able to control the number of alerts getting to your security operations teams and make sure only required alerts are raised.
In Microsoft 365 Defender, go to Settings > Endpoints > Indicators > Add New File Hash.
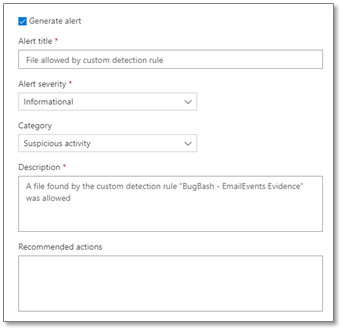
Choose to Block and remediate the file.
Choose if to Generate an alert on the file block event and define the alerts settings:
- The alert title
- The alert severity
- Category
- Description
- Recommended actions
Important
- Typically, file blocks are enforced and removed within a couple of minutes, but can take upwards of 30 minutes.
- If there are conflicting file IoC policies with the same enforcement type and target, the policy of the more secure hash will be applied. An SHA-256 file hash IoC policy will win over an SHA-1 file hash IoC policy, which will win over an MD5 file hash IoC policy if the hash types define the same file. This is always true regardless of the device group.
- In all other cases, if conflicting file IoC policies with the same enforcement target are applied to all devices and to the device’s group, then for a device, the policy in the device group will win.
- If the EnableFileHashComputation group policy is disabled, the blocking accuracy of the file IoC is reduced. However, enabling
EnableFileHashComputationmay impact device performance. For example, copying large files from a network share onto your local device, especially over a VPN connection, might have an effect on device performance.
For more information about the EnableFileHashComputation group policy, see Defender CSP.
Public Preview: Advanced hunting capabilities
Important
Information in this section (Public Preview for Automated investigation and remediation engine) relates to prerelease product which may be substantially modified before it’s commercially released. Microsoft makes no warranties, express or implied, with respect to the information provided here.
You can query the response action activity in advance hunting. Below is a sample advance hunting query:
search in (DeviceFileEvents, DeviceProcessEvents, DeviceEvents, DeviceRegistryEvents, DeviceNetworkEvents, DeviceImageLoadEvents, DeviceLogonEvents)
Timestamp > ago(30d)
| where AdditionalFields contains "EUS:Win32/CustomEnterpriseBlock!cl"
For more information about advanced hunting, see Proactively hunt for threats with advanced hunting.
Below are additional thread names which can be used in the sample query from above:
Files:
- EUS:Win32/CustomEnterpriseBlock!cl
- EUS:Win32/CustomEnterpriseNoAlertBlock!cl
Certificates:
- EUS:Win32/CustomCertEnterpriseBlock!cl
The response action activity can also be viewable in the device timeline.
Policy conflict handling
Cert and File IoC policy handling conflict will follow the below order:
- If the file is not allowed by Windows Defender Application Control and AppLocker enforce mode policy/policies, then Block
- Else if the file is allowed by the Microsoft Defender Antivirus exclusion, then Allow
- Else if the file is blocked or warned by a block or warn file IoC, then Block/Warn
- Else if the file is allowed by an allow file IoC policy, then Allow
- Else if the file is blocked by ASR rules, CFA, AV, SmartScreen, then Block
- Else Allow (passes Windows Defender Application Control & AppLocker policy, no IoC rules apply to it)
If there are conflicting file IoC policies with the same enforcement type and target, the policy of the more secure (meaning longer) hash will be applied. For example, an SHA-256 file hash IoC policy will win over an MD5 file hash IoC policy if both hash types define the same file.
Warning
Policy conflict handling for files and certs differ from policy conflict handling for domains/URLs/IP addresses.
Threat and vulnerability management’s block vulnerable application features uses the file IoCs for enforcement and will follow the above conflict handling order.
Examples
| Component | Component enforcement | File indicator Action | Result |
|---|---|---|---|
| Attack surface reduction file path exclusion | Allow | Block | Block |
| Attack surface reduction rule | Block | Allow | Allow |
| Windows Defender Application Control | Allow | Block | Allow |
| Windows Defender Application Control | Block | Allow | Block |
| Microsoft Defender Antivirus exclusion | Allow | Block | Allow |