

Note
We’ve renamed Microsoft Cloud App Security. It’s now called Microsoft Defender for Cloud Apps. In the coming weeks, we’ll update the screenshots and instructions here and in related pages. For more information about the change, see this announcement. To learn more about the recent renaming of Microsoft security services, see the Microsoft Ignite Security blog.
File Policies allow you to enforce a wide range of automated processes using the cloud provider’s APIs. Policies can be set to provide continuous compliance scans, legal eDiscovery tasks, DLP for sensitive content shared publicly, and many more use cases. Defender for Cloud Apps can monitor any file type based on more than 20 metadata filters (for example, access level, file type).
Supported file types
The Defender for Cloud Apps built-in DLP engines perform content inspection by extracting text from all common file types (100+) including Office, Open Office, compressed files, various rich text formats, XML, HTML, and more.
Policies
The engine combines three aspects under each policy:
- Content scan based on preset templates or custom expressions.
- Context filters including user roles, file metadata, sharing level, organizational group integration, collaboration context, and additional customizable attributes.
- Automated actions for governance and remediation. For more information, see Control.
Note
Only the governance action of the first triggered policy is guaranteed to be applied. For example, if a file policy has already applied a sensitivity label to a file, a second file policy cannot apply another sensitivity label to it.
Once enabled, the policy continuously scans your cloud environment and identifies files that match the content and context filters, and apply the requested automated actions. These policies detect and remediate any violations for at-rest information or when new content is created. Policies can be monitored using real-time alerts or using console-generated reports.
The following are examples of file policies that can be created:
- Publicly shared files – Receive an alert about any file in your cloud that is publicly shared by selecting all files whose sharing level is public.
- Publicly shared filename contains the organization’s name – Receive an alert about any file that contains your organization’s name and is publicly shared. Select files with a filename containing the name of your organization and which are publicly shared.
- Sharing with external domains – Receive an alert about any file shared with accounts owned by specific external domains. For example, files shared with a competitor’s domain. Select the external domain with which you want to limit sharing.
- Quarantine shared files not modified during the last period – Receive an alert about shared files that no one modified recently, to quarantine them or choose to turn on an automated action. Exclude all the Private files that weren’t modified during a specified date range. On Google Workspace, you can choose to quarantine these files, using the ‘quarantine file’ checkbox on the policy creation page.
- Sharing with unauthorized users – Receive an alert about files shared with unauthorized group of users in your organization. Select the users for whom sharing is unauthorized.
- Sensitive file extension – Receive an alert about files with specific extensions that are potentially highly exposed. Select the specific extension (for example, crt for certificates) or filename and exclude those files with private sharing level.
Create a new file policy
To create a new file policy, follow this procedure:
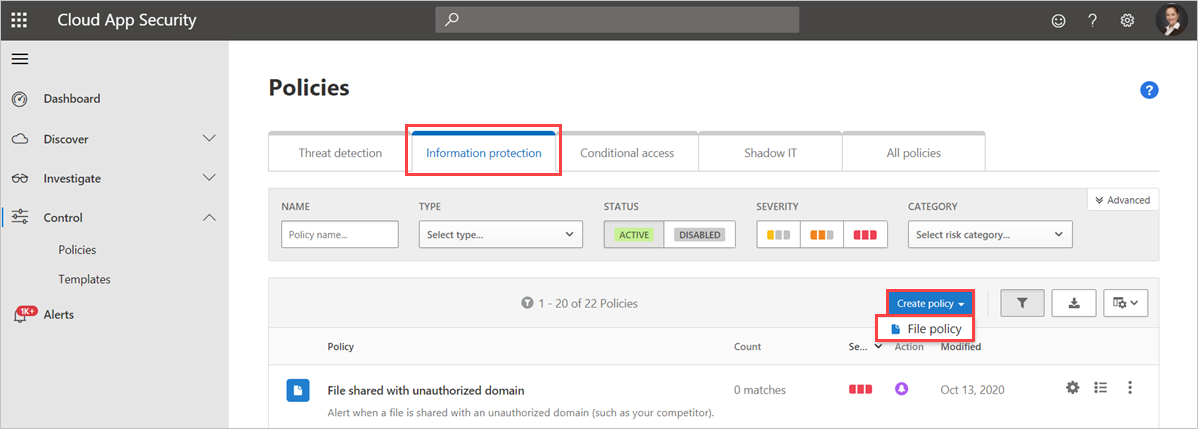
- Go to Control > Policies > Information Protection.
- Click Create policy and select File policy.
- Give your policy a name and description, if you want you can base it on a template, for more information on policy templates, see Control cloud apps with policies.
- Give your policy a Policy severity. If you have set Defender for Cloud Apps to send you notifications on policy matches for a specific policy severity level, this level is used to determine whether the policy’s matches trigger a notification.
- Within Category, link the policy to the most appropriate risk type. This field is informative only and helps you search for specific policies and alerts later, based on risk type. The risk may already be preselected according to the category for which you chose to create the policy. By default, File policies are set to DLP.
- Create a filter for the files this policy will act on to set which discovered apps trigger this policy. Narrow down the policy filters until you reach an accurate set of files you wish to act upon. Be as restrictive as possible to avoid false positives. For example, if you wish to remove public permissions, remember to add the Public filter, if you wish to remove an external user, use the “External” filter etc.
Note
When using the policy filters, Contains searches only for full words – separated by comas, dots, spaces, or underscores. For example if you search for malware or virus, it finds virus_malware_file.exe but it does not find malwarevirusfile.exe. If you search for malware.exe, then you find ALL files with either malware or exe in their filename, whereas if you search for “malware.exe” (with the quotation marks) you find only files that contain exactly “malware.exe”. Equals searches only for the complete string, for example if you search for malware.exe it finds malware.exe but not malware.exe.txt.
- Under the first Apply to filter, select all files excluding selected folders or selected folders for Box, SharePoint, Dropbox, OneDrive, where you can enforce your file policy over all files on the app or on specific folders. You’re redirected to sign in the cloud app, and then add the relevant folders.
- Under the second Apply to filter, select either all file owners, file owners from selected user groups or all file owners excluding selected groups. Then select the relevant user groups to determine which users and groups should be included in the policy.
- Select the Content inspection method. You can select either Built-in DLP or Data Classification Services. We recommend using Data Classification Services.
Once content inspection is enabled, you can choose to use preset expressions or to search for other customized expressions.
In addition, you can specify a regular expression to exclude a file from the results. This option is highly useful if you have an inner classification keyword standard that you want to exclude from the policy.
You can decide set the minimum number of content violations that you want to match before the file is considered a violation. For example, you can choose 10 if you want to be alerted on files with at least 10 credit card numbers found within its content.
When content is matched against the selected expression, the violation text is replaced with “X” characters. By default, violations are masked and shown in their context displaying 100 characters before and after the violation. Numbers in the context of the expression are replaced with “#” characters and are never stored within Defender for Cloud Apps. You can select the option to Unmask the last four characters of a violation to unmask the last four characters of the violation itself. It’s necessary to set which data types the regular expression searches: content, metadata and/or file name. By default it searches the content and the metadata.
- Choose the Governance actions you want Defender for Cloud Apps to take when a match is detected.
- Once you’ve created your policy, you can view it in the File policy tab. You can always edit a policy, calibrate its filters, or change the automated actions. The policy is automatically enabled upon creation and starts scanning your cloud files immediately. Take extra care when you set governance actions, they could lead to irreversible loss of access permissions to your files. It’s recommended to narrow down the filters to exactly represent the files that you wish to act upon, using multiple search fields. The narrower the filters, the better. For guidance, you can use the Edit and preview results button in the Filters section.

- To view file policy matches, files that are suspected to violate the policy, click Control and then Policies. Filter the results to display only the file policies using the Type filter at the top. For more information about the matches for each policy, click on a policy. This displays the “Matching now” files for the policy. Click the History tab to see a history back to up to six months of files that matched the policy.
File policy reference
This section provides reference details about policies, providing explanations for each policy type and the fields that can be configured for each policy.
A File policy is an API-based policy that enables you to control your organization’s content in the cloud, taking into account over 20 file metadata filters (including owner and sharing level) and content inspection results. Based on the policy results, governance actions can be applied. The content inspection engine can be extended via 3rd-party DLP engines as well as anti-malware solutions.
Each policy is composed of the following parts:
- File filters – Enable you to create granular conditions based on metadata.
- Content inspection – Enable you to narrow down the policy, based on DLP engine results. You can include a custom expression or a preset expression. Exclusions can be set and you can choose the number of matches. You can also use anonymization to mask the username.
- Actions – The policy provides a set of governance actions that can be automatically applied when violations are found. These actions are divided into collaboration actions, security actions, and investigation actions.
- Extensions – Content inspection can be performed via 3rd-party engines for improved DLP or anti-malware capabilities.
File queries
To make investigation even simpler, you can now create custom queries and save them for later use.
- In the File page, use the filters as described above to drill down into your apps as necessary.
- After you’ve finished building your query, click the Save as button in the top right corner of the filters.
- In the Save query pop-up, name your query.
- To use this query again in the future, under Queries, scroll down to Saved queries and select your query.