

Note
We’ve renamed Microsoft Cloud App Security. It’s now called Microsoft Defender for Cloud Apps. In the coming weeks, we’ll update the screenshots and instructions here and in related pages. For more information about the change, see this announcement. To learn more about the recent renaming of Microsoft security services, see the Microsoft Ignite Security blog.
Microsoft Defender for Cloud Apps can integrate with existing DLP solutions to extend these controls to the cloud while preserving a consistent and unified policy across on-premises and cloud activities. The platform exports easy-to-use interfaces including REST API and ICAP, enabling integration with content classification systems such as Symantec Data Loss Prevention (formerly Vontu Data Loss Prevention) or Forcepoint DLP.
Integration is accomplished by using the standard ICAP protocol, an http-like protocol described in RFC 3507. To secure ICAP for transmission of your data, it’s required to set up a secure TLS tunnel (stunnel) between your DLP solution and Defender for Cloud Apps. The stunnel setup provides TLS encryption functionality to your data as it travels between your DLP server and Defender for Cloud Apps.
This guide provides the steps necessary for configuring the ICAP connection in Defender for Cloud Apps and the stunnel setup to secure communication through it.
Architecture
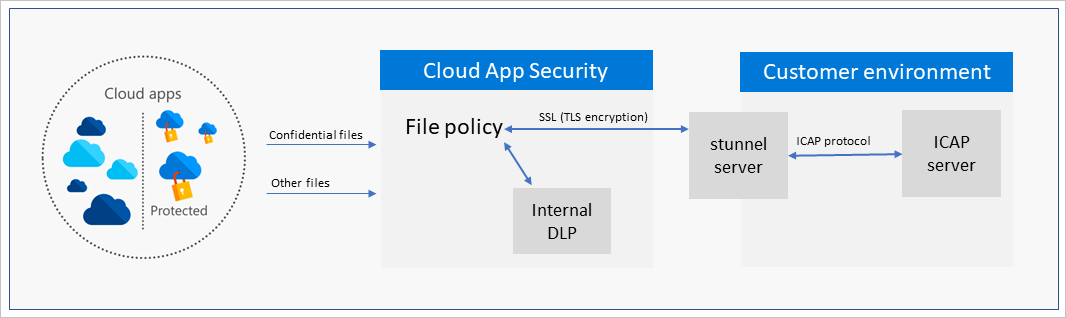
Defender for Cloud Apps scans your cloud environment and based on your file policy configuration, decides whether to scan the file using the internal DLP engine or the external DLP. If external DLP scan is applied, the file is sent over the secure tunnel to the customer environment where it’s relayed to the ICAP appliance for the DLP verdict: allowed/blocked. Responses are sent back to Defender for Cloud Apps over the stunnel where it’s used by the policy to determine subsequent actions such as notifications, quarantine, and sharing control.
Since Defender for Cloud Apps runs in Azure, a deployment in Azure yields improved performance. However, other options including other Clouds and On-Premises deployment are supported. Deploying in other environments may result in degraded performance due to higher latency and lower throughput. The ICAP server and stunnel must be deployed together on the same network to make sure the traffic is encrypted.
Prerequisites
In order for Defender for Cloud Apps to send data through your stunnel to your ICAP server, open your DMZ firewall to the external IP addresses used by Defender for Cloud Apps with a dynamic source port number.
- Source addresses: Refer to Connect apps, under Prerequisites
- Source TCP port: Dynamic
- Destination address(es): one or two IP address of the stunnel connected to the external ICAP server that you’ll configure in the next steps
- Destination TCP port: As defined in your network
Note
By default the stunnel port number is set to 11344. You can change it to another port if necessary, but be sure to make note of the new port number – you will be required to enter it in the next step.
STEP 1: Set up ICAP server
Set up an ICAP server, taking note of the port number, and make sure that you set Mode to Blocking. Blocking mode sets the ICAP server to relay the classification verdict back to Defender for Cloud Apps.
Refer to your External DLP product documentation for instructions on how to accomplish this setup. As an example, see Appendix A: Forcepoint ICAP server setup and Appendix B: Symantec Deployment Guide.
STEP 2: Set up your stunnel server
In this step, you set up the stunnel connected to your ICAP server.
Note
While highly recommended, this step is optional and can be skipped on test workloads.
Install stunnel on a server
Prerequisites
- A server – either a Windows Server or a Linux server based on a major distribution.
Refer to the stunnel website for details about the types of servers that support stunnel installation. If you’re using Linux, you can use your Linux distribution manager to install it.
Install stunnel on Windows
- Download the latest Windows Server installation (This application should work on any recent Windows Server edition). (default installation)
- During installation, don’t create a new self-signed certificate. You’ll create a certificate in a later step.
- Click Start server after installation.
- Create a certificate in one of the following ways:
- Use your certificate management server to create an TLS certificate on your ICAP server. Then copy the keys to the server you prepared for the stunnel installation.
- Or, on the stunnel server, use the following OpenSSL commands to generate a private key and a self-signed certificate. Replace these variables:
- key.pem with the name of your private key
- cert.pem with the name of your certificate
- stunnel-key with the name of the newly created key
- Under your stunnel installation path, open the config directory. By default it is: c:\Program Files (x86)\stunnel\config\
- Run the command line with admin permissions:
Bash
..\bin\openssl.exe genrsa -out key.pem 2048 ..\bin\openssl.exe req -new -x509 -config ".\openssl.cnf" -key key.pem -out .\cert.pem -days 1095 - Concatenate the cert.pem and key.pem and save them to the file:
type cert.pem key.pem >> stunnel-key.pem - Download the public key and save it in this location C:\Program Files (x86)\stunnel\config\MCASca.pem.
- Add the following rules to open the port in the Windows firewall:
Console
rem Open TCP Port 11344 inbound and outbound netsh advfirewall firewall add rule name="Secure ICAP TCP Port 11344" dir=in action=allow protocol=TCP localport=11344 netsh advfirewall firewall add rule name="Secure ICAP TCP Port 11344" dir=out action=allow protocol=TCP localport=11344 - Run:
c:\Program Files (x86)\stunnel\bin\stunnel.exeto open the stunnel application. - Click Configuration and then Edit configuration.
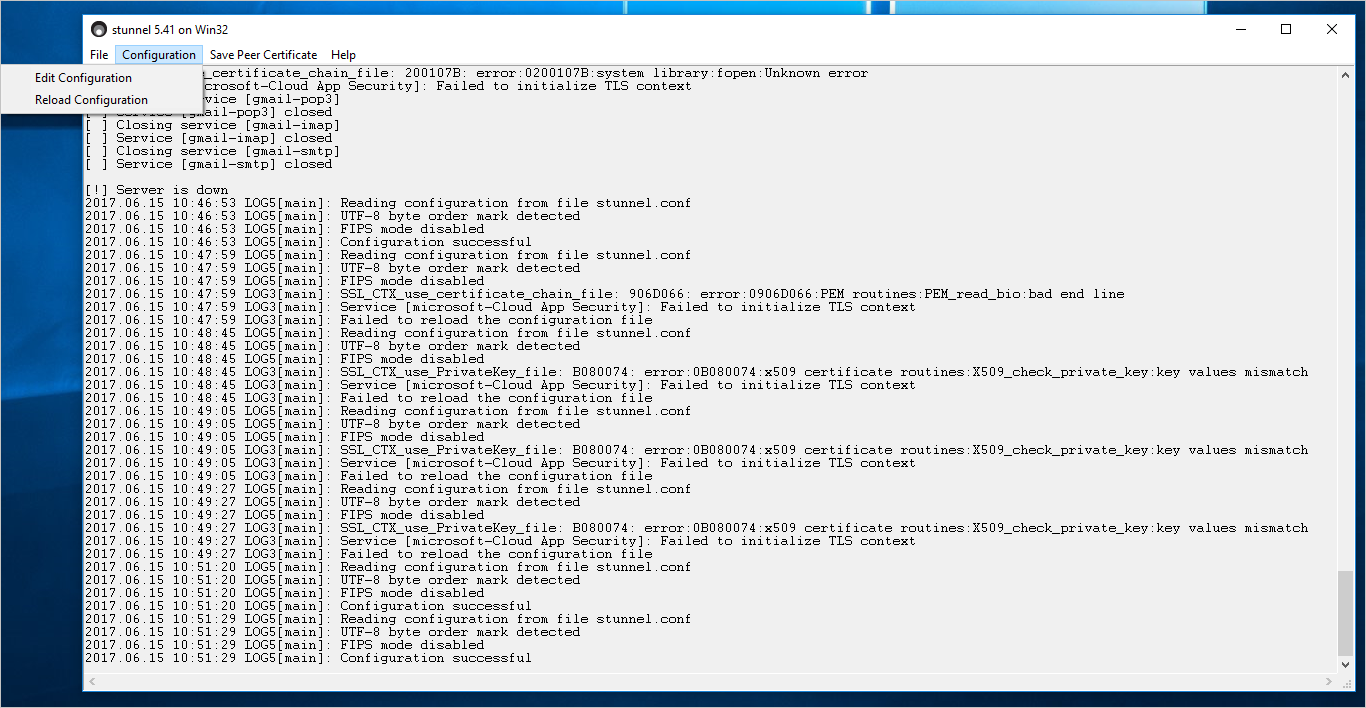
- Open the file and paste the following server configuration lines. The DLP Server IP is the IP address of your ICAP server, stunnel-key is the key that you created in the previous step, and MCASCAfile is the public certificate of the Defender for Cloud Apps stunnel client. Delete any example text that is in place (in the example it displays Gmail text) and copy the following text into the file:
ini
[microsoft-Cloud App Security] accept = 0.0.0.0:11344 connect = **ICAP Server IP**:1344 cert = C:\Program Files (x86)\stunnel\config\**stunnel-key**.pem CAfile = C:\Program Files (x86)\stunnel\config\**MCASCAfile**.pem TIMEOUTclose = 0 client = no - Save the file and then click Reload configuration.
- To validate that everything is running as expected, from a command prompt, run:
netstat -nao | findstr 11344
Install stunnel on Ubuntu
The following example is based on an Ubuntu server installation, when signed in as root user – for other servers use parallel commands.
On the prepared server, download and install the latest version of stunnel. Run the following command on your Ubuntu server to install both stunnel and OpenSSL:
apt-get update
apt-get install openssl -y
apt-get install stunnel4 -y
Verify that stunnel is installed by running the following command from a console. You should get the version number and a list of configuration options:
stunnel-version
Generate certificates
The ICAP server and Defender for Cloud Apps use a private key and public certificate for server encryption and authentication across the stunnel. Make sure you create the private key without a pass phrase so that stunnel can run as a background service. Also, set the permission on the files to readable for the stunnel owner and to none for everyone else.
You can create the certificates in one of the following ways:
- Use your certificate management server to create an TLS certificate on your ICAP server. Then copy the keys to the server you prepared for the stunnel installation.
- Or, on the stunnel server, use the following OpenSSL commands to generate a private key and a self-signed certificate. Replace these variables:
- key.pem with the name of your private key
- cert.pem with the name of your certificate
- stunnel-key with the name of the newly created key
Console
openssl genrsa -out key.pem 2048
openssl req -new -x509 -key key.pem -out cert.pem -days 1095
cat key.pem cert.pem >> /etc/ssl/private/stunnel-key.pem
Download the Defender for Cloud Apps stunnel client public key
Download the public key from this location: https://adaprodconsole.blob.core.windows.net/icap/publicCert.pem and save it in this location: /etc/ssl/certs/MCASCAfile.pem
Configure stunnel
The stunnel configuration is set in the stunnel.conf file.
- Create the stunnel.conf file in the following directory: vim /etc/stunnel/stunnel.conf
- Open the file and paste the following server configuration lines. The DLP Server IP is the IP address of your ICAP server, stunnel-key is the key that you created in the previous step, and MCASCAfile is the public certificate of the Defender for Cloud Apps stunnel client:
ini
[microsoft-Cloud App Security]
accept = 0.0.0.0:11344
connect = **ICAP Server IP**:1344
cert = /etc/ssl/private/**stunnel-key**.pem
CAfile = /etc/ssl/certs/**MCASCAfile**.pem
TIMEOUTclose = 1
client = no
Update your IP table
Update your IP address table with the following route rule:
iptables -I INPUT -p tcp --dport 11344 -j ACCEPT
To make the update to your IP table persistent, use the following commands:
sudo apt-get install iptables-persistent
sudo /sbin/iptables-save > /etc/iptables/rules.v4
Run stunnel
- On your stunnel server, run the following command:
Bash
vim /etc/default/stunnel4 - Change the variable ENABLED to 1:
Bash
ENABLED=1 - Restart the service for the configuration to take effect:
Bash
/etc/init.d/stunnel4 restart - Run the following commands to verify that the stunnel is running properly:
Bash
ps -A | grep stunneland that it’s listening on the port listed:
Bashnetstat -anp | grep 11344 - Make sure that the network in which the stunnel server was deployed matches the network prerequisites as mentioned earlier. This is required to allow incoming connections from Defender for Cloud Apps to successfully reach the server.
If the process is still not running, refer to the stunnel documentation to troubleshoot.
STEP 3: Connect to Defender for Cloud Apps
- In Defender for Cloud Apps, under Settings select Security extensions and select the External DLP tab.
- Click on the plus to add a new connection.
- In the Add new external DLP wizard, provide a Connection name (for example My Forcepoint connector) that will be used to identify the connector.
- Select the Connection type:
- Symantec Vontu – Use the customized integration for Vontu DLP appliances.
- Forcepoint DLP – Use the customized integration for Forcepoint DLP appliances.
- Generic ICAP – REQMOD – Use other DLP appliances that use Request Modification.
- Generic ICAP – RESPMOD – Use other DLP appliances that use Response Modification.
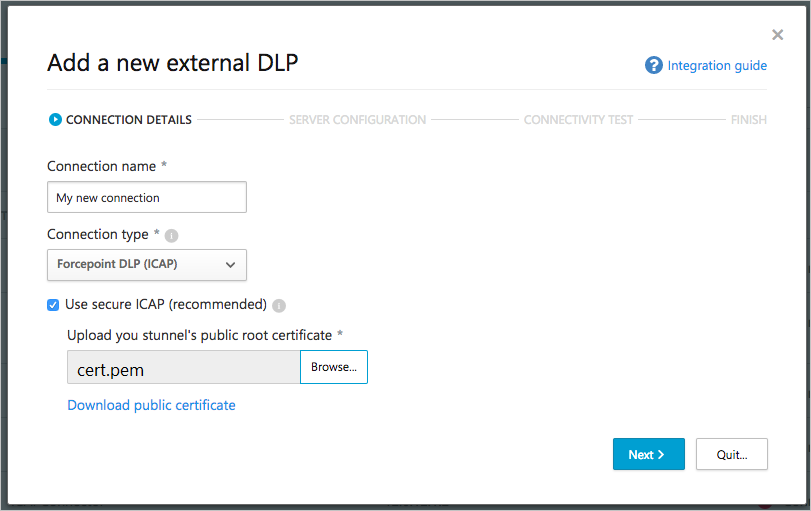
- Browse to select the public certificate you generated in the previous steps, “cert.pem”, to connect to your stunnel. Click Next.
Note
It is highly recommended to check the Use secure ICAP box to set up an encrypted stunnel gateway. If, for testing purposes or if you don’t have a stunnel server, you can uncheck this box to integrate directly with your DLP server.
- In the Server configuration screen, provide the IP address and Port of the stunnel server that you set up in Step 2. For load-balancing purposes, you can configure the IP address and Port of an additional server. The provided IP addresses should be the external static IP addresses of your servers.
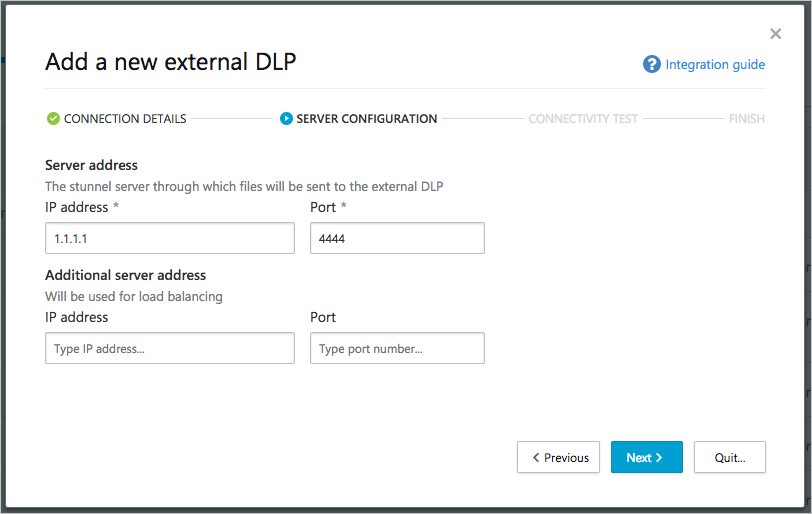
- Click Next. Defender for Cloud Apps tests connectivity to the server you configured. If you receive an error, review the instructions and network settings. After it’s successfully connected, you can click Quit.
- Now, to direct traffic to this external DLP server, when you create a File policy under Content inspection method, select the connection you created. Read more about creating a File policy.
Appendix A: ForcePoint ICAP server setup
In ForcePoint, set your appliance using the following steps:
- In your DLP appliance, go to Deployment > System Modules.
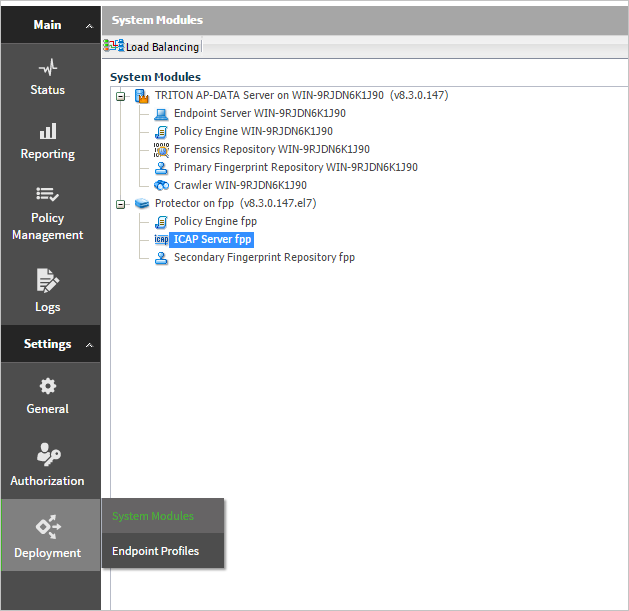
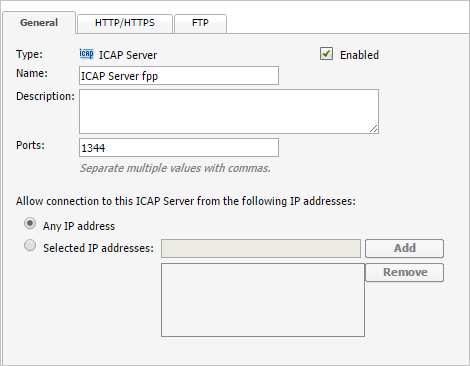
- In the General tab, make sure ICAP Server is Enabled and the default Port is set to 1344. Also, under Allow connection to this ICAP Server from the following IP addresses, select Any IP address.
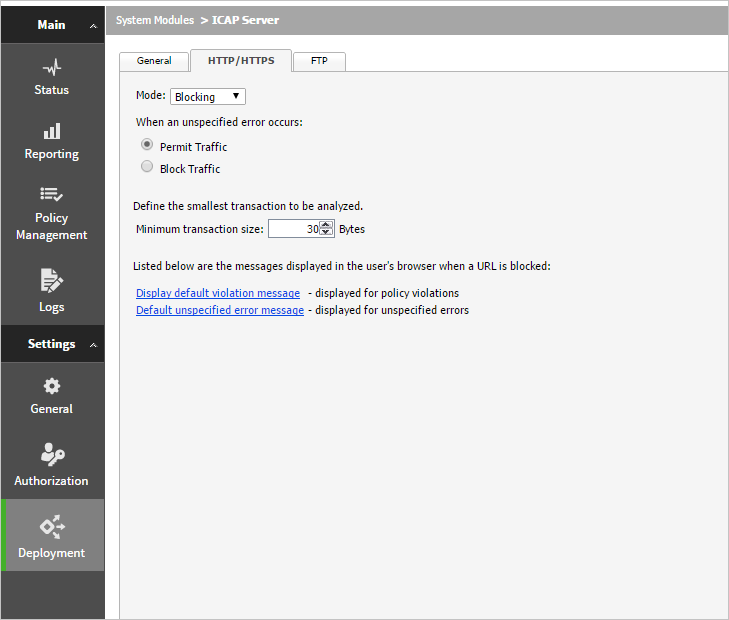
- In the HTTP/HTTPS tab, make sure to set Mode to Blocking.
Appendix B: Symantec Deployment Guide
The supported Symantec DLP versions are 11 and higher.
As noted above, you should deploy a detection server in the same Azure datacenter where your Defender for Cloud Apps tenant resides. The detection server syncs with the enforce server through a dedicated IPSec tunnel.
Detection server installation
The detection server used by Defender for Cloud Apps is a standard Network Prevent for Web server. There are several configuration options that should be changed:
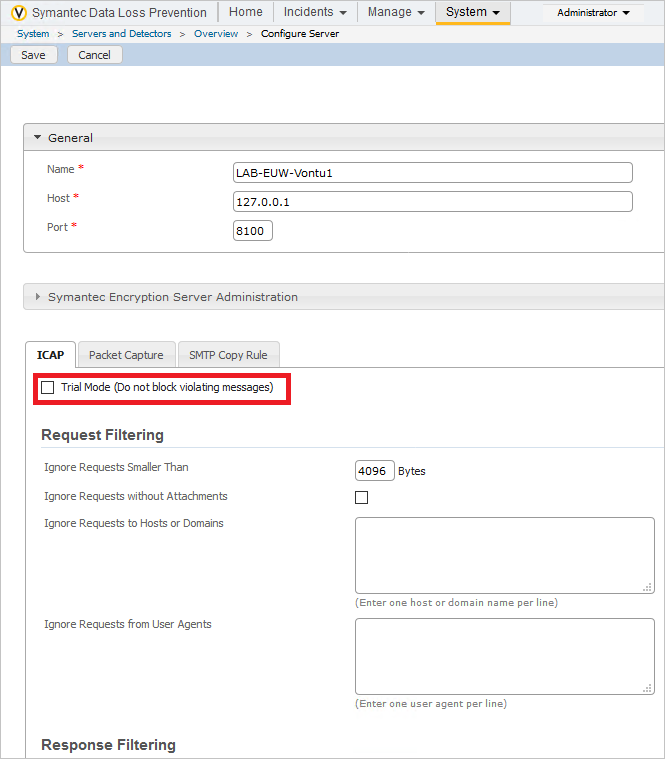
- Disable Trial Mode:
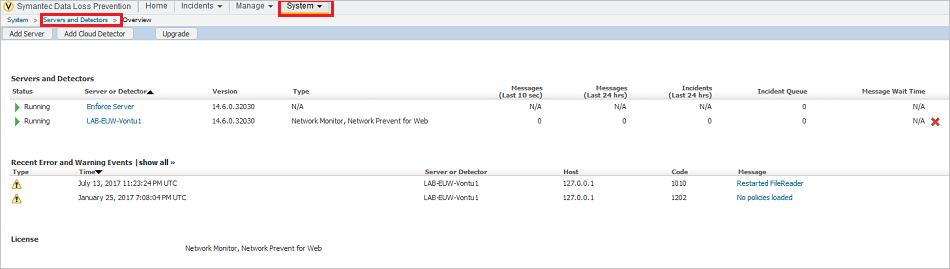
- Under System > Servers and Detectors, click on the ICAP target.
- Click Configure.
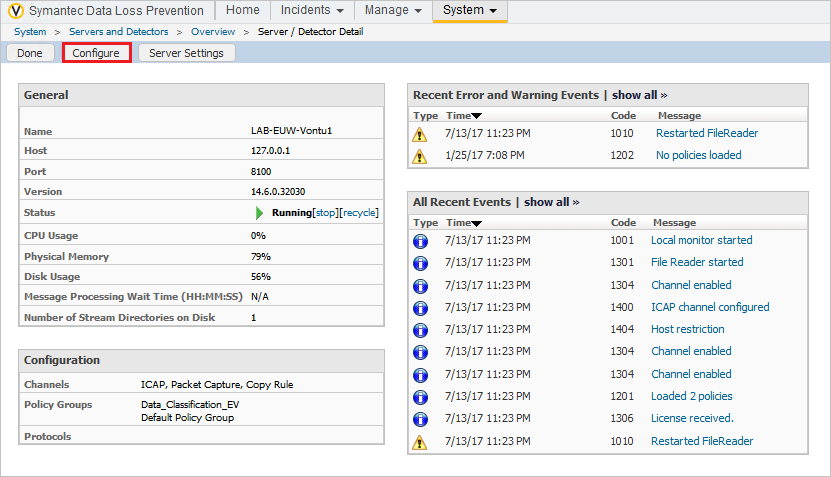
- Disable Trial Mode.
- Under System > Servers and Detectors, click on the ICAP target.
- Under ICAP > Response Filtering, change the Ignore Responses Smaller Than value to 1.
- And add “application/*” to the list of Inspect Content Type.
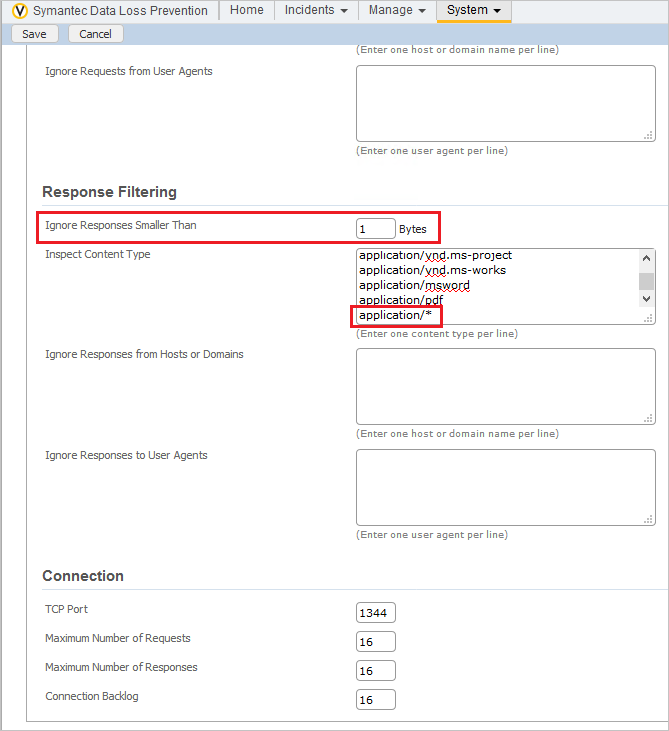
- Click Save
Policy configuration
Defender for Cloud Apps seamlessly supports all detection rule types included with Symantec DLP, so there’s no need to alter existing rules. However, there’s a configuration change that must be applied to all existing and new policies to enable full integration. This change is the addition of a specific response rule to all policies.
Add the configuration change to your Vontu:
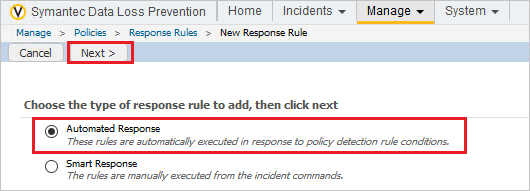
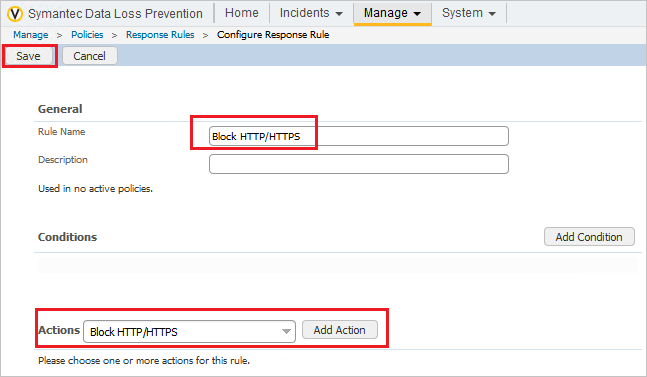
- Go to Manage > Policies > Response Rules and click Add Response Rule.

- Make sure Automated Response is selected and click Next.
- Type a rule name, for example, Block HTTP/HTTPS. Under Actions, select Block HTTP/HTTPS and click Save.
Add the rule you created to any existing policies:
- In each Policy, switch to the Response tab.
- From the Response rule drop-down, select the block response rule you created earlier.
- Save the policy.
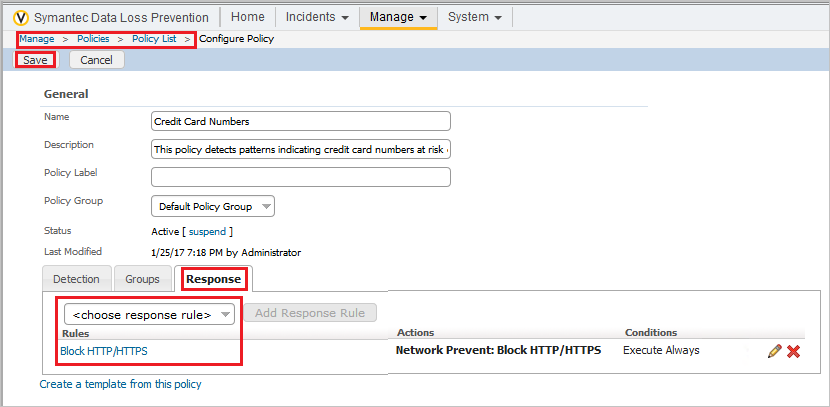
This rule must be added to all existing policies.
Note
If you use Symantec vontu to scan files from Dropbox, CAS automatically displays the file as originating from the following URL: http://misc/filename This placeholder url doesn’t actually lead anywhere but is used for logging purposes.