
Keeping your antivirus protection up to date is critical. There are two components to managing protection updates for Microsoft Defender Antivirus:
- Where the updates are downloaded from; and
- When updates are downloaded and applied.
This article describes how to specify from where updates should be downloaded (this is also known as the fallback order). See Manage Microsoft Defender Antivirus updates and apply baselines topic for an overview on how updates work, and how to configure other aspects of updates (such as scheduling updates).
Important
Microsoft Defender Antivirus Security intelligence updates are delivered through Windows Update and starting Monday, October 21, 2019, all security intelligence updates will be SHA-2 signed exclusively. Your devices must be updated to support SHA-2 in order to update your security intelligence. To learn more, see 2019 SHA-2 Code Signing Support requirement for Windows and WSUS.
Fallback order
Typically, you configure endpoints to individually download updates from a primary source followed by other sources in order of priority, based on your network configuration. Updates are obtained from sources in the order you specify. If updates from the current source are out-of-date, the next source in the list is used immediately.
When updates are published, some logic is applied to minimize the size of the update. In most cases, only the differences between the latest update and the update that is currently installed (this is referred to as the delta) on the device is downloaded and applied. However, the size of the delta depends on two main factors:
- The age of the last update on the device; and
- The source used to download and apply updates.
The older the updates on an endpoint, the larger the download will be. However, you must also consider download frequency as well. A more frequent update schedule can result in more network usage, whereas a less-frequent schedule can result in larger file sizes per download.
There are five locations where you can specify where an endpoint should obtain updates:
- Microsoft Update
- Windows Server Update Service [1]
- Microsoft Endpoint Configuration Manager
- Network file share
- Security intelligence updates for Microsoft Defender Antivirus and other Microsoft antimalware [2]
(1) Intune Internal Definition Update Server – If you use SCCM/SUP to get definition updates for Microsoft Defender Antivirus, and need to access Windows Update on blocked on client devices, you can transition to co-management and offload the endpoint protection workload to Intune. In the AntiMalware policy configured in Intune there is an option for ‘internal definition update server’ which can be configured to use on-premises WSUS as the update source. This helps you control which updates from the official WU server are approved for the enterprise, and also help proxy and save network traffic to the official Windows UPdates network.
(2) Your policy and registry might have this listed as Microsoft Malware Protection Center (MMPC) security intelligence, its former name.
To ensure the best level of protection, Microsoft Update allows for rapid releases, which means smaller downloads on a frequent basis. The Windows Server Update Service, Microsoft Endpoint Configuration Manager, and Microsoft security intelligence updates sources deliver less frequent updates. Thus, the delta can be larger, resulting in larger downloads.
Important
If you have set Microsoft Security intelligence page updates as a fallback source after Windows Server Update Service or Microsoft Update, updates are only downloaded from security intelligence updates when the current update is considered out-of-date. (By default, this is seven consecutive days of not being able to apply updates from the Windows Server Update Service or Microsoft Update services). You can, however, set the number of days before protection is reported as out-of-date.
Starting Monday, October 21, 2019, security intelligence updates will be SHA-2 signed exclusively. Devices must be updated to support SHA-2 in order to get the latest security intelligence updates. To learn more, see 2019 SHA-2 Code Signing Support requirement for Windows and WSUS.
Each source has typical scenarios that depend on how your network is configured, in addition to how often they publish updates, as described in the following table:
| Location | Sample scenario |
|---|---|
| Windows Server Update Service | You are using Windows Server Update Service to manage updates for your network. |
| Microsoft Update | You want your endpoints to connect directly to Microsoft Update. This can be useful for endpoints that irregularly connect to your enterprise network, or if you do not use Windows Server Update Service to manage your updates. |
| File share | You have non-Internet-connected devices (such as VMs). You can use your Internet-connected VM host to download the updates to a network share, from which the VMs can obtain the updates. See the VDI deployment guide for how file shares can be used in virtual desktop infrastructure (VDI) environments. |
| Microsoft Endpoint Manager | You are using Microsoft Endpoint Manager to update your endpoints. |
| Security intelligence updates for Microsoft Defender Antivirus and other Microsoft antimalware (formerly referred to as MMPC) | Make sure your devices are updated to support SHA-2. Microsoft Defender Antivirus Security intelligence updates are delivered through Windows Update, and starting Monday October 21, 2019 security intelligence updates will be SHA-2 signed exclusively. Download the latest protection updates because of a recent infection or to help provision a strong, base image for VDI deployment. This option should generally be used only as a final fallback source, and not the primary source. It will only be used if updates cannot be downloaded from Windows Server Update Service or Microsoft Update for a specified number of days. |
You can manage the order in which update sources are used with Group Policy, Microsoft Endpoint Configuration Manager, PowerShell cmdlets, and WMI.
Important
If you set Windows Server Update Service as a download location, you must approve the updates, regardless of the management tool you use to specify the location. You can set up an automatic approval rule with Windows Server Update Service, which might be useful as updates arrive at least once a day. To learn more, see synchronize endpoint protection updates in standalone Windows Server Update Service.
The procedures in this article first describe how to set the order, and then how to set up the File share option if you have enabled it.
Use Group Policy to manage the update location
- On your Group Policy management machine, open the Group Policy Management Console, right-click the Group Policy Object you want to configure and click Edit.
- In the Group Policy Management Editor go to Computer configuration.
- Click Policies then Administrative templates.
- Expand the tree to Windows components > Windows Defender > Signature updates and configure the following settings:
- Double-click the Define the order of sources for downloading security intelligence updates setting and set the option to Enabled.
- Enter the order of sources, separated by a single pipe, for example:
InternalDefinitionUpdateServer|MicrosoftUpdateServer|MMPC, as shown in the following screenshot.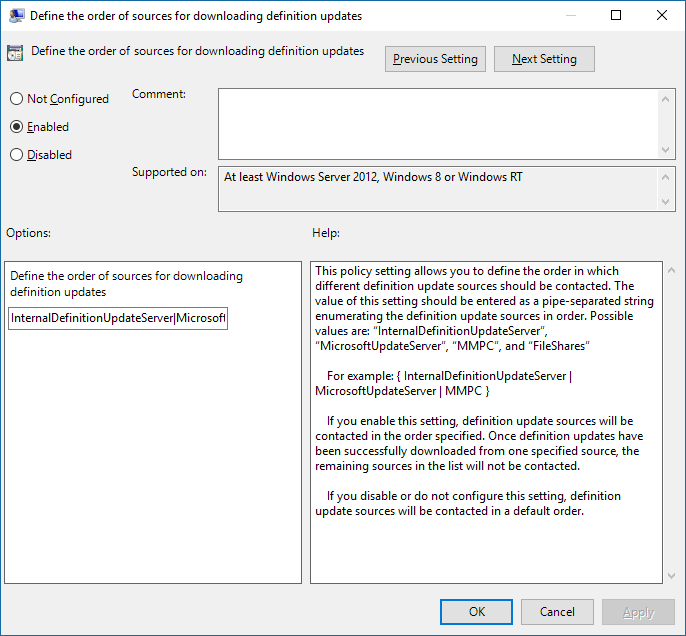
- Select OK. This will set the order of protection update sources.
- Double-click the Define file shares for downloading security intelligence updates setting and set the option to Enabled.
- Specify the file share source. If you have multiple sources, enter each source in the order they should be used, separated by a single pipe. Use standard UNC notation for denoting the path, for example:
\\host-name1\share-name\object-name|\\host-name2\share-name\object-name. If you do not enter any paths, then this source will be skipped when the VM downloads updates. - Click OK. This will set the order of file shares when that source is referenced in the Define the order of sources… group policy setting.
Note
For Windows 10, versions 1703 up to and including 1809, the policy path is Windows Components > Microsoft Defender Antivirus > Signature Updates For Windows 10, version 1903, the policy path is Windows Components > Microsoft Defender Antivirus > Security Intelligence Updates
Use Configuration Manager to manage the update location
See Configure Security intelligence Updates for Endpoint Protection for details on configuring Microsoft Endpoint Manager (current branch).
Use PowerShell cmdlets to manage the update location
Use the following PowerShell cmdlets to set the update order.
Set-MpPreference -SignatureFallbackOrder {LOCATION|LOCATION|LOCATION|LOCATION}
Set-MpPreference -SignatureDefinitionUpdateFileSharesSource {\\UNC SHARE PATH|\\UNC SHARE PATH}
See the following articles for more information:
- Set-MpPreference -SignatureFallbackOrder
- Set-MpPreference -SignatureDefinitionUpdateFileSharesSource
- Use PowerShell cmdlets to configure and run Microsoft Defender Antivirus
- Defender Antivirus cmdlets
Use Windows Management Instruction (WMI) to manage the update location
Use the Set method of the MSFT_MpPreference class for the following properties:
SignatureFallbackOrder
SignatureDefinitionUpdateFileSharesSource
See the following articles for more information:
Use Mobile Device Management (MDM) to manage the update location
See Policy CSP – Defender/SignatureUpdateFallbackOrder for details on configuring MDM.
What if we’re using a third-party vendor?
This article describes how to configure and manage updates for Microsoft Defender Antivirus. However, third-party vendors can be used to perform these tasks.
For example, suppose that Contoso has hired Fabrikam to manage their security solution, which includes Microsoft Defender Antivirus. Fabrikam typically uses Windows Management Instrumentation, PowerShell cmdlets, or Windows command-line to deploy patches and updates.
Note
Microsoft does not test third-party solutions for managing Microsoft Defender Antivirus.
Create a UNC share for security intelligence updates
Set up a network file share (UNC/mapped drive) to download security intelligence updates from the MMPC site by using a scheduled task.
- On the system on which you want to provision the share and download the updates, create a folder to which you will save the script.
Console
Start, CMD (Run as admin) MD C:\Tool\PS-Scripts\ - Create the folder to which you will save the signature updates.
Console
MD C:\Temp\TempSigs\x64 MD C:\Temp\TempSigs\x86 - Download the PowerShell script from www.powershellgallery.com/packages/SignatureDownloadCustomTask/1.4.
- Click Manual Download.
- Click Download the raw nupkg file.
- Extract the file.
- Copy the file SignatureDownloadCustomTask.ps1 to the folder you previously created, C:\Tool\PS-Scripts\ .
- Use the command line to set up the scheduled task.
Note
There are two types of updates: full and delta.
- For x64 delta:
PowerShell
Powershell (Run as admin) C:\Tool\PS-Scripts\ ".\SignatureDownloadCustomTask.ps1 -action create -arch x64 -isDelta $true -destDir C:\Temp\TempSigs\x64 -scriptPath C:\Tool\PS-Scripts\SignatureDownloadCustomTask.ps1 -daysInterval 1" - For x64 full:
PowerShell
Powershell (Run as admin) C:\Tool\PS-Scripts\ ".\SignatureDownloadCustomTask.ps1 -action create -arch x64 -isDelta $false -destDir C:\Temp\TempSigs\x64 -scriptPath C:\Tool\PS-Scripts\SignatureDownloadCustomTask.ps1 -daysInterval 1" - For x86 delta:
PowerShell
Powershell (Run as admin) C:\Tool\PS-Scripts\ ".\SignatureDownloadCustomTask.ps1 -action create -arch x86 -isDelta $true -destDir C:\Temp\TempSigs\x86 -scriptPath C:\Tool\PS-Scripts\SignatureDownloadCustomTask.ps1 -daysInterval 1" - For x86 full:
PowerShell
Powershell (Run as admin)

C:\Tool\PS-Scripts\

".\SignatureDownloadCustomTask.ps1 -action create -arch x86 -isDelta $false -destDir C:\Temp\TempSigs\x86 -scriptPath C:\Tool\PS-Scripts\SignatureDownloadCustomTask.ps1 -daysInterval 1"
Note
When the scheduled tasks are created, you can find these in the Task Scheduler under Microsoft\Windows\Windows Defender
- For x64 delta:
- Run each task manually and verify that you have data (mpam-d.exe, mpam-fe.exe, and nis_full.exe) in the following folders (you might have chosen different locations):
- C:\Temp\TempSigs\x86
- C:\Temp\TempSigs\x64
If the scheduled task fails, run the following commands:
ConsoleC:\windows\system32\windowspowershell\v1.0\powershell.exe -NoProfile -executionpolicy allsigned -command "&\"C:\Tool\PS-Scripts\SignatureDownloadCustomTask.ps1\" -action run -arch x64 -isDelta $False -destDir C:\Temp\TempSigs\x64" C:\windows\system32\windowspowershell\v1.0\powershell.exe -NoProfile -executionpolicy allsigned -command "&\"C:\Tool\PS-Scripts\SignatureDownloadCustomTask.ps1\" -action run -arch x64 -isDelta $True -destDir C:\Temp\TempSigs\x64" C:\windows\system32\windowspowershell\v1.0\powershell.exe -NoProfile -executionpolicy allsigned -command "&\"C:\Tool\PS-Scripts\SignatureDownloadCustomTask.ps1\" -action run -arch x86 -isDelta $False -destDir C:\Temp\TempSigs\x86" C:\windows\system32\windowspowershell\v1.0\powershell.exe -NoProfile -executionpolicy allsigned -command "&\"C:\Tool\PS-Scripts\SignatureDownloadCustomTask.ps1\" -action run -arch x86 -isDelta $True -destDir C:\Temp\TempSigs\x86"Note
Issues could also be due to execution policy.
- Create a share pointing to C:\Temp\TempSigs (e.g., \server\updates).
Note
At a minimum, authenticated users must have “Read” access.
- Set the share location in the policy to the share.
Note
Do not add the x64 (or x86) folder in the path. The mpcmdrun.exe process adds it automatically.