
To use Malwarebytes for Mac on your Mac running macOS, download and install the latest version of Malwarebytes for Mac. This article guides you through the Malwarebytes for Mac installation process. These steps also apply to reinstallation, or how to reclaim the application in case of an accidental uninstall.
- Download the latest version of Malwarebytes for Mac.
Note: If you are running OS X El Capitan 10.11, download this version of Malwarebytes for Mac. - Locate the downloaded file Malwarebytes-Mac-4.x.y.zzz.pkg.
4.x.y.zzz represents the version number.
In most cases, downloaded files are saved in the Downloads folder. - Double-click the file Malwarebytes-Mac-4.x.y.zzz.pkg to start the setup wizard.
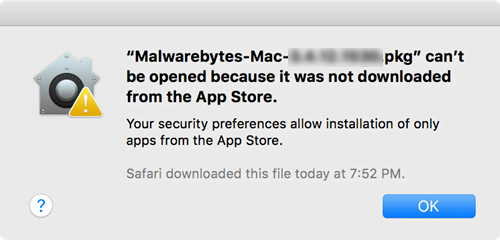
If you receive the following security warning dialog, refer to Apple’s article MacOS Sierra: Open an app from an unidentified developer.
- In the Install Malwarebytes for Mac pop-up window, click Continue.
- Read the improvements and issues fixed in the latest version of Malwarebytes and click Continue.
- Read the Malwarebytes Software License Agreement and click Continue.
- To confirm you agree to the Software License Agreement, click Agree.
- The next screen shows the install location and file size. Click Continue.
- Click Install.
- In the pop-up window, enter your Mac User Name and Password and click Install Software.
- After Malwarebytes for Mac has finished installing, click Close to exit the setup wizard. You can choose to keep the installer in your Mac.
- Malwarebytes first opens with a welcome screen. Click Get started to continue.
- A screen asks what kind of computer you are installing Malwarebytes on. This choice determines the kinds of Malwarebytes product notifications you will receive periodically. Select either Personal Computer or Work Computer and click Continue. See bullets below for a description of each option.
- Personal Computer: a device owned by you or your family for home and personal use.
- Work Computer: a device owned by your company or place of employment. This option is intended for Malwarebytes for Teams customers or Macs used primarily in a work or business environment.
- The following screen allows you to choose one of the following:
- Use Malwarebytes Free: Click this button if you want to use the Malwarebytes Free edition. Certain features are unavailable in the Free edition, such as Scheduled Scans and Real-Time Protection. The following screen displays so you may input an email to receive product and marketing emails. You can manage your communication preferences in your Malwarebytes Account. Click Open Malwarebytes Free.
- Purchase Premium: Click this button to view purchase options for a Malwarebytes Premium subscription.
- Claim free 14-day trial: This button only appears if it is your first time installing Malwarebytes on your machine. Click this button to unlock Malwarebytes Premium features for 14 days. If you choose to claim a free 14-day trial, the following screen prompts you to enter an email to receive product and marketing emails. Click Start Trial to begin your 14-day Trial or click No thanks, I just want to scan to continue with Malwarebytes Free edition
- Activate license: Click this button if you already have a license key. A new screen will appear so you can input the key and enable Malwarebytes Premium. For more information, see Activate Premium subscription in Malwarebytes for Mac.
- Choose one:
- If you’re running macOS 10.14 Mojave or earlier, proceed to step 16.
- If you’re running macOS 10.15 Catalina or macOS 11 Big Sur, skip to step 19.
- The following screen asks you to give Malwarebytes permission to enable Real-Time Protection on your Mac. Click Allow.
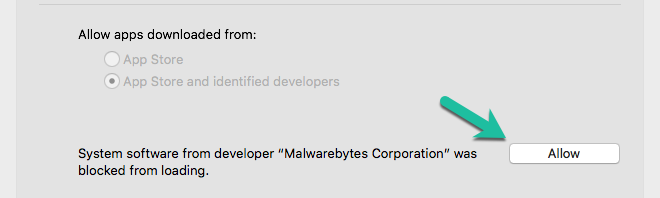
- In the System Extension Blocked, pop-up window, click Open Security Preferences.
- Click the Allow button to enable Real-Time Protection.
- This step only applies to macOS 10.15 Catalina or macOS 11 Big Sur. Click Open Preferences to give full disk access to Malwarebytes. This is to allow Malwarebytes to scan your Mac for infections. For detailed instructions, see Give Full Disk Access for Malwarebytes on Mac. After giving Malwarebytes Full Disk Access, click Next > Next > Done.
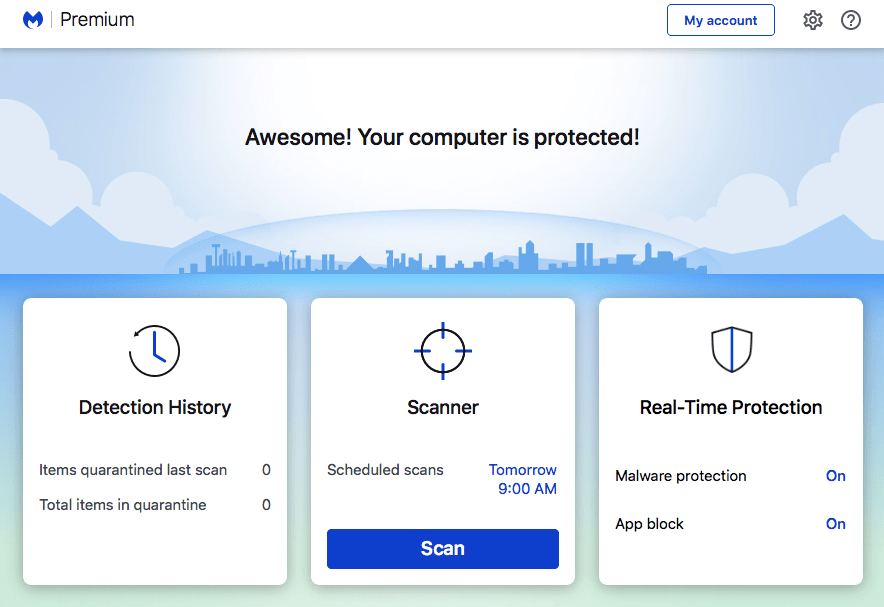
Malwarebytes is now fully installed and displays the main program Dashboard. Below is an example of the Dashboard for a Malwarebytes Premium user.
To activate a Malwarebytes Premium subscription, see how to Activate your subscription in Malwarebytes for Mac.
Source : Official Malwarebytes Brand
Editor by : BEST Antivirus KBS Team
(Visited 22 times, 1 visits today)