
Note
We’ve renamed Microsoft Cloud App Security. It’s now called Microsoft Defender for Cloud Apps. In the coming weeks, we’ll update the screenshots and instructions here and in related pages. For more information about the change, see this announcement. To learn more about the recent renaming of Microsoft security services, see the Microsoft Ignite Security blog.
Session controls in Microsoft Defender for Cloud Apps work with the featured apps. For a list of apps that are featured by Defender for Cloud Apps to work out-of-the-box, see Protect apps with Defender for Cloud Apps Conditional Access App Control.
Prerequisites
- Your organization must have the following licenses to use Conditional Access App Control:
- Azure Active Directory (Azure AD) Premium P1 or higher, or the license required by your identity provider (IdP) solution
- Microsoft Defender for Cloud Apps
- Apps must be configured with single sign-on
- Apps must use one of the following authentication protocols:
TABLE 1 IdP Protocols Azure AD SAML 2.0 or OpenID Connect Other SAML 2.0
To deploy featured apps
Follow these steps to configure featured apps to be controlled by Microsoft Defender for Cloud Apps Conditional Access App Control.
Step 1: Configure your IdP to work with Defender for Cloud Apps
Step 2: Sign in to each app using a user scoped to the policy
Step 3: Verify the apps are configured to use access and session controls
Step 4: Enable the app for use in your organization
Step 5: Test the deployment
Step 1: Configure your IdP to work with Defender for Cloud Apps
Configure integration with Azure AD
Note
When configuring an application with SSO in Azure AD, or other identity providers, one field that may be listed as optional is the sign-on URL setting. Note that this field may be required for Conditional Access App Control to work.
Use the following steps to create an Azure AD Conditional Access policy that routes app sessions to Defender for Cloud Apps. For other IdP solutions, see Configure integration with other IdP solutions.
- In Azure AD, browse to Security > Conditional Access.
- On the Conditional Access pane, in the toolbar at the top, select New policy -> Create new policy.
- On the New pane, in the Name textbox, enter the policy name.
- Under Assignments, select Users or workload identities and assign the users and groups that will be onboarding (initial sign-on and verification) the app.
- Under Assignments, select Cloud apps or actions and assign the apps and actions you want to control with Conditional Access App Control.
- Under Access controls, select Session, select Use Conditional Access App Control, and choose a built-in policy (Monitor only (Preview) or Block downloads (Preview)) or Use custom policy to set an advanced policy in Defender for Cloud Apps, and then select Select.
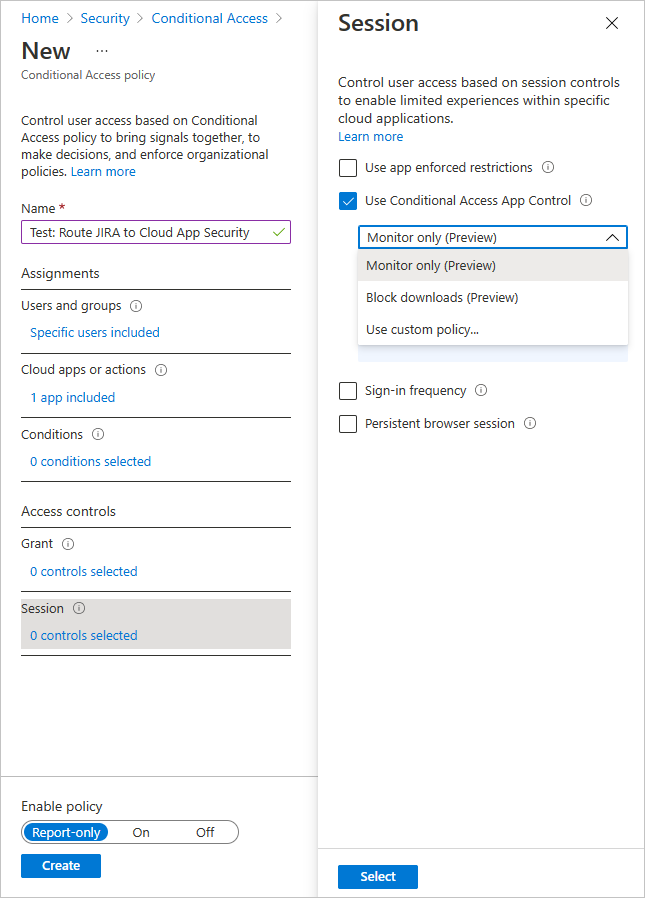
- Optionally, add conditions and grant controls as required.
- Set Enable policy to On and then select Create.
Configure integration with other IdP solutions
Use the following steps to route app sessions from other IdP solutions to Defender for Cloud Apps. For Azure AD, see Configure integration with Azure AD.
Note
For examples of how to configure IdP solutions, see:
- In Defender for Cloud Apps, browse to Investigate > Connected apps > Conditional Access App Control apps.
- Select + Add, and in the pop-up, select the app you want to deploy, and then select Start Wizard.
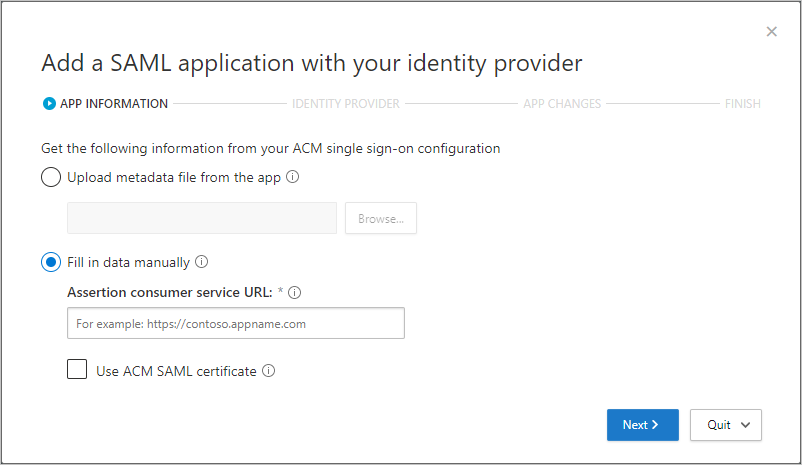
- On the APP INFORMATION page, fill out the form using the information from your app’s single sign-on configuration page, and then select Next.
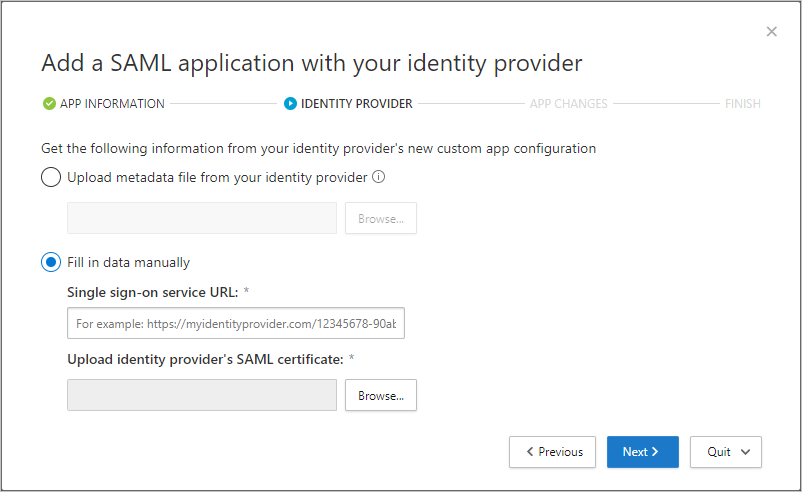
- If your IdP provides a single sign-on metadata file for the selected app, select Upload metadata file from the app and upload the metadata file.
- Or, select Fill in data manually and provide the following information:
- Assertion consumer service URL
- If your app provides a SAML certificate, select Use <app_name> SAML certificate and upload the certificate file.
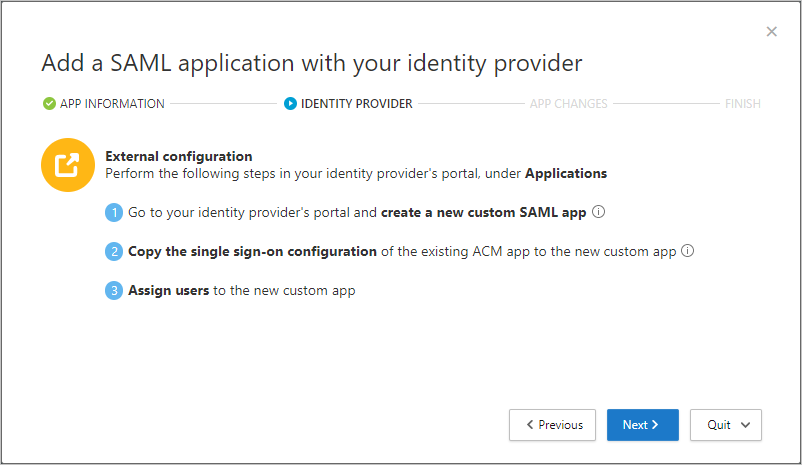
- On the IDENTITY PROVIDER page, use the provided steps to set up a new application in your IdP’s portal, and then select Next.
- Go to your IdP’s portal and create a new custom SAML app.
- Copy the single sign-on configuration of the existing
<app_name>app to the new custom app. - Assign users to the new custom app.
- Copy the apps single sign-on configuration information. You’ll need it in the next step.
Note
These steps may differ slightly depending on your identity provider. This step is recommended for the following reasons:
- Some identity providers do not allow you to change the SAML attributes or URL properties of a gallery app
- Configuring a custom app enables you to test this application with access and session controls without changing the existing behavior for your organization.
- On the next page, fill out the form using the information from your app’s single sign-on configuration page, and then select Next.
- If your IdP provides a single sign-on metadata file for the selected app, select Upload metadata file from the app and upload the metadata file.
- Or, select Fill in data manually and provide the following information:
- Assertion consumer service URL
- If your app provides a SAML certificate, select Use <app_name> SAML certificate and upload the certificate file.
- On the next page, copy the following information, and then select Next. You’ll need the information in the next step.
- Single sign-on URL
- Attributes and values
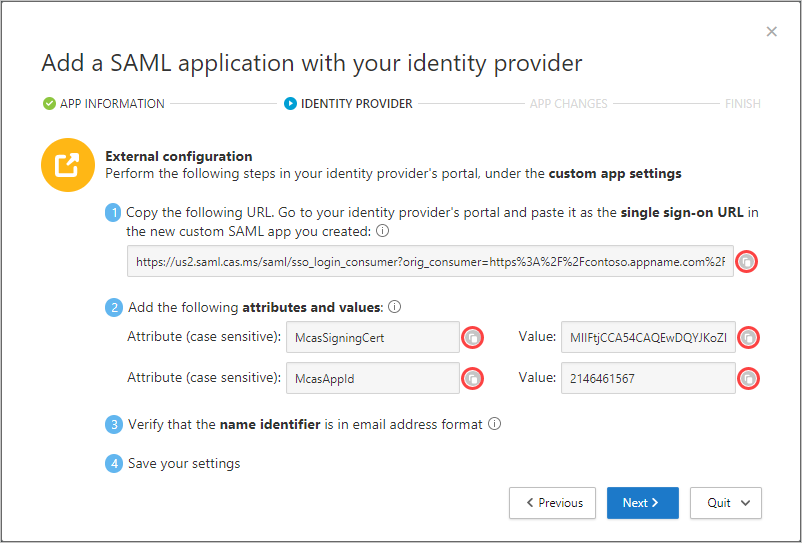
- In your IdP’s portal, do the following:
Note
The settings are commonly found in IdP portal’s custom app settings page
- In the single sign-on URL field, enter the single sign-on URL you made a note of earlier.
Note
Some providers may refer to the single sign-on URL as the Reply URL.
- Add the attributes and values you made a note of earlier to the app’s properties.
Note
- Some providers may refer to them as User attributes or Claims.
- When creating a new SAML app, the Okta Identity Provider limits attributes to 1024 characters. To mitigate this limitation, first create the app without the relevant attributes. After creating the app, edit it, and then add the relevant attributes.
- Verify that the name identifier is in the email address format.
- Save your settings.
- In the single sign-on URL field, enter the single sign-on URL you made a note of earlier.
- On the APP CHANGES page, do the following, and then select Next. You’ll need the information in the next step.
- Copy the Single sign-on URL
- Download the Defender for Cloud Apps SAML certificate
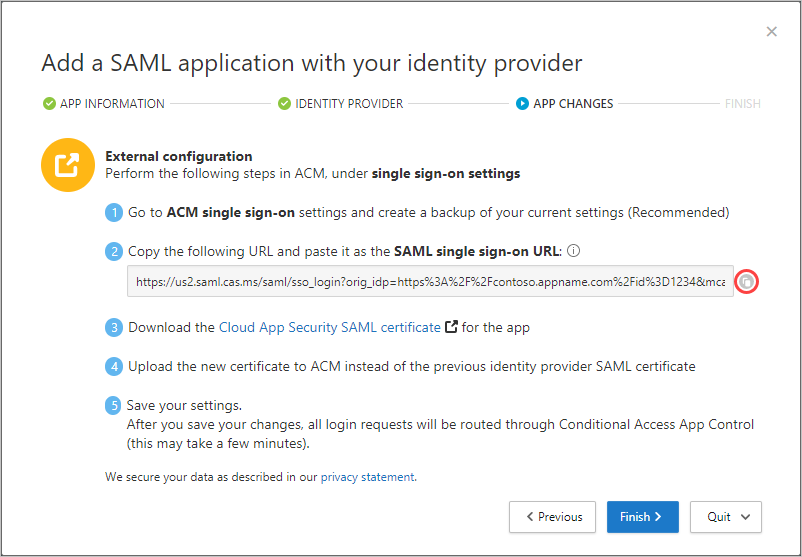
- In your app’s portal, on the single sign-on settings, do the following:
- [Recommended] Create a backup of your current settings.
- Replace the Identity Provider Login URL field value with the Defender for Cloud Apps SAML single sign-on URL you noted earlier.
- Upload the Defender for Cloud Apps SAML certificate you downloaded earlier.
- Select Save.
Note
- After saving your settings, all associated login requests to this app will be routed through Conditional Access App Control.
- The Defender for Cloud Apps SAML certificate is valid for one year. After it expires, a new certificate will need to be generated.
Step 2: Sign in to each app using a user scoped to the policy
Note
Before proceeding, make sure to first sign out of existing sessions.
After you’ve created the policy, sign in to each app configured in that policy. Make sure you sign in using a user configured in the policy.
Defender for Cloud Apps will sync your policy details to its servers for each new app you sign in to. This may take up to one minute.
Step 3: Verify the apps are configured to use access and session controls
The preceding instructions helped you create a built-in Defender for Cloud Apps policy for featured apps directly in Azure AD. In this step, verify that the access and session controls are configured for these apps.
- In the Defender for Cloud Apps portal, select the settings cog
 , and then select Conditional Access App Control.
 - In the Conditional Access App Control apps table, look at the Available controls column and verify that both Access control or Azure AD Conditional Access, and Session control appear for your apps.
Note
If session control doesn’t appear for an app, it’s not yet available for that specific app. You can either add it immediately as a custom app, or you can open a request to add it as a featured app by clicking Request session control.

Step 4: Enable the app for use in your organization
Once you’re ready to enable the app for use in your organization’s production environment, do the following steps.
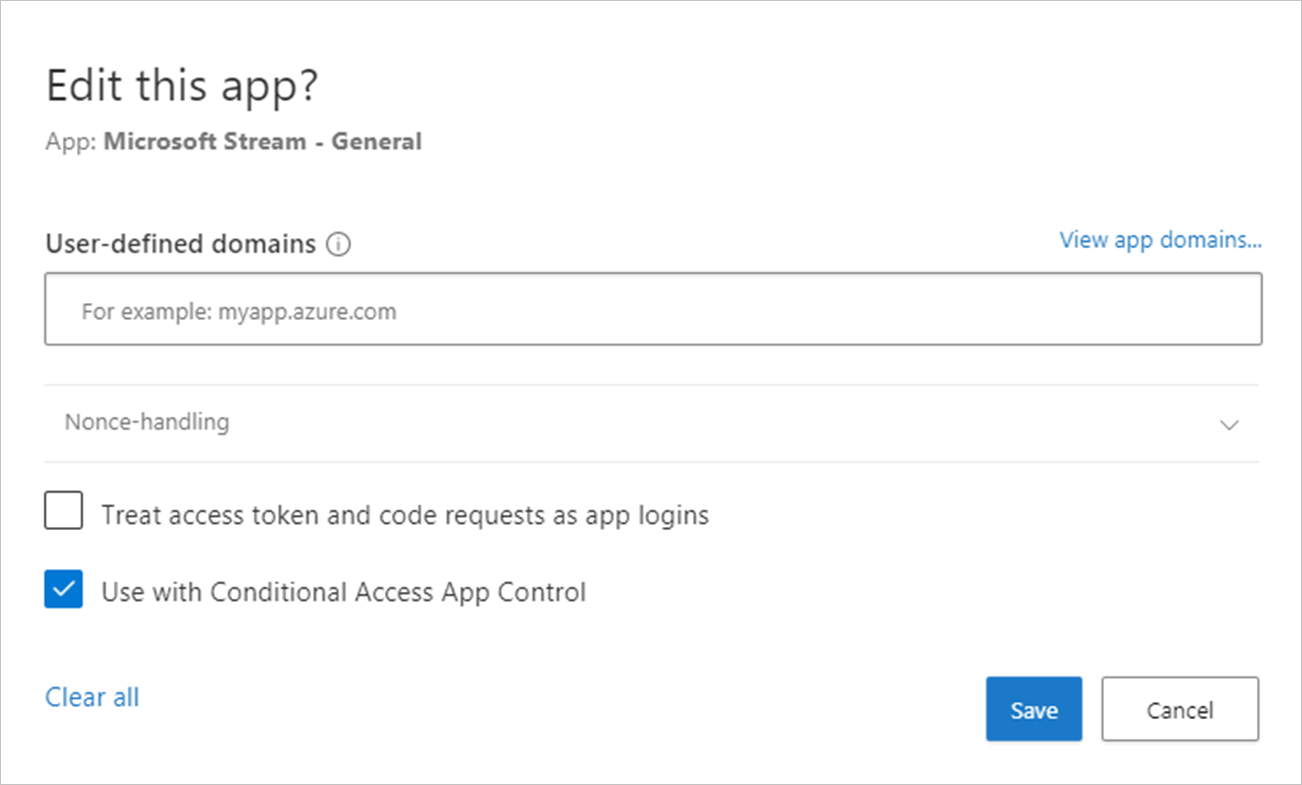
- In Defender for Cloud Apps, select the settings cog , and then select Conditional Access App Control.
- In the list of apps, on the row in which the app you’re deploying appears, choose the three dots at the end of the row, and then choose Edit app.
- Select Use with Conditional Access App Control and then select Save.
Step 5: Test the deployment
- First sign out of any existing sessions. Then, try to sign in to each app that was successfully deployed. Sign in using a user that matches the policy configured in Azure AD, or for a SAML app configured with your identity provider.
- In the Defender for Cloud Apps portal, under Investigate, select Activity log, and make sure the login activities are captured for each app.
- You can filter by clicking on Advanced, and then filtering using Source equals Access control.
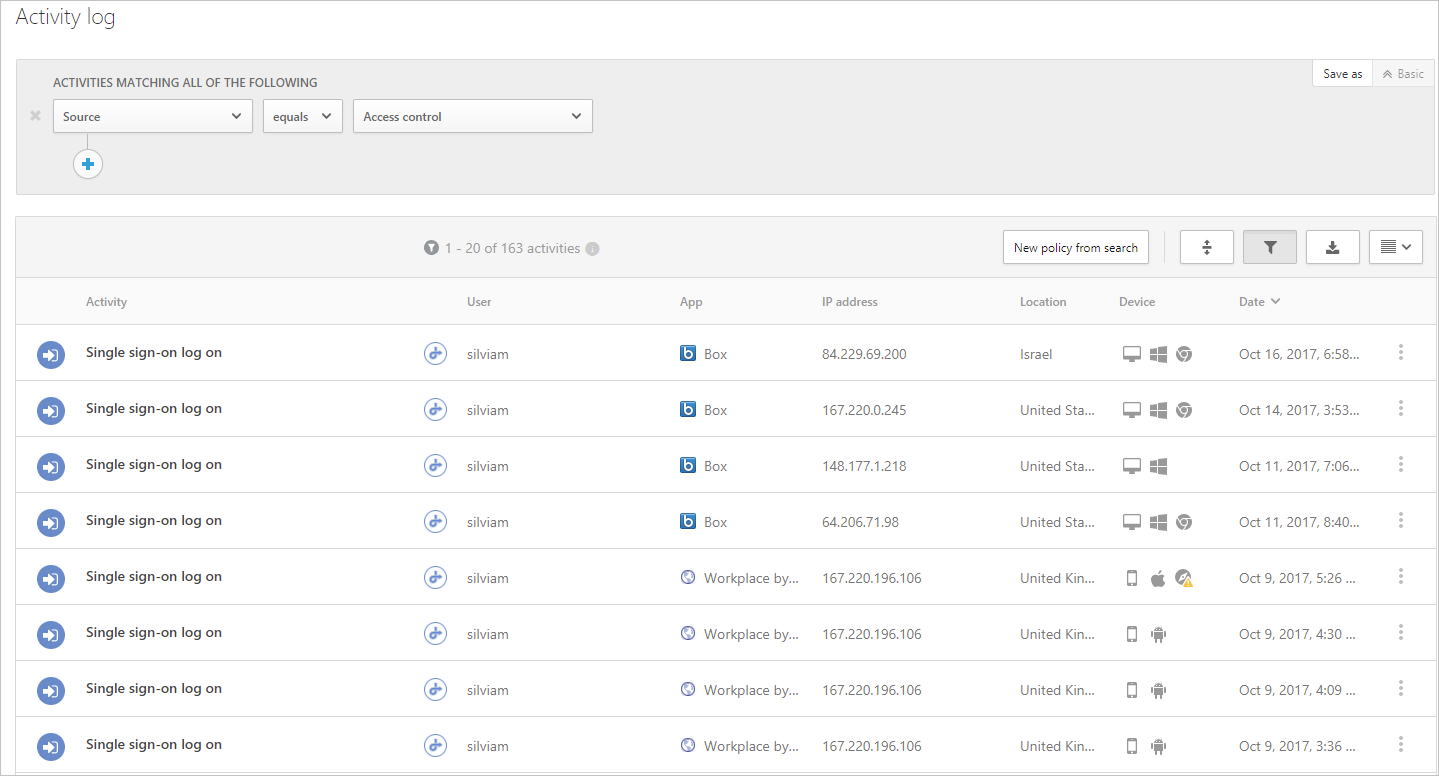
- It’s recommended that you sign into mobile and desktop apps from managed and unmanaged devices. This is to make sure that the activities are properly captured in the activity log.
To verify that the activity is properly captured, select a single sign-on login activity so that it opens the activity drawer. Make sure the User agent tag properly reflects whether the device is a native client (meaning either a mobile or desktop app) or the device is a managed device (compliant, domain joined, or valid client certificate).
Note
After it is deployed, you can’t remove an app from the Conditional Access App Control page. As long as you don’t set a session or access policy on the app, the Conditional Access App Control won’t change any behavior for the app.