

In this article, you’ll learn how to correctly configure Microsoft Defender for Identity sensor settings to start seeing data. You’ll need to do additional configuration and integration to take advantage of Defender for Identity’s full capabilities.
Prerequisites
- An Defender for Identity instance that’s connected to Active Directory.
- A downloaded copy of your Defender for Identity sensor setup package and the access key.
Configure sensor settings
After the Defender for Identity sensor is installed, do the following to configure Defender for Identity sensor settings.
- Click Launch to open your browser and sign in to the Defender for Identity portal.
- In the Defender for Identity portal, go to Configuration and, under System, select Sensors.
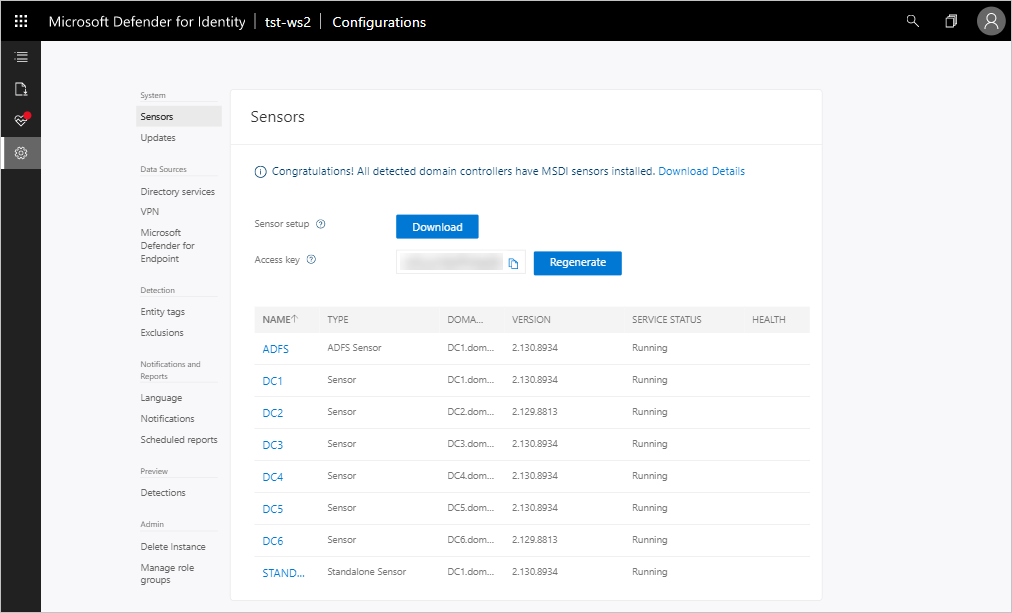
- Click on the sensor you want to configure and enter the following information:
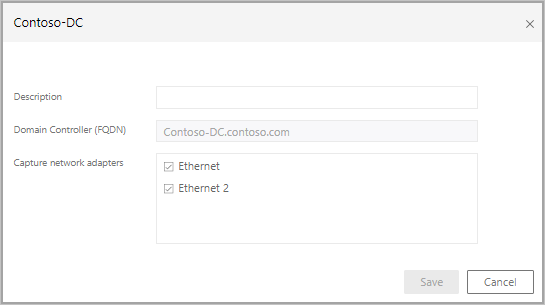
- Description: Enter a description for the Defender for Identity sensor (optional).
- Domain Controllers (FQDN) (required for the Defender for Identity standalone sensor, this can’t be changed for the Defender for Identity sensor): Enter the complete FQDN of your domain controller and click the plus sign to add it to the list. For example, dc01.contoso.com
The following information applies to the servers you enter in the Domain Controllers list:
- All domain controllers whose traffic is being monitored via port mirroring by the Defender for Identity standalone sensor must be listed in the Domain Controllers list. If a domain controller isn’t listed in the Domain Controllers list, detection of suspicious activities might not function as expected.
- At least one domain controller in the list should be a global catalog. This enables Defender for Identity to resolve computer and user objects in other domains in the forest.
- Capture Network adapters (required):
- For Defender for Identity sensors, all network adapters that are used for communication with other computers in your organization.
- For Defender for Identity standalone sensor on a dedicated server, select the network adapters that are configured as the destination mirror port. These network adapters receive the mirrored domain controller traffic.
- Click Save.
Validate installations
To validate that the Defender for Identity sensor has been successfully deployed, check the following:
- Check that the service named Azure Advanced Threat Protection sensor is running. After you save the Defender for Identity sensor settings, it might take a few seconds for the service to start.
- If the service doesn’t start, review the “Microsoft.Tri.sensor-Errors.log” file located in the following default folder, “%programfiles%\Azure Advanced Threat Protection sensor\Version X\Logs”.
Note
The version of Defender for Identity updates frequently, to check the latest version, in the Defender for Identity portal, go to Configuration and then About.
- Go to your Defender for Identity instance URL. In the Defender for Identity portal, search for something in the search bar, such as a user or group on your domain.
- Verify Defender for Identity connectivity on any domain device using the following steps:
- Open a command prompt
- Type
nslookup - Type server then the FQDN or IP address of the domain controller where the Defender for Identity sensor is installed. For example,
server contosodc.contoso.azure- Make sure to replace contosodc.contoso.azure and contoso.azure with the FQDN of your Defender for Identity sensor and domain name respectively.
- Type
ls -d contoso.azure - Repeat steps 3 and 4 for each sensor you wish to test.
- From the Defender for Identity console, open the entity profile for the computer you ran the connectivity test from.
- Check the related logical activity and confirm connectivity.
Note
If the domain controller you wish to test is your first deployed sensor, wait at least 15 minutes to allow the database backend to finish initial deployment of the necessary microservices before you attempt to verify the related logical activity for that domain controller.