Important
The improved Microsoft 365 Defender portal is now available. This new experience brings Defender for Endpoint, Defender for Office 365, Microsoft 365 Defender, and more into the Microsoft 365 Defender portal. Learn what’s new.
Microsoft 365 Defender includes powerful automated investigation and response capabilities that can save your security operations team much time and effort. With self-healing, these capabilities mimic the steps a security analyst would take to investigate and respond to threats, only faster, and with more ability to scale.
This article describes how to configure automated investigation and response in Microsoft 365 Defender with these steps:
- Review the prerequisites.
- Review or change the automation level for device groups.
- Review your security and alert policies in Office 365.
- Make sure Microsoft 365 Defender is turned on.
Then, after you’re all set up, you can view and manage remediation actions in the Action center.
Prerequisites for automated investigation and response in Microsoft 365 Defender
| Requirement | Details |
|---|---|
| Subscription requirements | One of these subscriptions:
|
| Network requirements | |
| Windows device requirements |
|
| Protection for email content and Office files | Microsoft Defender for Office 365 configured |
| Permissions | To configure automated investigation and response capabilities, you must have the Global Administrator or Security Administrator role assigned in either Azure Active Directory (https://portal.azure.com) or in the Microsoft 365 admin center (https://admin.microsoft.com).To get the permissions needed to work with automated investigation and response capabilities, such as reviewing, approving, or rejecting pending actions, see Required permissions for Action center tasks. |
Review or change the automation level for device groups
Whether automated investigations run, and whether remediation actions are taken automatically or only upon approval for your devices depend on certain settings, such as your organization’s device group policies. Review the configured automation level for your device group policies.
- Go to the Microsoft Defender Security Center (https://securitycenter.windows.com) and sign in.
- Go to Settings > Permissions > Device groups.
- Review your device group policies. In particular, look at the Remediation level column. We recommend using Full – remediate threats automatically. You might need to create or edit your device groups to get the level of automation you want. To get help with this task, see the following articles:
Review your security and alert policies in Office 365
Microsoft provides built-in alert policies that help identify certain risks. These risks include Exchange admin permissions abuse, malware activity, potential external and internal threats, and information governance risks. Some alerts can trigger automated investigation and response in Office 365. Make sure your Defender for Office 365 features are configured correctly.
Although certain alerts and security policies can trigger automated investigations, no remediation actions are taken automatically for email and content. Instead, all remediation actions for email and email content await approval by your security operations team in the Action center.
Security settings in Office 365 help protect email and content. To view or change these settings, follow the guidance in Protect against threats.
- In the Microsoft 365 Defender portal, go to Policies & Rules > Threat policies.
- Make sure all of the following policies are configured. To get help and recommendations, see Protect against threats.
- Make sure Safe Attachments for SharePoint, OneDrive, and Microsoft Teams is turned on.
- Make sure Zero-hour auto purge (ZAP) in Exchange Online is in effect.
- (This step is optional.) Review your Office 365 alert policies in the Microsoft 365 compliance center (https://compliance.microsoft.com/compliancepolicies). Several default alert policies are in the Threat management category. Some of these alerts can trigger automated investigation and response. To learn more, see Default alert policies.
Make sure Microsoft 365 Defender is turned on
- Sign in to the Microsoft 365 Defender portal
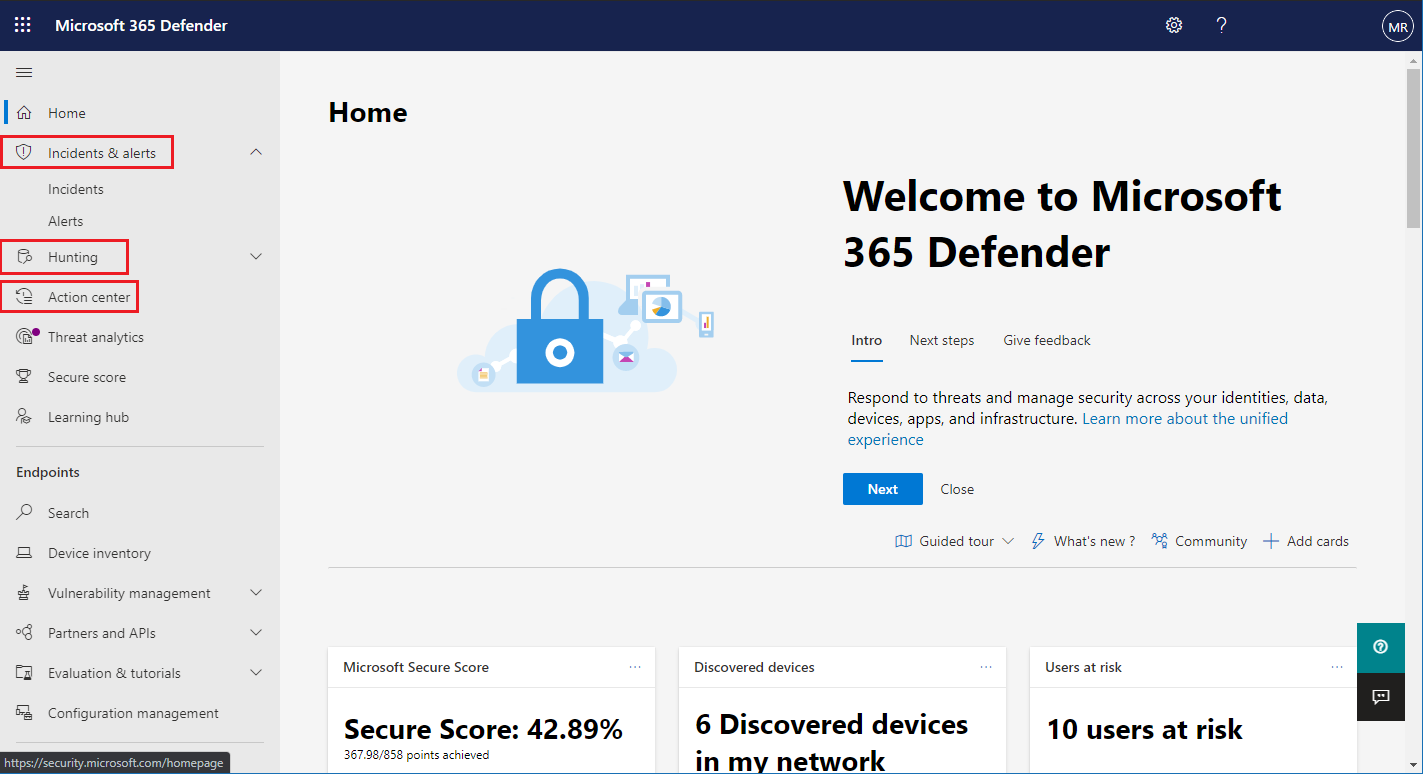
- In the navigation pane, look for Incidents & Alerts, Hunting, and Action center as shown in the preceding image.
- If you see Incidents & Alerts, Hunting, and Action center, Microsoft 365 Defender is turned on. See the Review or change the automation level for device groups section of this article.
- If you do not see Incidents, Action center, or Hunting, Microsoft 365 Defender might not be turned on. In this case, visit the Action center.
- In the navigation pane, choose Settings > Microsoft 365 Defender. Confirm that Microsoft 365 Defender is turned on.
Tip
Need help? See Turn on Microsoft 365 Defender.


