
Note
We’ve renamed Microsoft Cloud App Security. It’s now called Microsoft Defender for Cloud Apps. In the coming weeks, we’ll update the screenshots and instructions here and in related pages. For more information about the change, see this announcement. To learn more about the recent renaming of Microsoft security services, see the Microsoft Ignite Security blog.
This article provides admins with guidance on how to investigate and resolve common access and session control issues as experienced by admins and end users.
Before you continue, make sure your environment meets the following minimum general requirements for access and session controls.
- Licensing: Make sure you have a valid license.
- Single Sign-On (SSO): Apps must be configured with one of the supported SSO solutions.
- Azure Active Directory (Azure AD) using SAML 2.0 or OpenID Connect 2.0
- Third-party IdP using SAML 2.0
- Browser support: Session controls are available for browser-based sessions on these supported browsers: Microsoft Edge (latest), Google Chrome (latest), Mozilla Firefox (latest), or Apple Safari (latest)
- Downtime: Defender for Cloud Apps allows you to define the default behavior to apply if there is a service disruption, such as a component not functioning correctly. You can choose to harden (block) or bypass (allow) users from taking actions on potentially sensitive content when the normal policy controls cannot be enforced. This default behavior during system downtime can be configured in the Defender for Cloud Apps portal, as follows: Settings > Conditional Access App Control > Default behavior > Allow or Block access.
Issues experienced by admins
This section is for admins configuring access and session controls with Defender for Cloud Apps and helps identify common situations that may arise in the following areas:
Network conditions
Common network condition issues you may encounter include:
Network errors when navigating to a browser page
When you are first setting up Defender for Cloud Apps access and session controls for an app, common network errors that may arise include: “This site is not secure” and “There is no internet connection”. These messages can indicate a general network configuration error.
Recommended steps
- Configure your firewall to work with Defender for Cloud Apps using the Azure IP addresses and DNS names relevant to your environment.
- Add outbound port 443 for the following IP addresses and DNS names for your Defender for Cloud Apps data center.
- Restart your device and your browser session
- Verify that the login is working as expected
- Enable TLS 1.2 in your browser’s internet options.
Note
- Defender for Cloud Apps leverages Transport Layer Security (TLS) protocols 1.2+ to provide best-in-class encryption. Native client apps and browsers that do not support TLS 1.2+ will not be accessible when configured with session control. However, SaaS apps that use TLS 1.1 or lower will appear in the browser as using TLS 1.2+ when configured with Defender for Cloud Apps.
- While session controls are built to work with any browser on any major platform on any operating system, we support Microsoft Edge (latest), Google Chrome (latest), Mozilla Firefox (latest), or Apple Safari (latest). Access to mobile and desktop apps can also be blocked or allowed.
TABLE 2 Browser Steps Microsoft Internet Explorer 1. Open Internet Explorer
2. Select Tools > Internet Options > Advance tab
3. Under Security, select TLS 1.2
4. Select Apply, and then select OK
5. Restart your browser and verify that you can access the appMicrosoft Edge / Edge Chromium 1. Open search from the taskbar and search for “Internet Options”
2. Select Internet Options
3. Under Security, select TLS 1.2
4. Select Apply, and then select OK
5. Restart your browser and verify that you can access the appGoogle Chrome 1. Open Google Chrome
2. At the top-right, click More (3 vertical dots) > Settings
3. At the bottom, click Advanced
4. Under System, click Open proxy settings
5. On the Advanced tab, under Security, select TLS 1.2
6. Click OK
7. Restart your browser and verify that you are able to access the appMozilla Firefox 1. Open Mozilla Firefox
2. In the address bar and search for “about:config”
3. In the Search box, search for “TLS”
4. Double-click the entry for security.tls.version.min
5. Set the integer value to 3 to force TLS 1.2 as the minimum required version
6. Click Save (check mark to the right of the value box)
7. Restart your browser and verify that you are able to access the appSafari If you are using Safari version 7 or greater, TLS 1.2 is automatically enabled
Slow login
Proxy chaining and nonce-handling are some of the common issues that could result in slow login performance.
Recommended steps
- Configure your environment to remove firewall and forward proxy chaining, connecting two or more proxy servers to navigate to the intended page, and other external factors that can cause slowness in the login process.
- Identify if proxy chaining is occurring in your environment
- Remove additional forward proxies where possible
- Turn off nonce-handling for your apps that do not use nonce.
Note
Some apps use a nonce hash during authentication to prevent replay attacks. By default, Defender for Cloud Apps assumes an app uses a nonce. If the app you are working with does not use nonce, you can disable nonce-handling for this app in Defender for Cloud Apps.
- In Defender for Cloud Apps, in the menu bar, click the settings cog, and then select Conditional Access App Control.
- In the list of apps, on the row in which the app you are configuring appears, choose the three dots at the end of the row, and then choose Edit app.
- Click Nonce-handling to expand the section and then clear Enable nonce handling.
- Log out of the app and close out all browser sessions.
- Restart your browser and login to the app and verify that the login is working as expected.
Additional considerations
While troubleshooting network conditions, there are some additional things to consider about the Defender for Cloud Apps proxy.
- Session is being routed to another data center
Defender for Cloud Apps leverages Azure Data Centers around the world to optimize performance through geolocation. This means that a user’s session may be hosted outside of a region, depending on traffic patterns and their location. However, to protect your privacy, no session data is stored in these data centers.
- Proxy performance
Deriving a performance baseline depends on many factors outside of the Defender for Cloud Apps proxy, such as:
- What other proxies or gateways sit in series with this proxy
- Where the user is coming from
- Where the targeted resource resides
- Specific requests on the page
In general, any proxy will add latency. The advantages of the Defender for Cloud Apps proxy are:
- Leveraging the global availability of Azure domain controllers to geolocate users to the nearest node and reduce their round-trip distance, on a scale that few services around the world have.
- Leveraging the integration with Azure AD Conditional Access to only route the sessions you want to proxy to our service, instead of all users in all situations.
Device identification
Defender for Cloud Apps provides the following options for identifying a device’s management state.
- Microsoft Intune compliance
- Hybrid Azure AD Domain joined
- Client certificates
For more information on device identification, see Managed Device Identification.
Common device identification issues you may encounter include
- Misidentified Intune Compliant or Hybrid Azure AD joined devices
- Client certificates are not prompting when expected
- Client certificates are prompting at every login
- Additional considerations
Misidentified Intune Compliant or Hybrid Azure AD joined devices
Azure AD Conditional Access enables Intune compliant and Hybrid Azure AD joined device information to be passed directly to Defender for Cloud Apps, where the device state can be used as a filter for access or session policies. For more information, see Introduction to device management in Azure Active Directory.
Recommended steps
- In Defender for Cloud Apps, in the menu bar, click the settings cog, and then select Settings.
- Under Conditional Access App Control, select Device identification. This page shows the device identification options available in Defender for Cloud Apps.
- For Intune compliant device identification and Hybrid Azure AD joined identification respectively, click View configuration and verify that the services are set up.
Note
These are automatically synced from Azure AD and Intune respectively.
- Create an access or session policy with the Device Tag filter equal to Hybrid Azure AD joined, Intune compliant, or both.
- In a browser, log in to a device that is Hybrid Azure AD joined or Intune compliant based on your policy filter.
- Verify that activities from these devices are populating the log. In Defender for Cloud Apps, on the Activity log page, filter on Device Tag equal to Hybrid Azure AD joined, Intune compliant, or both based on your policy filters.
- If activities are not populating in the Defender for Cloud Apps activity log, go to Azure AD and do the following:
- Under Monitoring > Sign-ins, verify that there are sign-in activities in logs.
- Select the relevant log entry for the device you logged into.
- In the Details pane, on the Device info tab, verify that the device is Managed (Hybrid Azure AD joined) or Compliant (Intune compliant). If you cannot verify either state, try another log entry or ensure that your device data is configured correctly in Azure AD.
- For Conditional Access, some browsers may require additional configuration such as installing an extension. Use the information in the Conditional Access browser support guide to configure your browser.
- If you still do not see the device information in the Sign-ins page, open a support ticket for Azure AD.
Client certificates are not prompting when expected
The device identification mechanism can request authentication from relevant devices using client certificates. You can upload an X.509 root or intermediate certificate authority (CA) formatted in the PEM certificate format. These certificates must contain the public key of the CA, which is then used to sign the client certificates presented during a session. For more information about client certificates, see Client-certificate authenticated devices.
Recommended steps
- In Defender for Cloud Apps, in the menu bar, click the settings cog, and then select Settings.
- Under Conditional Access App Control, select Device identification. This page shows the device identification options available in Defender for Cloud Apps.
- Verify that you uploaded an X.509 root or intermediate CA. You must upload the CA that is used to sign your relevant certificate authority.
- Create an access or session policy with the Device Tag filter equal to Valid client certificate.
- Make sure that your client certificate is:
- deployed using the PKCS #12 file format, typically a .p12 or .pfx file extension
- installed in the user store, not the device store, of the device you are using for testing
- Restart your browser session
- When logging in to the protected app
- Verify that you are redirected to the URL
<https://*.managed.access-control.cas.ms/aad_login> - If you are using iOS, make sure you are using the Safari browser
- If you are using Firefox, you must also add the certificate to Firefox’s own certificate store. All other browsers use the same default certificate store. Learn how to add a certificate to the Firefox certificate store.
- Verify that you are redirected to the URL
- Validate that the client certificate prompted in your browser.
- If it does not appear, try a different browser. Most major browsers support performing a client certificate check. However, mobile and desktop apps often leverage built-in browsers that may not support this check and therefore affect authentication for these apps.
- Verify that activities from these devices are populating the log. In Defender for Cloud Apps, on the Activity log page, filter on Device Tag equal to Valid client certificate.
- If you still do not see the prompt, open a support ticket and include the following information:
- The details of the browser or native app where you experienced the problem
- The operating system version (ex. iOS/Android/Windows 10)
- Mention if the prompt is working on Edge Chromium
Client certificates are prompting at every login
If you are experiencing the client certificate popping up after opening a new tab, this might be due to settings hidden within Internet Options.
| Browser | Steps |
|---|---|
| Microsoft Internet Explorer | 1. Open Internet Explorer 2. Select Tools > Internet Options > Advance tab 3. Under Security, select Don’t prompt for Client Certificate selection when only one certificate exists 4. Select Apply, and then select OK 5. Restart your browser and verify that you can access the app without the additional prompts |
| Microsoft Edge / Edge Chromium | 1. Open search from the taskbar and search for “Internet Options” 2. Select Internet Options 3. Select Security, select Local intranet, and then click Custom level 4. Under Miscellaneous > Don’t prompt for Client Certificate selection when only one certificate exists, select Disable 5. Click OK to close the custom level dialog box 6. Click Apply, and then select OK to close Internet options 7. Restart your browser and verify that you can access the app without the additional prompts |
Additional considerations
While troubleshooting device identification, there are some additional things to consider.
- Client Certificate Revocation Protocol
You can require certificate revocation for Client Certificates. Certificates that have been revoked by the CA no longer be trusted. Selecting this option will require all certificates to pass the CRL protocol. If your client certificate does not contain a CRL endpoint, you will not be able to connect from the managed device.
Onboarding an app
You can onboard the following types of apps for access and session controls:
- Featured apps: Apps that come with session controls out-of-the-box as indicated by the Session control label
- Any (custom) apps: Custom line-of-business (LOB) or on-premises apps can be onboarded to session controls by an admin

When onboarding an app, it is crucial to make sure that you follow each step in the proxy deployment guides:
- Deploy featured apps with session controls
- Deploy custom LOB apps, non-featured SaaS apps, and on-premises apps hosted via the Azure AD app proxy with session controls
Common scenarios you may encounter while onboarding an app include:
- App does not appear on the Conditional Access App Control apps page
- App status: Continue Setup
- Cannot configure controls for native apps
- App is not recognized page appears
- Request session control option appears
- Additional considerations
App does not appear on the Conditional Access App Control apps page
When onboarding an app to Conditional Access App Control, the final step in the deployment guides is to have the end user navigate to the app. The recommendations listed below are steps that can be done if the app is not appearing after having gone through the guides.
Recommended steps
- Make sure your app meets the Conditional Access app prerequisites
| Identity provider | Validations |
|---|---|
| Azure AD | 1. Make sure you have a valid license for Azure AD Premium P1 in addition to a Defender for Cloud Apps license 2. Make sure that the app uses the SAML 2.0 or the OpenID Connect protocol 3. Make sure that the app SSO in Azure AD |
| Third-party | 1. Make sure you have a valid Defender for Cloud Apps license 2. Create a duplicate app 3. Make sure that the app uses the SAML protocol 4. Validate that you have fully onboarded the app and the status of the app is Connected |
- In your Azure AD policy, under the Session, make sure that the session is forced to route to Defender for Cloud Apps, which will in turn allow the app to appear in on the Conditional Access App Control apps page, as follows:
- Conditional Access App Control is selected
- In the built-in policies drop-down, make sure Monitor only is selected
- Make sure to navigate to the app in a new browser session by using a new incognito mode or by signing in again.
App status: Continue Setup
An app’s status can vary from Continue Setup, Connected, and No Activities.
For apps connected via third-party identity providers (IdP), if the setup is not complete, when accessing the app you will see a page with the status of Continue Setup. Use the following steps complete the setup.
Recommended steps
- Click Continue Setup.
- Go through the deployment guide and verify that you have completed all the steps. Pay particular attention to the following:
- Make sure you create a new custom SAML app. You need this to change the URLs and SAML attributes that might not be available in gallery apps.
- If your identity provider does not allow the reuse of the same identifier (also known as Entity ID or Audience), change the identifier of the original app.
Cannot configure controls for native apps
Native apps can be detected heuristically and you can use access policies to monitor or block them. Use the following steps to configure controls for native apps.
Recommended steps
- In an access policy, add a Client app filter, and set it equal to Mobile and desktop.
- Under Actions, select Block.
- Optionally, customize the blocking message that your users get when they’re unable to download files, for example, “You must use a web browser to access this app”.
- Test and validate that the control is working as expected.
App is not recognized page appears
Defender for Cloud Apps can recognize over 25,000 apps through the Cloud App Catalog (Discover -> Cloud app catalog). If you are using a custom app that is configured through Azure AD SSO that is NOT one of the 25,000 apps, you will come across an App is not recognized page. To resolve the issue, you must configure the app on the Conditional Access App Control.
Recommended steps
- In Defender for Cloud Apps, in the menu bar, click the settings cog, and then select Conditional Access App Control.
- In the banner, click View new apps.
- In the list of new apps, locate the app that you are onboarding, click on the + sign, and then click Add.
- Select whether the app is a custom or standard app.
- Continue through the wizard, make sure that specified User-defined domains are correct for the app you are configuring.
- Verify the app appears in the Conditional Access App Control apps page.
Request session control option appears
After adding an app, you may see the Request session control option. This occurs because only featured apps have out-of-the-box session controls. For any other app, you must go through a self-onboarding process.
Recommended steps
- In Defender for Cloud Apps, in the menu bar, click the settings cog and select Settings.
- Under Conditional Access App Control, select App onboarding/maintenance.
- Enter the user principal name or email for the users that will be onboarding the app, and then click Save.
- Go to the app that you are deploying. The page you see depends on whether the app is recognized. Do one of the following:
TABLE 5 App status Description Steps Not recognized You will see an app not recognized page prompting you to configure your app. 1. Add the app to Conditional Access App Control.
2. Add the domains for the app, and then return to the app and refresh the page.
3. Install the certificates for the app.Recognized You will see an onboarding page prompting you to continue the app configuration process. – Install the certificates for the app. Note: Make sure the app is configured with all domains required for the app to function correctly. To configure additional domains, proceed to Add the domains for the app, and then return to the app page.
Additional considerations
While troubleshooting onboarding apps, there are some additional things to consider.
- Apps in Conditional Access App Control do not align with Azure AD apps
The app names in Azure AD and Defender for Cloud Apps might differ based on the ways the products identify apps. Defender for Cloud Apps identifies apps using the app’s domains and adds them to the cloud app catalog, where we have over 25,000 apps. Within each app, there you can view or add to the subset of domains. In contrast, Azure AD identifies apps using service principals. For more information, see app and service principal objects in Azure AD.
In practice, it means that selecting SharePoint Online in Azure AD is equivalent to selecting apps, such as Word Online and Teams, in Defender for Cloud Apps because the apps use the
sharepoint.comdomain.
Creating access and session policies
Defender for Cloud Apps provides the following configurable policies:
- Access policies: To monitor or block access to browser, mobile, and/or desktop apps
- Session policies. To monitor, block, and perform specific actions to prevent data infiltration and exfiltration scenarios in the browser
To use these policies in Defender for Cloud Apps, you must first configure a policy in Azure AD Conditional Access to extend session controls, as follows: In the Azure AD policy, under Access controls, click Session, select Use Conditional Access App Control and choose a built-in policy (Monitor only or Block downloads) or Use custom policy to set an advanced policy in Defender for Cloud Apps, and then click Select.
Common scenarios you may encounter while configuring these policies include:
- In Conditional Access policies, you cannot see the Conditional Access App Control option
- Error message when creating a policy: You don’t have any apps deployed with Conditional Access App Control
- Cannot create session policies for an app
- Cannot choose Inspection Method: Data Classification Service
- Cannot choose Action: Protect
- Additional considerations
In Conditional Access policies, you cannot see the Conditional Access App Control option
To route sessions to Defender for Cloud Apps, Azure AD Conditional Access policies must be configured to include Conditional Access App Control session controls.
Recommended steps
- If you do not see the Conditional Access App Control option in your Conditional Access policy, make sure that you have a valid license for Azure AD Premium P1 as well as a valid Defender for Cloud Apps license.
Error message when creating a policy: You don’t have any apps deployed with Conditional Access App Control
When creating an access or session policy, you may see the following error message: “You don’t have any apps deployed with Conditional Access App Control”. This error indicates that the app has not been deployed.
Recommended steps
- In Defender for Cloud Apps, in the menu bar, click the settings cog, and then select Conditional Access App Control.
- If you see the message No apps connected, use the following guide to deploy apps:
- Deploy featured apps that have session control enabled
- Deploy custom line-of-business apps, non-featured SaaS apps, and on-premise apps hosted via the Azure Active Directory (Azure AD) Application Proxy with session controls
- If you run into any issues while deploying the app, see Onboarding an app.
Cannot create session policies for an app
After adding a custom app, in the Conditional Access App Control apps page, you may see the option: Request session control.
Note
Featured apps have out-of-the-box session controls. For any other apps, you must go through a self-onboarding process.
Recommended steps
- Use the following self-onboarding guide to deploy any app to session control: Deploy custom line-of-business apps, non-featured SaaS apps, and on-premise apps hosted via the Azure Active Directory (Azure AD) Application Proxy with session controls.
- Create a session policy, select the App filter, make sure that your app is now listed in the dropdown list.
Cannot choose Inspection Method: Data Classification Service
In session policies, when using the Control file download (with inspection) session control type, you can use the Data Classification Service inspection method to scan your files in real time and detect sensitive content that matches any of the criteria you have configured. If the Data Classification Service inspection method is not available, use the following steps to investigate the issue.
Recommended steps
- Verify that the Session control type is set to Control file download (with inspection).
Note
The Data Classification Service inspection method is only available for the Control file download (with inspection) option.
- Determine whether the Data Classification Service feature is available in your region.
- If the feature is not available in your region, use the Built-in DLP inspection method.
- If the feature is available in your region but you still can’t see the Data Classification Service inspection method, open a support ticket.
Cannot choose Action: Protect
In session policies, when using the Control file download (with inspection) session control type, in addition to the Monitor and Block actions, you can specify the Protect action. This action enables you to permit file downloads with the option to encrypt or apply permissions to the file based on conditions, content inspection, or both. If the Protect action is not available, use the following steps to investigate the issue.
Recommended steps
- If the Protect action is not available or is greyed out, verify that you have the Azure Information Protection (AIP) Premium P1 license. For more information, see Microsoft Information Protection integration.
- If the Protect action is available, but are not seeing the appropriate labels.
- In Defender for Cloud Apps, in the menu bar, click the settings cog, select Microsoft Information Protection, and verify that the integration is enabled.
- For Office labels, in the AIP portal, make sure Unified Labeling is selected.
Additional considerations
While troubleshooting onboarding apps, there are some additional things to consider.
- Understanding the difference between the Azure AD Conditional Access policy settings: “Monitor only”, “Block downloads”, and “Use custom policy”
In Azure AD Conditional Access policies, you can configure the following built-in Defender for Cloud Apps controls: Monitor only and Block downloads. This applies and enforces the Defender for Cloud Apps proxy feature for cloud apps and conditions configured in Azure AD. For more complex policies, select Use custom policy, which allows you to configure access and session policies in Defender for Cloud Apps.
- Understanding the “Mobile and desktop” client app filter option in access policies
In Defender for Cloud Apps access policies, unless the Client app filter is specifically set to Mobile and desktop, the resulting access policy will only apply to browser sessions. The reason for this, is to prevent inadvertently proxying user sessions, which may be a byproduct of using this filter.
Issues experienced by end users
This section is for end users using apps protected by Defender for Cloud Apps and helps identify common situations that may arise in the following areas:
- User monitoring page is not appearing
- Not able to access app from a third-party Identity Provider
- Something Went Wrong page appears
- Clipboard actions or file controls are not being blocked
- Downloads are not being protected
- Navigating to a particular URL of a suffixed app and landing on a generic page
- Blocking downloads cause PDF previews to be blocked
- Additional considerations
User monitoring page is not appearing
When routing a user through the Defender for Cloud Apps, you can notify the user that their session will be monitored. By default, the user monitoring page is enabled.
Recommended steps
- In Defender for Cloud Apps, in the menu bar, click the settings cog, and then select Settings.
- Under Conditional Access App Control, select User monitoring. This page shows the user monitoring options available in Defender for Cloud Apps.
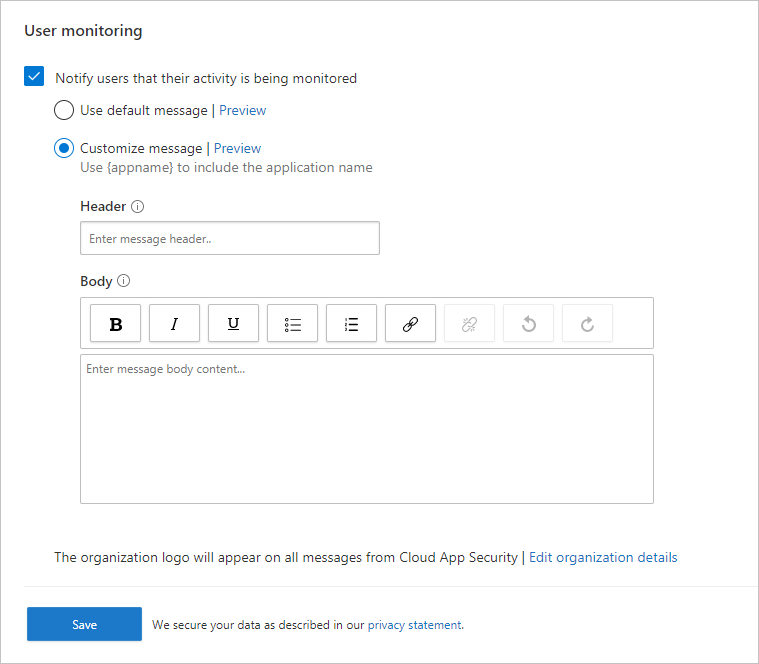
- Verify that the Notify users that their activity is being monitored option is selected.
- Choose whether you want to use the default message or provide a custom message.
TABLE 6 Message type Details Default Header:
Access to [App Name Will Appear Here] is monitored
Body:
For improved security, your organization allows access to [App Name Will Appear Here] in monitor mode. Access is only available from a web browser.Custom Header:
Use this box to provide a custom heading to inform users they are being monitored.
Body:
Use this box to add additional custom information for the user, such as who to contact with questions, and supports the following inputs: plain text, rich text, hyperlinks. - Click Preview to verify the user monitoring page that appears before accessing an app.
- Click Save.
Not able to access app from a third-party Identity Provider
If an end user is receiving a general failure after logging into an app from a third-party Identity Provider, validate the third-party IdP configuration.
Recommended steps
- In Defender for Cloud Apps, in the menu bar, click the settings cog, and then select Conditional Access App Control.
- In the list of apps, on the row in which the app you are not able to access appears, choose the three dots at the end of the row, and then choose Edit app.
- Validate that the SAML certificate that was uploaded is correct
- Verify that valid SSO URLs have been provided in the app configuration
- Validate that the attributes and values in the custom app are reflected in identity provider settings
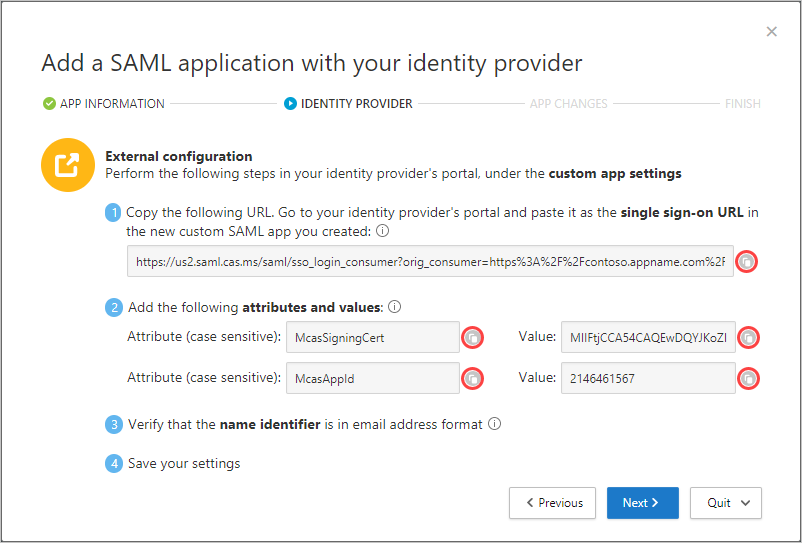
- If you still can’t access the app, open a support ticket.
Something Went Wrong page appears
Sometimes during a proxied session, the Something Went Wrong page may appear. This can happen when:
- A user logs in after being idle for a while
- Refreshing the browser and the page load takes longer than expected
- The third-party IdP app is not configured correctly
Recommended steps
- If the end user is trying to access an app that is configured using a third-party IdP, see Not able to access app from a third-party IdP and App status: Continue Setup.
- If the end user unexpectedly reached this page, do the following:
- Restart your browser session
- Clear history, cookies, and cache from the browser
Clipboard actions or file controls are not being blocked
The ability to block clipboard actions such as cut, copy, paste, and file controls such as download, upload, and print is required to prevent data exfiltration and infiltration scenarios. This ability enables companies to balance security and productivity for end users. If you are experiencing problems with these features, use the following steps to investigate the issue.
Recommended steps
If the session is being proxied, use the following steps to verify the policy:
- In Defender for Cloud Apps, under Investigate, Select Activity log.
- Use the advanced filter, select Applied action and set its value equal to Blocked.
- Verify that there are blocked file activities.
- If there is an activity, expand the activity drawer by clicking on the activity
- On the activity drawer’s General tab, click the matched policies link, to verify the policy you enforced is present.
- If you do not see your policy, see Creating access and session policies.
- If you see Access blocked/allowed due to Default Behavior, this indicates that the system was down and the default behavior was applied.
- To change the default behavior, in Defender for Cloud Apps, in the menu bar, click the settings cog and select Settings. Then under Conditional Access App Control, select Default Behavior, and set the default behavior to Allow or Block access.
- Go to
https://status.cloudappsecurity.com/and monitor notifications about system downtime.
- If you still not able to see blocked activity, open a support ticket.
Downloads are not being protected
As an end user, downloading sensitive data on an unmanaged device might be necessary. In these scenarios, you can protect documents with Microsoft Information Protection. If the end user was not able to successfully encrypt the document, use the following steps to investigate the issue.
Recommended steps
- In Defender for Cloud Apps, under Investigate, Select Activity log.
- Use the advanced filter, select Applied action and set its value equal to Protected.
- Verify that there are blocked file activities.
- If there is an activity, expand the activity drawer by clicking on the activity
- On the activity drawer’s General tab, click the matched policies link, to verify the policy you enforced is present.
- If you do not see your policy, see Creating access and session policies.
- If you see Access blocked/allowed due to Default Behavior, this indicates that the system was down and the default behavior was applied.
- To change the default behavior, in Defender for Cloud Apps, in the menu bar, click the settings cog, and then select Settings. Then under Conditional Access App Control, select Default Behavior, and set the default behavior to Allow or Block access.
- Go to
https://status.cloudappsecurity.com/and monitor notifications about system downtime.
- If you are protecting the file with an AIP label or custom permissions, in the Activity description, make sure the file extension is one of the following supported file types:
- Word: docm, docx, dotm, dotx
- Excel: xlam, xlsm, xlsx, xltx
- PowerPoint: potm, potx, ppsx, ppsm, pptm, pptx
- PDF* if Unified Labeling is enabled
- If the file type is not supported, in the session policy, you can select Block download of any file that in unsupported by native protection or where native protection is unsuccessful.
- If you still not able to see blocked activity, open a support ticket.
Navigating to a particular URL of a suffixed app and landing on a generic page
All proxies that suffix URLs are susceptible to context loss, an issue where navigating to a link loses the full path of the link and typically lands on the home page of the app. Defender for Cloud Apps is uniquely positioned to address this limitation and solve context loss by partnering with Microsoft and non-Microsoft vendors.
If adjusting the global policy does not fix the issue, then you can workaround context loss issues as follows:
- Navigate to a URL where context loss occurs.
- Make a note of the suffixed URL domain including the suffix added by Defender for Cloud Apps. For example:
https://www.yammer.com.mcas.ms. - Copy the path from the original URL. For example, if the original particular URL was
https://www.yammer.com/organization/threads/threadnumber, copy/organization/threads/threadnumber. - Append the copied path to the suffixed domain. For example:
https://www.yammer.com.mcas.ms/organization/threads/threadnumber. - Navigate to the new suffixed URL.
For apps experiencing context loss, please submit a support ticket. We will work with each app provider directly to resolve those issues.
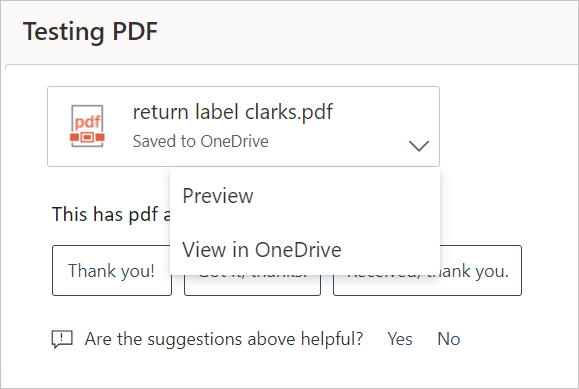
Blocking downloads cause PDF previews to be blocked
Occasionally when previewing or printing PDF files, apps initiate a download of the file. This causes Defender for Cloud Apps to intervene to ensure the download is blocked and that data isn’t leaked from your environment. For example, if you created a session policy to block downloads for Outlook Web Access (OWA), then previewing or printing PDF files may be blocked, with a message like this:
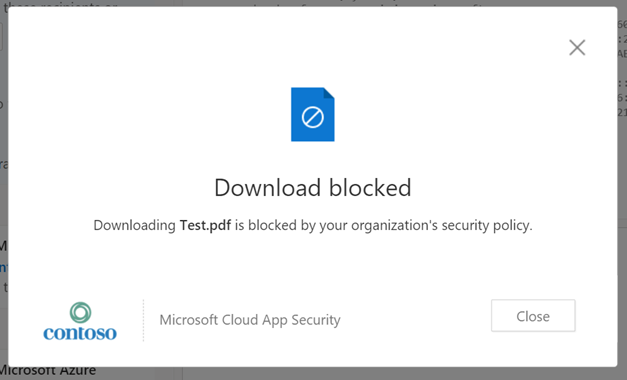
To allow the preview, an Exchange administrator should perform the following steps:
- Download the Exchange Online PowerShell Module.
- Connect to the module using the commands described in Connect to Exchange Online PowerShell
- After you’ve connected to the Exchange Online PowerShell, use the Set-OwaMailboxPolicy cmdlet to update the parameters in the policy:
PowerShell
Set-OwaMailboxPolicy -Identity OwaMailboxPolicy-Default -DirectFileAccessOnPrivateComputersEnabled $false -DirectFileAccessOnPublicComputersEnabled $falseNote
The OwaMailboxPolicy-Default policy is the default OWA policy name in Exchange Online. Some customers may have deployed additional or created a custom OWA policy with a different name. If you have multiple OWA policies, they may be applied to specific users. Therefore, you’ll need to also update them to have complete coverage.
- After these parameters have been set, run a test on OWA with a PDF file and a session policy configured to block downloads. The Download option should be removed from the dropdown and you can preview the file.
Additional considerations
While troubleshooting apps, there are some additional things to consider.
- Session controls support for modern browsers
Defender for Cloud Apps session controls now includes support for the new Microsoft Edge browser based on Chromium. While we’ll continue supporting the most recent versions of Internet Explorer and the legacy version of Microsoft Edge, the support will be limited and we recommend using the new Microsoft Edge browser.
- Double login
A double login occurs due to the presumed use of a nonce, a cryptographic token used by apps to prevent replay attacks. By default, Defender for Cloud Apps assumes an app uses a nonce. If you are confident the app does not use a nonce, you can disable this by editing the app in Defender for Cloud Apps and the issue will be resolved. For steps to disable nonce, see Slow login.
If the app uses a nonce and this feature cannot be disabled, the second login may be transparent to users, or they may be prompted to log in again.