

Issue
- Install the ESET Remote Administrator Agent (ERA Agent) to client workstations remotely using the ESET Remote Administrator (ERA) Web Console
- Reinstall the ERA Agent to orphaned or disconnected client workstations using the ERA Web Console
- A client workstation was orphaned or disconnected because it was pointed at an absent or incorrect server
Solution
Getting Started with ERA: Step 4 of 6
← Add Client Computers | Deploy ESET endpoint solutions →
To install or reinstall client workstations to the ERA Server, follow the steps below:
- Open ESET Remote Administrator Web Console (ERA Web Console) in your web browser and log in.
- Click Admin
 → Server Tasks → Agent Deployment → New.

Figure 1-1
- Type a Name and optional Description for your task. Select Agent Deployment from the Task drop-down menu.

Figure 1-2
- Expand Settings, and configure the settings listed below to your preference (fields marked with a * are mandatory). Click ERA Certificate and verify the correct certificate created during installation is selected and then click Finish.
-
- Automatic resolution of suitable Agent—If you have multiple operating systems (Windows, Linux, Mac OS X) in your network, select this option and this task will automatically run the appropriate server-compatible Agent installation package for each system.
-
- * Targets—Select the clients that will receive this task. Click Targets, navigate to the group the target client workstations belong to, select the target clients and then click OK.
-
- * Username/Password—The Username and Password fields are for the user with sufficient rights to perform a remote agent installation (not your ESET-issued Username). The username should be typed in the following format: %domainname%\AdminUsername.
-
- Server hostname—Enter a server hostname if the client hostname differs from that of the server. Alternatively, you can enter the IP address if you are having hostname resolution issues.
-
- * Peer certificate/ERA certificate—This is the security certificate and certificate authority for the agent installation. You can select the default certificate and certificate authority, or use custom certificates.
-
- Custom certificate—If you use a custom certificate for authentication, navigate to that certificate and select it when installing the Agent.
-
- Certificate passphrase—Optionally, you can create a password for the certificate. If you apply a password for a certificate, users will be required to enter it before they can install ERA Agent using that certificate.
-
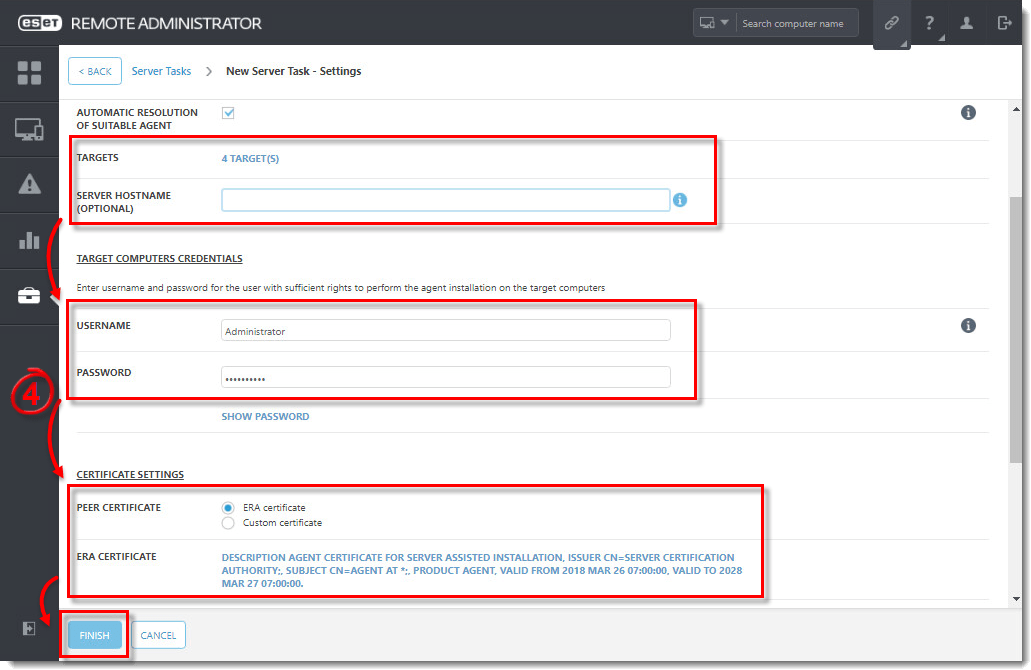
Figure 1-3
- Expand the Summary section to review your configured settings.
- Repeat the Agent deployment task to apply your new certificate to the ERA Agents on client computers.
- If you are performing a new installation of ERA, proceed to Step 5, deploy ESET endpoint products to your client computers.
Last Updated: Jul 16, 2021
(Visited 22 times, 1 visits today)