

Depending on the Microsoft security products that you use, some advanced features might be available for you to integrate Defender for Endpoint with.
Enable advanced features
- In the navigation pane, select Settings > Endpoints > Advanced features.
- Select the advanced feature you want to configure and toggle the setting between On and Off.
- Click Save preferences.
Use the following advanced features to get better protected from potentially malicious files and gain better insight during security investigations.
Automated investigation
Turn on this feature to take advantage of the automated investigation and remediation features of the service. For more information, see Automated investigation.
Live response
Turn on this feature so that users with the appropriate permissions can start a live response session on devices.
For more information about role assignments, see Create and manage roles.
Live response for servers
Turn on this feature so that users with the appropriate permissions can start a live response session on servers.
For more information about role assignments, see Create and manage roles.
Live response unsigned script execution
Enabling this feature allows you to run unsigned scripts in a live response session.
Always remediate PUA
Potentially unwanted applications (PUA) are a category of software that can cause your machine to run slowly, display unexpected ads, or at worst, install other software, which might be unexpected or unwanted.
Turn on this feature so that potentially unwanted applications (PUA) are remediated on all devices in your tenant even if PUA protection is not configured on the devices. This will help protect users from inadvertently installing unwanted applications on their device. When turned off, remediation is dependent on the device configuration.
Restrict correlation to within scoped device groups
This configuration can be used for scenarios where local SOC operations would like to limit alert correlations only to device groups that they can access. By turning on this setting, an incident composed of alerts that cross device groups will no longer be considered a single incident. The local SOC can then take action on the incident because they have access to one of the device groups involved. However, global SOC will see several different incidents by device group instead of one incident. We don’t recommend turning on this setting unless doing so outweighs the benefits of incident correlation across the entire organization.
Note
Changing this setting impacts future alert correlations only.
Enable EDR in block mode
Endpoint detection and response (EDR) in block mode provides protection from malicious artifacts, even when Microsoft Defender Antivirus is running in passive mode. When turned on, EDR in block mode blocks malicious artifacts or behaviors that are detected on a device. EDR in block mode works behind the scenes to remediate malicious artifacts that are detected post breach.
Autoresolve remediated alerts
For tenants created on or after Windows 10, version 1809, the automated investigation, and remediation capability is configured by default to resolve alerts where the automated analysis result status is “No threats found” or “Remediated”. If you don’t want to have alerts auto-resolved, you’ll need to manually turn off the feature.
Tip
For tenants created prior to that version, you’ll need to manually turn this feature on from the Advanced features page.
Note
- The result of the auto-resolve action may influence the Device risk level calculation which is based on the active alerts found on a device.
- If a security operations analyst manually sets the status of an alert to “In progress” or “Resolved” the auto-resolve capability will not overwrite it.
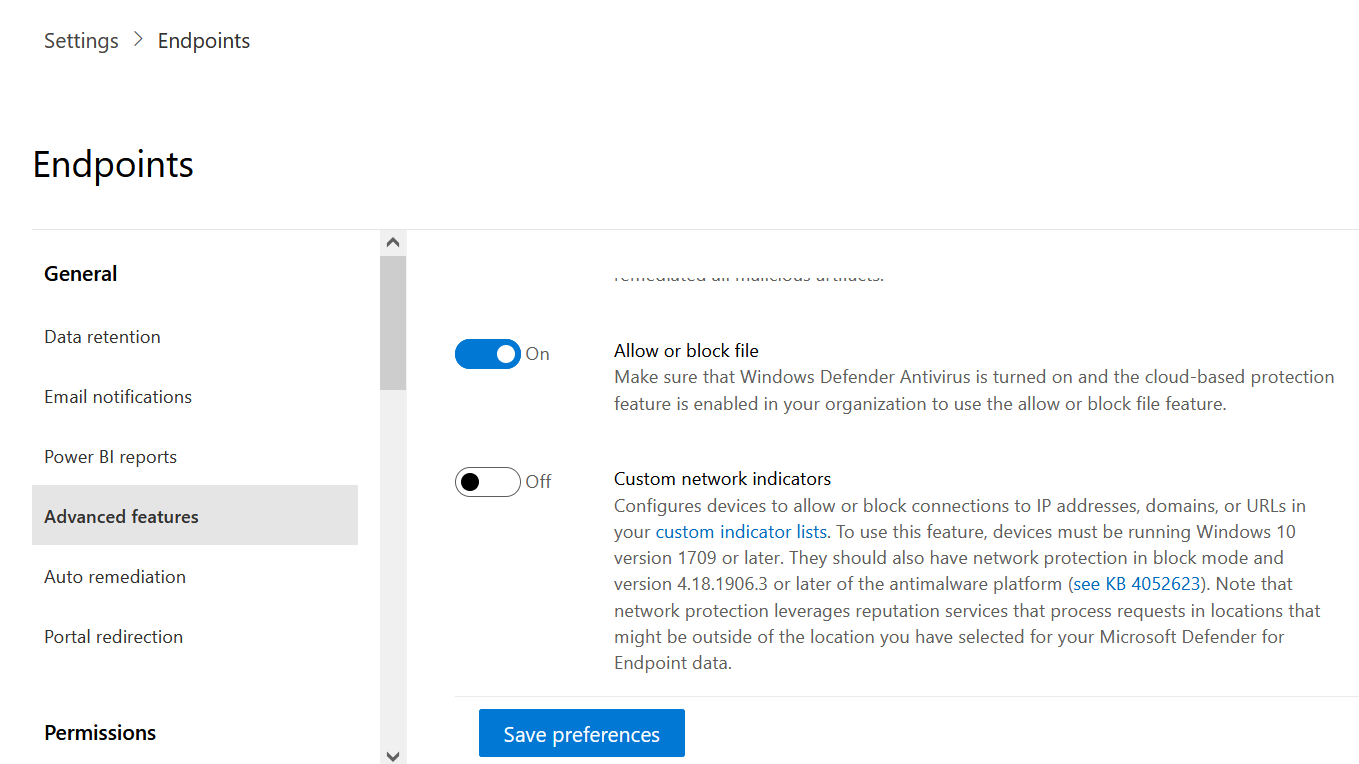
Allow or block file
Blocking is only available if your organization fulfills these requirements:
- Uses Microsoft Defender Antivirus as the active antimalware solution and,
- The cloud-based protection feature is enabled
This feature enables you to block potentially malicious files in your network. Blocking a file will prevent it from being read, written, or executed on devices in your organization.
To turn Allow or block files on:
- In the navigation pane, select Settings > Endpoints > General > Advanced features > Allow or block file.
- Toggle the setting between On and Off.
- Select Save preferences at the bottom of the page.
After turning on this feature, you can block files via the Add Indicator tab on a file’s profile page.
Custom network indicators
Turning on this feature allows you to create indicators for IP addresses, domains, or URLs, which determine whether they’ll be allowed or blocked based on your custom indicator list.
To use this feature, devices must be running Windows 10 version 1709 or later, or Windows 11. They should also have network protection in block mode and version 4.18.1906.3 or later of the antimalware platform see KB 4052623.
For more information, see Manage indicators.
Note
Network protection leverages reputation services that process requests in locations that might be outside of the location you’ve selected for your Defender for Endpoint data.
Tamper protection
During some kinds of cyber attacks, bad actors try to disable security features, such as anti-virus protection, on your machines. Bad actors like to disable your security features to get easier access to your data, to install malware, or to otherwise exploit your data, identity, and devices.
Tamper protection essentially locks Microsoft Defender Antivirus and prevents your security settings from being changed through apps and methods.
This feature is available if your organization uses Microsoft Defender Antivirus and Cloud-based protection is enabled. For more information, see Use next-generation technologies in Microsoft Defender Antivirus through cloud-delivered protection.
Keep tamper protection turned on to prevent unwanted changes to your security solution and its essential features.
Show user details
Turn on this feature so that you can see user details stored in Azure Active Directory. Details include a user’s picture, name, title, and department information when investigating user account entities. You can find user account information in the following views:
- Security operations dashboard
- Alert queue
- Device details page
For more information, see Investigate a user account.
Skype for Business integration
Enabling the Skype for Business integration gives you the ability to communicate with users using Skype for Business, email, or phone. This can be handy when you need to communicate with the user and mitigate risks.
Note
When a device is being isolated from the network, there’s a pop-up where you can choose to enable Outlook and Skype communications which allows communications to the user while they are disconnected from the network. This setting applies to Skype and Outlook communication when devices are in isolation mode.
Microsoft Defender for Identity integration
The integration with Microsoft Defender for Identity allows you to pivot directly into another Microsoft Identity security product. Microsoft Defender for Identity augments an investigation with more insights about a suspected compromised account and related resources. By enabling this feature, you’ll enrich the device-based investigation capability by pivoting across the network from an identify point of view.
Note
You’ll need to have the appropriate license to enable this feature.
Office 365 Threat Intelligence connection
This feature is only available if you’ve an active Office 365 E5 or the Threat Intelligence add-on. For more information, see the Office 365 Enterprise E5 product page.
When you turn on this feature, you’ll be able to incorporate data from Microsoft Defender for Office 365 into Microsoft 365 Defender to conduct a comprehensive security investigation across Office 365 mailboxes and Windows devices.
Note
You’ll need to have the appropriate license to enable this feature.
To receive contextual device integration in Office 365 Threat Intelligence, you’ll need to enable the Defender for Endpoint settings in the Security & Compliance dashboard. For more information, see Threat investigation and response.
Microsoft Threat Experts – Targeted Attack Notifications
Out of the two Microsoft Threat Expert components, targeted attack notification is in general availability. Experts-on-demand capability is still in preview. You can only use the experts-on-demand capability if you’ve applied for preview and your application has been approved. You can receive targeted attack notifications from Microsoft Threat Experts through your Defender for Endpoint portal’s alerts dashboard and via email if you configure it.
Note
The Microsoft Threat Experts capability in Defender for Endpoint is available with an E5 license for Enterprise Mobility + Security.
Microsoft Defender for Cloud Apps
Enabling this setting forwards Defender for Endpoint signals to Microsoft Defender for Cloud Apps to provide deeper visibility into cloud application usage. Forwarded data is stored and processed in the same location as your Defender for Cloud Apps data.
Note
This feature will be available with an E5 license for Enterprise Mobility + Security on devices running Windows 10, version 1709 (OS Build 16299.1085 with KB4493441), Windows 10, version 1803 (OS Build 17134.704 with KB4493464), Windows 10, version 1809 (OS Build 17763.379 with KB4489899), later Windows 10 versions, or Windows 11.
Microsoft Secure Score
Forwards Microsoft Defender for Endpoint signals to Microsoft Secure Score in the Microsoft 365 Defender portal. Turning on this feature gives Microsoft Secure Score visibility into the device’s security posture. Forwarded data is stored and processed in the same location as your Microsoft Secure Score data.
Enable the Microsoft Defender for Endpoint integration from the Microsoft Defender for Identity portal
To receive contextual device integration in Microsoft Defender for Identity, you’ll also need to enable the feature in the Microsoft Defender for Identity portal.
- Log in to the Microsoft Defender for Identity portal with a Global Administrator or Security Administrator role.
- Click Create your instance.
- Toggle the Integration setting to On and click Save.
After completing the integration steps on both portals, you’ll be able to see relevant alerts in the device details or user details page.
Web content filtering
Block access to websites containing unwanted content and track web activity across all domains. To specify the web content categories you want to block, create a web content filtering policy. Ensure you’ve network protection in block mode when deploying the Microsoft Defender for Endpoint security baseline.
Share endpoint alerts with Microsoft Compliance Center
Forwards endpoint security alerts and their triage status to Microsoft Compliance Center, allowing you to enhance insider risk management policies with alerts and remediate internal risks before they cause harm. Forwarded data is processed and stored in the same location as your Office 365 data.
After configuring the Security policy violation indicators in the insider risk management settings, Defender for Endpoint alerts will be shared with insider risk management for applicable users.
Microsoft Intune connection
Defender for Endpoint can be integrated with Microsoft Intune to enable device risk-based conditional access. When you turn on this feature, you’ll be able to share Defender for Endpoint device information with Intune, enhancing policy enforcement.
Important
You’ll need to enable the integration on both Intune and Defender for Endpoint to use this feature. For more information on specific steps, see Configure Conditional Access in Defender for Endpoint.
This feature is only available if you’ve the following:
- A licensed tenant for Enterprise Mobility + Security E3, and Windows E5 (or Microsoft 365 Enterprise E5)
- An active Microsoft Intune environment, with Intune-managed Windows devices Azure AD-joined.
Conditional Access policy
When you enable Intune integration, Intune will automatically create a classic Conditional Access (CA) policy. This classic CA policy is a prerequisite for setting up status reports to Intune. It shouldn’t be deleted.
Note
The classic CA policy created by Intune is distinct from modern Conditional Access policies, which are used for configuring endpoints.
Device discovery
Helps you find unmanaged devices connected to your corporate network without the need for extra appliances or cumbersome process changes. Using onboarded devices, you can find unmanaged devices in your network and assess vulnerabilities and risks. For more information, see Device discovery.
Note
You can always apply filters to exclude unmanaged devices from the device inventory list. You can also use the onboarding status column on API queries to filter out unmanaged devices.
Preview features
Learn about new features in the Defender for Endpoint preview release. Try upcoming features by turning on the preview experience.
You’ll have access to upcoming features, which you can provide feedback on to help improve the overall experience before features are generally available.
Download quarantined files
Backup quarantined files in a secure and compliant location so they can be downloaded directly from quarantine. The Download file button will always be available in the file page. This setting is turned on by default. Learn more about requirements